First Build. Titan 48 w Lab 12.

Post your build odyssey here.
Message
Author
User avatar
Tom Smit
Posts: 7569
Joined: Sat Jan 05, 2008 1:24 pm
Location: Sarnia, Ont. Canada

Re: First Build. Titan 48 w Lab 12.

#16 Post by Tom Smit »

just a simple question. if we wanted to secure panels in place with screws, I assume I'll have to predrill the side panel but do I also pre drill the side of the panel to be secured, or just hold it in and drill the screw in ??
Predrill through the side where the screws should go. Then clamp the panel in place (correctly) and drill pilot holes from the outside the side. Remove the panel, install screws from outside the side panel far enough to poke through the hole and also align the panel to be installed. Apply a bead of expanding polyurathane adhesive onto the side where the new panel is going to go, install the panel over the screws (which are acting like guide pins) and push down. Tighten screws to pull the panel to the side, and you should see squeeze-out of the adhesive.

Don't forget to make sure that all panels are flat, not warped.
TomS

jimbo7
Posts: 874
Joined: Fri Dec 28, 2012 10:45 am
Location: St. Louis

Re: First Build. Titan 48 w Lab 12.

#17 Post by jimbo7 »

What Tom said.

I've learned my lesson dozens of times, that it's easier to drill pilots than fix a split in wood.
P.S. If you're using PL, you don't as many or as big wood screws.
BFM builds:
XF212
T24 BP102 24"
2x SLA's 6-5" mids, 9- gt-302's
2x AT 14" MCM 55-2421
TrT 5" MCM 55-2421
AT 18" JBL GTO804
2x OT12 flat array
2x SLA Pro 2-Alpha 6's 2-Goldwoods
2x T39 24" 3012lf
Simplex 10 BP102

jmanso
Posts: 134
Joined: Wed Feb 05, 2014 6:33 am
Location: Lisbon, Portugal

Re: First Build. Titan 48 w Lab 12.

#18 Post by jmanso »

i've got some photos for you guys!
Attachments
5.jpg
4.jpg
3.jpg
2.jpg
1.jpg

jmanso
Posts: 134
Joined: Wed Feb 05, 2014 6:33 am
Location: Lisbon, Portugal

Re: First Build. Titan 48 w Lab 12.

#19 Post by jmanso »

:)
Attachments
7.jpg
8.jpg
9.jpg
10.jpg
11.jpg

djtrumptight
Posts: 823
Joined: Tue Dec 15, 2009 6:08 pm
Location: Detroit,Michigan

Re: First Build. Titan 48 w Lab 12.

#20 Post by djtrumptight »

hey, yes I can take a picture of the exact one we are using, but I was assured by a retailer that it was similar to pl premium. that product isn't carried here in Portugal, and at least on the label it states mostly the same information.

waterproof, 200kg strength, polyurethane adhesive, paintable, and it states lastly that it's "made for surfaces that are under extreme vibrations".

Thats where the problem is,a retailer assured you but he has probably never built a horn design subwoofer.Looking at the last pic you posted you are gonna have air leaks,i can clearly see area's where there is no glue or squeeze out.From what i understand of the product you used,its something like liquid nails.The problem within the cabs is not vibrations,braces take care of that but its the pressure of the design.
Built:
2 Autotuba's MCM 55 2421
8 T48's 24"wide 3015 LF
2 DR 250's melded Deltalite II 2510
2 DR 250's flat Deltalite II 2510
2 SLA HT systems
1 Table Tuba Dayton DCS 255-4
2 T 39's 20" wide 3012 LF
1 T-18 13" wide MCM 55 2421
2 SLA Pro's

jmanso
Posts: 134
Joined: Wed Feb 05, 2014 6:33 am
Location: Lisbon, Portugal

Re: First Build. Titan 48 w Lab 12.

#21 Post by jmanso »

Hi there,

I appreciate the concern, and as of now we've stopped the build until we figure out the best way to continue.

My plan would be to set the driver up and possible chalk all of the glue joins to see if any chalk "jumps out".

I just dont know if I should place the chalk inside or outside the speaker box? Would it hurt the driver to have chalk in it ? Or I should just blow it out afterwards?

also, regarding the squeazeout you've mentioned. We've had squeeze out with all panels except that one on that side, it squeezed a whole lot on the other side (and on all other panels we've glued),

That being said, our panel 5 is a bit warped, left it dewarping over night and possibly will try to do the driver test tonight.

If I do find some airleaks we will probably stop the project for a few days until we can find actual PL Premium which will be a tough call here in Portugal...

Cheers

User avatar
escapemcp
Posts: 1219
Joined: Thu Feb 07, 2013 8:57 pm
Location: Bristol, UK

Re: First Build. Titan 48 w Lab 12.

#22 Post by escapemcp »

djtrumptight wrote:hey, yes I can take a picture of the exact one we are using, but I was assured by a retailer that it was similar to pl premium. that product isn't carried here in Portugal, and at least on the label it states mostly the same information.

waterproof, 200kg strength, polyurethane adhesive, paintable, and it states lastly that it's "made for surfaces that are under extreme vibrations".

Thats where the problem is,a retailer assured you but he has probably never built a horn design subwoofer.Looking at the last pic you posted you are gonna have air leaks,i can clearly see area's where there is no glue or squeeze out.From what i understand of the product you used,its something like liquid nails.The problem within the cabs is not vibrations,braces take care of that but its the pressure of the design.
x10000000000000000000000000000000000000000000000000000000000000000000000.... squared.

Your glue ISN'T the stuff... it does not mention anywhere that it is expanding, therefore it won't expand (if it did, it would be mentioned pretty early in the description as it is a major feature). See if you can find Everbuild Lumberjack Wood Gel <-clickable link - Tool Station may even ship from the UK. Search for 30MINPU3 if you are looking for the Everbuild product
Image

If you don't get the right glue, then you are just building a driver destroyer and NOT a subwoofer. DO NOT CONTINUE UNTIL YOU HAVE THE RIGHT GLUE (sorry to use caps, but this is so important, I think it deserves caps - can someone back me up to prove the point!). We just want to make sure that you do this RIGHT and make yourself a killer sub.

User avatar
escapemcp
Posts: 1219
Joined: Thu Feb 07, 2013 8:57 pm
Location: Bristol, UK

Re: First Build. Titan 48 w Lab 12.

#23 Post by escapemcp »

This guy is selling a 12 pack on eBay and only charging £9.95 for international delivery. I pay about £4.20 per tube though, so he looks quite expensive

Tool Net is one of the cheapest places I have found per tube. 12 tubes comes out at £50, so even with P&P, it would work out pretty cheap.

Just search for 30MINPU3 to find others... maybe you can find a stockist in Portugal???

jmanso
Posts: 134
Joined: Wed Feb 05, 2014 6:33 am
Location: Lisbon, Portugal

Re: First Build. Titan 48 w Lab 12.

#24 Post by jmanso »

We'll try to get a distributor in Portugal to proceed.

I just want to understand why this glue isnt exactly right. because on the link you provided it doesnt say that it expands anywhere.

and I'd like to know if I can just scrape the best i can the panels I already have glued and just cover the existing glue with PL Premium. since the existing glue already has the panels quite in place I figure PL should take care of any airleaks.

or if should we scrap it all and start again ...

Also is it worth mounting the driver to give it a test just to make sure?

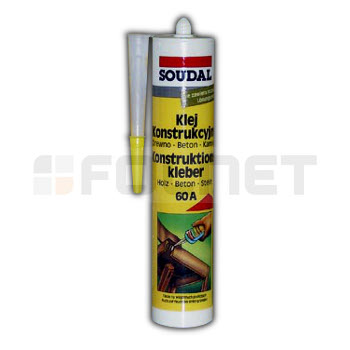
I found the exact glue we are using on this website:

http://www.soudal.com/soudalweb/images/ ... a%20PU.pdf

I know it's in Portuguese but I'll try to translate the following specs grid the best I can:

Base: Poliurethane
Consistency: Paste
Hardening: Air Humidity
Skin Formation: 15 min. (20°C/65% H.R.)
glueing time: 3mm/24h (20°C/65% H.R.)
Hardness 40 ± 5 Shore A (DIN 53505)
Density 1 ,30 kg/m3
(DIN 53479)
Temperature Interval -30°C a +90°C
Elastic Recuperation (ISO 7389) > 80%
Max Deformation 20%
Elasticity Module 100 % 0,80 N/mm2
(DIN 53504)
Max Tension 1,70 N/mm2
(DIN 53504)
Break Point 700% (DIN 53504)

I just want to understand what exactly makes the difference, because this brand is not manufactured by the retailer. they move dozens of brands with hundreds of products and I'd just like to see exactly what makes the difference so that I can at least know what to look for before I go spend triple or more having to import PL if we can't find it locally...

I want to make clear we'd be using pl without any shred of doubt if we could find it, we do want to stick to the plans....

that being said, we are on a tight budget, and 100€+ in glues to find out later that we could find something here that worked would be a bummer :/

Thanks for the patience

MissileCrisis
Posts: 1128
Joined: Sat Dec 15, 2012 1:30 pm
Location: Walnut Creek, California

Re: First Build. Titan 48 w Lab 12.

#25 Post by MissileCrisis »

All my best builds happened whilst working full time. It's when I have this thing called free-time that I get lazy :).
Built
2 x TLAH
1 Titan 39 (lab 12, 15 inch)
1 Tuba 60 (lab 12, 20 inch)
SLA Center
2 x Mini MLTP subwoofers
1 x 212 TH (custom)
2 x Mini-Karlsonators
Owned, but not built
2 x Jack 12 (2512, melded)

User avatar
AntonZ
Posts: 2687
Joined: Sun May 14, 2006 6:00 am
Location: NL

Re: First Build. Titan 48 w Lab 12.

#26 Post by AntonZ »

If you can find that one, see if you can also find "Soudal 60A". I have used that on several cabinets, works very well. Yes, it expands.

Image Image

jmanso
Posts: 134
Joined: Wed Feb 05, 2014 6:33 am
Location: Lisbon, Portugal

Re: First Build. Titan 48 w Lab 12.

#27 Post by jmanso »

Hey, so here is where we're at:

We've placed the driver in the baffle and hooked it up to a 10v 38hz sine.

We've used both a soft plastic tube, a hard plastic cone and a piece of transparent paper near all the joints and not one of these 3 methods accused any kind of gap. Neither did the baffle.

We pushed the voltage to 13 and it started to make a rattling sound, i suspect it was the loose cable that started vibrating but it could be from all the panels missing.

Whats your opinion? Are these tests sufficient for us to continue?? We need to hurry if we can because since every panel is already cut the are quickly warping. Thanks

Also on the joint that didnt squeeze out we've applied another bead of glue.

sine143
Posts: 3066
Joined: Sat Feb 06, 2010 3:27 pm
Location: Raleigh NC

Re: First Build. Titan 48 w Lab 12.

#28 Post by sine143 »

what do you mean by "panels missing" ?
Built:
2x Tuba 30s delta12lf loaded (gone)
4x Otop12 d2512 loaded
8x t48s (18, 18, 24, 24, 30, 30) 3015lf loaded
2x AT (1 mcm, 1 gto 804)
2x SLA Pro (dayton pa6, 6 goldwood piezo loaded)
1x bastard XF208

2x OT212 (delta pro 450a loaded, eminence psd)

Bruce Weldy
Posts: 8539
Joined: Fri Nov 27, 2009 11:37 am
Location: New Braunfels, TX

Re: First Build. Titan 48 w Lab 12.

#29 Post by Bruce Weldy »

If you didn't have the other side on yet, then your test was meaningless. Air will take the path of least resistance. If the cab isn't totally put together, the there won't be the build up of pressure that will occur when it is.


I don't see why you couldn't clean all the joints, then apply an expanding glue over the top of the joint. Don't scrimp - put on a bunch and don't wipe it or try to make it look pretty.

6 - T39 3012LF
4 - OT12 2512
1 - T24
1 - SLA Pro
2 - XF210


"A system with a few knobs set up by someone who knows what they are doing is always better than one with a lot of knobs set up by someone who doesn't."

jmanso
Posts: 134
Joined: Wed Feb 05, 2014 6:33 am
Location: Lisbon, Portugal

Re: First Build. Titan 48 w Lab 12

#30 Post by jmanso »

I'm sorry but i didnt take any pics today.

We have panels 1, 2,3 and 4 assembled.

The purpose was to check the driver box for any leaks. Either from the joints or from the baffle.

We have reducers which is why we could conduct the test.

Drilled a hole on the back of panel 3 and glued speaker cable through it. Then we laid the cab down on panel 3 and installed gasket and driver.

Turned cab back onits side and gave about 10v through it.

Post Reply