DJ Facade (Lycra)

Post your build odyssey here.
Message
Author
miked
Posts: 1209
Joined: Fri Oct 23, 2009 4:18 am
Location: San Antonio, TX

DJ Facade (Lycra)

#1 Post by miked »

If this thread does not belong here, my apologies; please relocate it to wherever it should be. Thanks.

You don't see too many threads of this type here on BFM and I'm not going to waste my time posting on other forums of this ilk. I know you guys will appreciate this and that's what matters.

As with most things in life, "presentation" goes a long way. Cabs need fresh coats of paint, stands need to not be all dented and banged up, etc. And a mobile DJ cannot have all his gear just thown on a Walmart plastic folding table with all the gear/cords/DJ's skinny legs visible for all to see. That's why they make these:

Image

That one there costs $300 NOT including the lights. :shock: Not a lot of money, but it's a lot when you don't have it. And just to put a fine point on it; being that we're all DIY-minded, it's a HELL OF A LOT OF MONEY for what is essentially some 1x4"s, paint, a few hinges and lycra stretchy fabric. So I am building my own. Just Google "DIY DJ Facade" and you'll be inundated with vids, threads, pics, etc. I'm not doing anything original here. Mine will come in at just about $100 INCLUDING color changing LED strip lighting (not DMX controlled but pretty nonetheless). A note on the "$100" cost. I DID purchase 2x as much Lycra as I need to ensure that I have matching fabric in the future. Who knows how many different types of "white Lycra" there are out there? So I actually spent about $15 more than $100, but technically, I only needed to buy "enough." Just thought I'd mention that...it's important.

Here's the lights I bought. If you don't already know, you can cut the strips wherever you want, solder/run wires to the next part of the strip, etc. That's what I'll be doing...I think. We'll see what happens...I'm "winging" the lighting part. http://www.ebay.com/itm/321174326624?ss ... 1497.l2649

Onto the facade itself. It's just a bunch of wooden frames with Lycra in the middle Mine will have a 4'x4' center section (did not want the seam in the middle like pictured above) and two 2'x4' hinged wings on the sides. I will use piano hinges to minimize the gap b/t panels.

I started with a pile of 1"x4"'s, and cut them to size (48" and 24") with 45-degree angles on the ends.
Image

I also bought 3/8" square dowels (I didn't know you could call a square piece of wood a "dowel") for a very special use.
Image

The Lycra that goes in the opening can be stapled in. But what happens WHEN (not "IF") it rips or gets torn? Then you have to remove 1,024 staples and restaple the new fabric in...and hope the new staples can bite into the already chewed-up wood. That was not satisfactory, IMO. Some people use opaque plexiglass instead of Lycra. That can't get torn, but it's more work to install and keep from vibrating, etc.

So, I put a dado along the inner edge of the frame pieces that the square dowel will fit down into and hold the fabric in. Easily removable. Here is the test piece I used to get the dado correctly sized. It took longer to do THIS than to make the damn frame pieces!
Image

Dadoes cut into frame pieces.
Image

I didn't want the facade just resting on the floor...it'll get chewed up quickly that way. So I drilled holes for adjustable feet in the bottom rails of all three panels.
Image

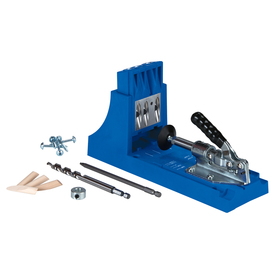
All three feet for the 4' center section. You can also see the Kreg pocket holes I drilled. I finally broke down and bought the jig...would've come in handy on my OmniTop and T48 builds. :wall:
Image

Pile of frame pieces ready for assembly tomorrow. I will be gluing these together (NOT PL!!! Had enough of PL for awhile!) as well as using the pocket screws.
Image

It will be some work to fill/sand the frames to make the joints disappear, but after that, a few coats of primer and a few coats of spray gloss black and I'm in business. More pics as I progress. Thanks for looking!
Last edited by miked on Sat Nov 02, 2013 10:19 pm, edited 1 time in total.

User avatar
doncolga
Posts: 1967
Joined: Thu Jul 01, 2010 3:01 pm
Location: Statesboro, GA
Contact:

Re: DJ Facade

#2 Post by doncolga »

Looks really nice man. I'll be following your thread. Good luck with this.

Donny
Donny Collins
Built:
Two 18" Tuba 30's 3012 LF
Two 26" Tuba 30's Lab 12
Two OmniTop 12's DL 2512 (Melded Array)
Presonus Studio One DAW
Harrison Consoles MixBus 32C DAW

miked
Posts: 1209
Joined: Fri Oct 23, 2009 4:18 am
Location: San Antonio, TX

Re: DJ Facade

#3 Post by miked »

Thank you, Donny. I bounced back and forth b/t building a "full height" facade and a table top one. Should my side business grow like I hope it will, I'll eventually need both, but the-full height version covers 90% of it, I think.

For the lights, I'd like to cut the 16-foot strip into 2'/4' pieces, and run them along the tops/bottoms of all three frames. But that means wires to solder and wires to run along panels that are hinged and fold...a reciepe for failure, IMO. I may still do that and figure out a connection scheme...maybe Molex connectors...I have a bunch left over from my computer modding days years ago. Or, I may just run one continuous strip around the perimeter of the 4' center section and be done with it. I dunno right now.

David Raehn
Posts: 676
Joined: Tue Apr 30, 2013 5:56 pm
Location: Colonial Beach VA

Re: DJ Facade

#4 Post by David Raehn »

You could always use the OT12 road case.... :wink:
BFM rig:
6 OT12
4 T48
4 WH8
Other:
56 box Electrotec LabQ rig
Way too many cables
:noob:

miked
Posts: 1209
Joined: Fri Oct 23, 2009 4:18 am
Location: San Antonio, TX

Re: DJ Facade

#5 Post by miked »

You know, that was a thought I had while I was designing it. I thought it would work "OK enough" as a facade if I threw a big, black sheet over it. Problem is that the thing is huge and heavy, even when empty. In fact, I'm guessing that most probably it will live permanently in the trailer, strapped to a wall. It seems like too much trouble to wheel a 500-pound case out of the trailer simply to unload it there and carry the tops to wherever. But we'll see how it goes...depends on the venue, I guess. If it's a smooth path from the unloading area to the performance area, then yes, I'll wheel the case all the way in. It rolls very nicely (good wheels) but it's still a mutha to muscle around.

The original idea behind the roadcase was for the tops to either be in the case, or on the stands ready to play...i.e. to minimize their chance at getting banged up. Subs are subs. They are going to get kicked, stomped on and generally molested. That is expected...and nobody really sees them, most times. Easy enough to touch them up with black spray paint...or Sharpie marker. But tops are out there, out front...they need to stay pretty looking. Those are my thoughts on that.

I got the frames assembled. Being that these will be moved around a lot, I opted to use glue as well as the pocket screws.

Here's the 4'x4' section.
Image

And the two, 2'x4' sections.
Image

Being that I used pocket screws (how handy these things are!) I probably could've gotten away with butt joints. But it's too late now. The 45s turned out pretty good, though.
Image

One thing I'm a bit concerned about is that there is a lot of face grain on both sides of the boards. Of course, I put the best side of each board facing out, but even the best sides are "not acceptable as-is". There will be a lot of sanding. The back, I don't care about. I'll give it a one-time sanding and then just primer the crap out of it.

The original thought for the LED strip lights was to put them on the inside edge of the frame. But that will only work if you use plexiglass, and the plexi is channel-mounted towards the front of the frames. When you use Lycra, that inside edge is covered up...unless you wanted to put the lights OUTSIDE the Lycra, but that totally defeats the purpose of the Lycra in the first place. I'll have to test how it looks with the LEDs mounted on the rear of the frame. I.E. they would be facing me, as I stand in back of the facade. I could put another frame surrounding the "window" and mount the lights on there, but then THAT would prevent me from folding the panels flat for transport/storage. We'll see what happens. The lights will be here on Tuesday...long before I'm ready to test or mount them, so it'll all work out.

miked
Posts: 1209
Joined: Fri Oct 23, 2009 4:18 am
Location: San Antonio, TX

Re: DJ Facade

#6 Post by miked »

Three things:

1. This pine or fir (dunno which, but I think it's Fir) wood dents if you press your fingernail in it.
2. That makes it REAL easy to sand.
3. I love the freaking daylights out of my $30 HarborFreight DA palm sander.

I spent literally five minutes on this 2'x4' frame with 220-grit paper. It is far from "done" b/c there are lots of knots that need to be filled/sanded, but the corners are darn near perfect. Maybe this wont' require as much "manual labor" as I initially surmised. What a pleasant thought.

Image
Image
Image

I need to decide real quick what I'm going to do about the outer edges; either give them a 1/4" roundover or leave them alone. Square edges "ding up" easier than rounded over edges, especially when the wood is Jello-soft like this stuff, so I'm leaning towards rounding them over. I'd love to Duratex this thing but firstly, I'm out of Duratex and secondly "Hell no! DTex is too expensive."

User avatar
Tom Smit
Posts: 7595
Joined: Sat Jan 05, 2008 1:24 pm
Location: Sarnia, Ont. Canada

Re: DJ Facade

#7 Post by Tom Smit »

I would go for "round-over" so that the Lycra won't tear at the corners.
TomS

miked
Posts: 1209
Joined: Fri Oct 23, 2009 4:18 am
Location: San Antonio, TX

Re: DJ Facade

#8 Post by miked »

Very glad I decided to round over the outer edges. Very happy with how they turned out and it was dead-easy compared to rounding over BB.

Image
Image
Image

Being that the frames are built, I can't round over the inside edges unless I finish the corners by hand. Not doing that. Not that it would be too much work, but b/c I never can seem to match-up a by-hand roundover with a router roundover. The inside edges have been sanded down and are fairly smooth to the touch. By the time all the paint is on them, they'll be very smooth and I'll be very careful stretching the Lycra. And...that is also one of the reasons why I bought twice as much Lycra as I'll need..."just in case." /whistling

User avatar
Charles Jenkinson
Posts: 1127
Joined: Sat Aug 06, 2011 3:25 pm
Location: Manchester, UK

Re: DJ Facade

#9 Post by Charles Jenkinson »

And there was me, seriously thinking DJ Facade was your new business name. :(

:)
2xJ12L (3012HO) switchable/melded
2xT30

Words&graphics - Audio&Acoustics - Hardware&DSP; 3 different paradigms.

miked
Posts: 1209
Joined: Fri Oct 23, 2009 4:18 am
Location: San Antonio, TX

Re: DJ Facade

#10 Post by miked »

LOL! Facade = "fake front" or "deceptive appearance." That would be sorta correct...I'm more of a "content provider" than a "DJ" in the traditional sense of the word. I have a hell of a sound system , though. :ugeek:

User avatar
escapemcp
Posts: 1219
Joined: Thu Feb 07, 2013 8:57 pm
Location: Bristol, UK

Re: DJ Facade

#11 Post by escapemcp »

miked wrote:Being that I used pocket screws (how handy these things are!) I probably could've gotten away with butt joints.
Thanks miked... you have just been the straw that breaks the camel's back - i.e. I have to get a pocket hole jig! :broke:

David Raehn
Posts: 676
Joined: Tue Apr 30, 2013 5:56 pm
Location: Colonial Beach VA

Re: DJ Facade

#12 Post by David Raehn »

My pockets already have holes....... :broke: No jig required.
BFM rig:
6 OT12
4 T48
4 WH8
Other:
56 box Electrotec LabQ rig
Way too many cables
:noob:

miked
Posts: 1209
Joined: Fri Oct 23, 2009 4:18 am
Location: San Antonio, TX

Re: DJ Facade

#13 Post by miked »

draehn wrote:My pockets already have holes....... :broke: No jig required.
LOL! Me too...that's why it's taken so long to be able to buy the Kreg jig. Let's see: Buy wood and Duratex and PL and build T48s or buy a Kreg jig? :slap:

User avatar
escapemcp
Posts: 1219
Joined: Thu Feb 07, 2013 8:57 pm
Location: Bristol, UK

Re: DJ Facade

#14 Post by escapemcp »

miked wrote:Let's see: Buy wood and Duratex and PL and build T48s or buy a Kreg jig? :slap:
I'm getting the Kreg Mini.. it's more of a faff to position, but for £16 (around 25 of your dollars), seems like a steal to me!

miked
Posts: 1209
Joined: Fri Oct 23, 2009 4:18 am
Location: San Antonio, TX

Re: DJ Facade

#15 Post by miked »

The mini jig does not come with the clamp that holds the material to the jig while drilling the pocket holes. This is of vital importance as the distance/depth/placement of the holes is essential to how the whole pocket screw system works. I'd save up a few more pennies (pence? shillings?) and get the full jig. You don't need the Master kit, but the full jig is worth the money.
This is the one I bought. I also bought a Face Clamp which is totally worth the money as well.
Image

I patched up the frames. Funny enough, compared to patching ripped-out round-overs and corners on BB, this was pretty easy. Just slapped the wood filler on the nice, flat surface and done. I will let it dry until tomorrow morning before sanding. Not sure if you can see in these pics, but I also rounded over the inner edge of the "window" for a more polished look. Glad I took the time to do it. I will be even MORE glad when I finally can buy a small router table. Instead of clamp both sides, run router over one edge, unclamp, turn workpiece, clamp both sides, and on and on, I could just spin the frame around the bit on the table and be done in two minutes. That's next on the wish-and-point-and-shoot-and-hope-the-wife-don't-catch-me list.

Image
Image
Image

While shoving the frames around as I rounded over/sanded/patched them, I was pleased to note how solid and non-flexy they feel, even the 4-footer. Glad I went with 1'x4's instead of the 1'x3's I had originally planned to use. In fact, I even bought the 1x3s then as I was about to cut them, I said "Nah...what was I thinking?" It's not a mistake if you catch it in time. :slap:

Post Reply