OTop12 Platforms
Posted: Mon Apr 15, 2013 5:38 pm
Having recently completed 4 OTop12's (minus grills...currently ordered) I was in need of a way to mount them atop stands. I opted not to include a tophat inside my OTops due to balance issues. The only place to safely mount a tophat in an OTop is in the middle of the cab, poking up through the lower reflector. OTops are very back-heavy; even more so when you have the 16-pound Delta Pro 12 woofers like I do. With the tophat dead-center in the cab, the cabs would be unbalanced and wouldn't sit correctly on stands, especially stacking them 2-high.
The best way to mount OTops is to actually SIT them on all four feet, on top of a platform/scaffold-type "stand." Not being a welder and being short on cash, I had to think up a second-best, but still portable and strong, option. I built a platform with normal, 1-3/8" steel tophats mounted inside of it. The platform sits on TWO standard tripod stands, dividing the weight of two OTops (almost 100 pounds) between the two stands.
First, some build pics, then the finished product...or you could just be a party pooper and scroll down to get to the finished pics...but what fun is that?
Platforms are constructed of 3/4" oak ply on the top/bottom/front back with 3/4" "BC" plywood braces inside. Plenty of PL and 1.5" brads holds them together. You could park a bus on these things. Finished size is 4" thick x 22" wide x 19-1/2" deep. They weigh 19.3 pounds each (weighed on a digital postal scale).
Cut four boards to 18-1/2" x 21".

Calculated the internal space needed for recessed tophats and cut my uprights to 2-3/4" high. Tophats were just sitting approximately where they'd be mounted...I was "eyeballing."


Test fitting the top. Note the recesses in the top for the cab's feet to sit in. If you're thinking "Why, it's nothing more than a pallet, actually!" You'd be incorrect. It's a High-Speed Loudspeaker Placement Accessory.

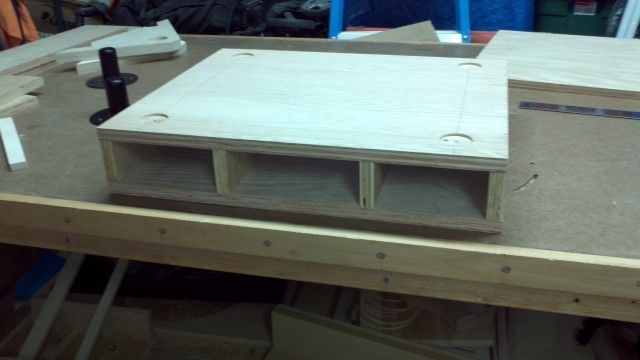
Wanted to make sure the tophats had plenty of support and the mounting screws plenty of wood to bite into. Cut 5"x5" squares of 3/4" ply and PL'd/brad nailed in place. And yes; that bottom piece WAS going to be a top piece. Until I cut the 4 cab-foot receses in the wrong spots. Then the top became a bottom real quick.


Chucked the 2" Forstner bit (IIRC it was 2") in the drill and bored the mounting holes.

And we wind up with this.

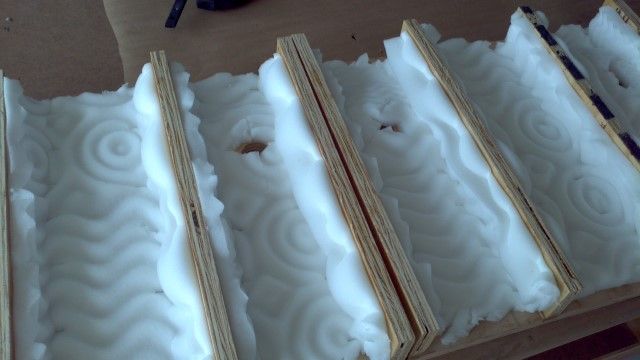
Realized that these would essentially be empty, reverberant boxes. So I lined them with mattress topper left over from the OTop build. Just stapled it in.

PL'd the daylights out of them. Here they are, drying/curing. Note the diameter of the tophats traced on the bottom for recessing.


I made a template for recessing the tophats...no pic of the template. After cutting the recesses, I realized the diameter of the tophat is larger at the bottom (at the mounting flange) and would not sit flush. So I had to route out additional material right at the opening.


Tophats sit flush now.


Then it was time to roundover the edges (3/8" roundover bit) and spackle, spackle, spackle.


Lots of sanding, four coats of Duratex, corners and mounted hats later and tada!


And the finished product/proof of concept. I only have two stands ATM; the other two (identical ones) are in the mail. Note that I chose these stands specifically b/c they have a steel pin that holds the pole up. The twist knob/friciton knob is only used to keep the pole from spinning. Stands are rated at 120 pounds EACH. So 120-ish pounds split b/t 2 stands should be cake.


Camera was tilted. They don't lean this far foward IRL. I got the center of gravity almost perfectly centered over the tophats...could've been moved forward about another 1/2"-3/4" but "good enough" works too.


I have black racheting tie downs in the mail as well. I was just testing it all out with these safety orange ones.


With just one cab you don't need the tie downs at all. Of course, I'll use them anyway.


Some notes: I just assumed that both tripod stands would "open and sit at the exact same height." They don't. Getting them to the same height takes a little work. Also, the tophats are 15-1/2" center-to-center in the platforms. Both stands need to be pretty much exactly that far apart, else they don't sit right. That said, with everything where it needs to be the platform is very stable and sits hard and firm. There is a little wiggle room inside the tophat. Though my hats are 1-3/8" and poles in the stands are 1-3/8" there's still some play. With two cabs mounted, the whole assembly will rock front/back maybe a 1/4" in each direction, but you really have to push on it. The STANDS however, do not move. I will set the whole thing up in the backyard this weekend and watch it all day while the wind blows. I do not think I'll need it, but possibly another strap or two anchoring the platform "fully rocked forward/backward" might be in order, but I doubt it.
So there you have it. I'm pleased with how they turned out. They were quick and cheap to build and get the job done. In the future, I'd still like to get collapsable stands like Pulseman's built, but that's down the road. For now, these fit the bill. Thanks for looking.
The best way to mount OTops is to actually SIT them on all four feet, on top of a platform/scaffold-type "stand." Not being a welder and being short on cash, I had to think up a second-best, but still portable and strong, option. I built a platform with normal, 1-3/8" steel tophats mounted inside of it. The platform sits on TWO standard tripod stands, dividing the weight of two OTops (almost 100 pounds) between the two stands.
First, some build pics, then the finished product...or you could just be a party pooper and scroll down to get to the finished pics...but what fun is that?
Platforms are constructed of 3/4" oak ply on the top/bottom/front back with 3/4" "BC" plywood braces inside. Plenty of PL and 1.5" brads holds them together. You could park a bus on these things. Finished size is 4" thick x 22" wide x 19-1/2" deep. They weigh 19.3 pounds each (weighed on a digital postal scale).
Cut four boards to 18-1/2" x 21".

Calculated the internal space needed for recessed tophats and cut my uprights to 2-3/4" high. Tophats were just sitting approximately where they'd be mounted...I was "eyeballing."


Test fitting the top. Note the recesses in the top for the cab's feet to sit in. If you're thinking "Why, it's nothing more than a pallet, actually!" You'd be incorrect. It's a High-Speed Loudspeaker Placement Accessory.


Wanted to make sure the tophats had plenty of support and the mounting screws plenty of wood to bite into. Cut 5"x5" squares of 3/4" ply and PL'd/brad nailed in place. And yes; that bottom piece WAS going to be a top piece. Until I cut the 4 cab-foot receses in the wrong spots. Then the top became a bottom real quick.


Chucked the 2" Forstner bit (IIRC it was 2") in the drill and bored the mounting holes.

And we wind up with this.

Realized that these would essentially be empty, reverberant boxes. So I lined them with mattress topper left over from the OTop build. Just stapled it in.


PL'd the daylights out of them. Here they are, drying/curing. Note the diameter of the tophats traced on the bottom for recessing.


I made a template for recessing the tophats...no pic of the template. After cutting the recesses, I realized the diameter of the tophat is larger at the bottom (at the mounting flange) and would not sit flush. So I had to route out additional material right at the opening.


Tophats sit flush now.


Then it was time to roundover the edges (3/8" roundover bit) and spackle, spackle, spackle.


Lots of sanding, four coats of Duratex, corners and mounted hats later and tada!


And the finished product/proof of concept. I only have two stands ATM; the other two (identical ones) are in the mail. Note that I chose these stands specifically b/c they have a steel pin that holds the pole up. The twist knob/friciton knob is only used to keep the pole from spinning. Stands are rated at 120 pounds EACH. So 120-ish pounds split b/t 2 stands should be cake.


Camera was tilted. They don't lean this far foward IRL. I got the center of gravity almost perfectly centered over the tophats...could've been moved forward about another 1/2"-3/4" but "good enough" works too.


I have black racheting tie downs in the mail as well. I was just testing it all out with these safety orange ones.


With just one cab you don't need the tie downs at all. Of course, I'll use them anyway.


Some notes: I just assumed that both tripod stands would "open and sit at the exact same height." They don't. Getting them to the same height takes a little work. Also, the tophats are 15-1/2" center-to-center in the platforms. Both stands need to be pretty much exactly that far apart, else they don't sit right. That said, with everything where it needs to be the platform is very stable and sits hard and firm. There is a little wiggle room inside the tophat. Though my hats are 1-3/8" and poles in the stands are 1-3/8" there's still some play. With two cabs mounted, the whole assembly will rock front/back maybe a 1/4" in each direction, but you really have to push on it. The STANDS however, do not move. I will set the whole thing up in the backyard this weekend and watch it all day while the wind blows. I do not think I'll need it, but possibly another strap or two anchoring the platform "fully rocked forward/backward" might be in order, but I doubt it.
So there you have it. I'm pleased with how they turned out. They were quick and cheap to build and get the job done. In the future, I'd still like to get collapsable stands like Pulseman's built, but that's down the road. For now, these fit the bill. Thanks for looking.