Titan 39 Build
Re: Titan 39 Build
Yeah, casters on the back/bottom corner. I'm still debating hand holds elsewhere on the cab - seems like I can lift it OK as is right now, but maybe another set on the front bottom edge wouldn't be a bad idea.
Re: Titan 39 Build
Another set on the bottom front edge would be a very good idea. Plus, you'll lose a few precious ounces of weight in the process. If you made a handle hole jig for your router, adding the handles is a 2-minute job. Oh, and definitely roundover the edges. 3/8" roundover works well with the large, plastic corners.
T48 build thread: http://billfitzmaurice.info/forum/viewt ... 30&t=20315
OTop12 build thread: http://billfitzmaurice.info/forum/viewt ... 30&t=19214
OTop12 build thread: http://billfitzmaurice.info/forum/viewt ... 30&t=19214
-
Bruce Weldy
- Posts: 8719
- Joined: Fri Nov 27, 2009 11:37 am
- Location: New Braunfels, TX
Re: Titan 39 Build
I've found that one handhold on the bottom is sufficient. It's only used when getting help lifting up a step or into a trailer. The cab is light enough that it's a one-hand job (yeah, yeah..I get it).
I put mine on the cross brace. Easy to grab and you don't have to bend over as far. Works great.
I put mine on the cross brace. Easy to grab and you don't have to bend over as far. Works great.
You do not have the required permissions to view the files attached to this post.
6 - T39 3012LF
4 - OT12 2512
1 - T24
1 - SLA Pro
2 - XF210
"A system with a few knobs set up by someone who knows what they are doing is always better than one with a lot of knobs set up by someone who doesn't."

Re: Titan 39 Build
Yeah, I like the curvy braces look 
2xJ15, THT, 4xT39 3012 (2x15", 2x20"), 2xSLA Pro, 2x short SLA Pro (Dayton), W6
Re: Titan 39 Build
Yeah, I thought the curved braces looked a little nicer. I wish I could claim creative rights for those, but "they're in the plans" 
Re: Titan 39 Build
The curved braces are not in the T48 plans.  Maybe by the time it comes to cut them out, I'll have enough free time to figure out how to make them myself. I can cut almost any parts and put'em together great; just don't ask me to design anything. Stick figures are difficult for me to draw...that gives you an idea of my "design skill range."
T48 build thread: http://billfitzmaurice.info/forum/viewt ... 30&t=20315
OTop12 build thread: http://billfitzmaurice.info/forum/viewt ... 30&t=19214
OTop12 build thread: http://billfitzmaurice.info/forum/viewt ... 30&t=19214
-
Bruce Weldy
- Posts: 8719
- Joined: Fri Nov 27, 2009 11:37 am
- Location: New Braunfels, TX
Re: Titan 39 Build
Cut the brace to specs, then just carve out the front side. Same with the cross brace.miked wrote:The curved braces are not in the T48 plans.
6 - T39 3012LF
4 - OT12 2512
1 - T24
1 - SLA Pro
2 - XF210
"A system with a few knobs set up by someone who knows what they are doing is always better than one with a lot of knobs set up by someone who doesn't."
Re: Titan 39 Build
Last night I got started on the second sub. I got the sides laid out and all of the panels rough cut. I also got the hand holds routed on the top and back panels.
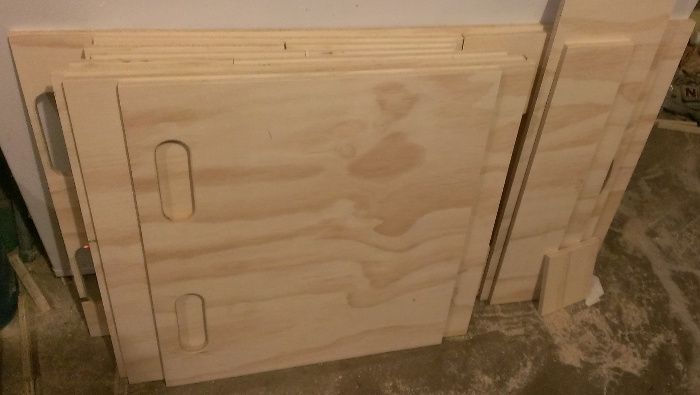
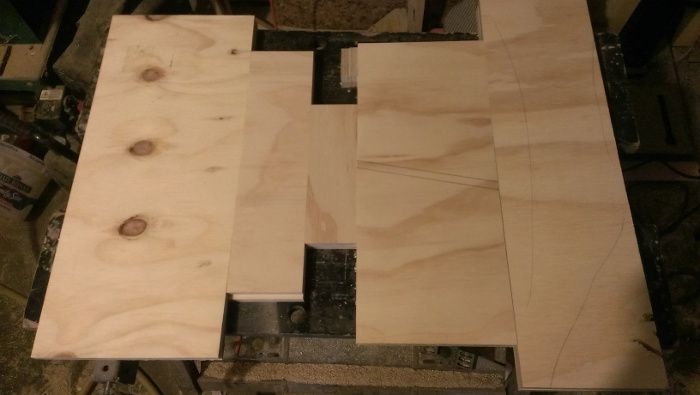
Things were moving along nicely until I got to this part of panel 2 (at around midnight) which halted progress - I ran out of T-nuts. I'll have to pick up a few more today. I could have probably gone ahead and kept going, and just installed the T-nuts later, but I wanted to be able to install the "safety screws" so I wouldn't risk having spinning T-nuts later on. I don't think it would be possible to get the safety screws in once the panel was installed.

I wanted to keep working, so I went ahead and cut blanks for all of the little brace pieces. On the first sub, I probably spent more time looking for scraps to use for the braces than I did on the rest of the build. This time I have an extra sheet of plywood, so I didn't have to rummage. I'm hoping that having these ready to go will shave off a lot of time with the assembly.
I need to keep trucking on this one - goal is to have the 2nd one completely assembled by Friday night, including having both subs filled/sanded/radiused. Should be spraying the Duratex this weekend. I think I'm also going to whip together a quick n' dirty amp rack, too, so I can shoot it with the Duratex while I'm spraying everything else.

Things were moving along nicely until I got to this part of panel 2 (at around midnight) which halted progress - I ran out of T-nuts. I'll have to pick up a few more today. I could have probably gone ahead and kept going, and just installed the T-nuts later, but I wanted to be able to install the "safety screws" so I wouldn't risk having spinning T-nuts later on. I don't think it would be possible to get the safety screws in once the panel was installed.

I wanted to keep working, so I went ahead and cut blanks for all of the little brace pieces. On the first sub, I probably spent more time looking for scraps to use for the braces than I did on the rest of the build. This time I have an extra sheet of plywood, so I didn't have to rummage. I'm hoping that having these ready to go will shave off a lot of time with the assembly.

I need to keep trucking on this one - goal is to have the 2nd one completely assembled by Friday night, including having both subs filled/sanded/radiused. Should be spraying the Duratex this weekend. I think I'm also going to whip together a quick n' dirty amp rack, too, so I can shoot it with the Duratex while I'm spraying everything else.
Re: Titan 39 Build
I don't have the T48 plans, but for the T39, they were in the Sketchup model, not in the instructions. As Bruce said, cut the pieces per the instructions, and then apply "reasonable" curves.miked wrote:The curved braces are not in the T48 plans.
I'm a nerd, so I drew mine up in AutoCAD so I could print out a template at full scale. Then I cut the curves on the band saw and cleaned them up on my oscillating spindle sander.

Re: Titan 39 Build
There's nothing wrong with being a nerd. I'm more artistic nerd though so I sat down with a sketchpad to draw out my braces. 
4xOT12s, 2xT39s@22", TTLS@18", 2xT60@18"
Re: Titan 39 Build
Sometimes being a nerd pays off
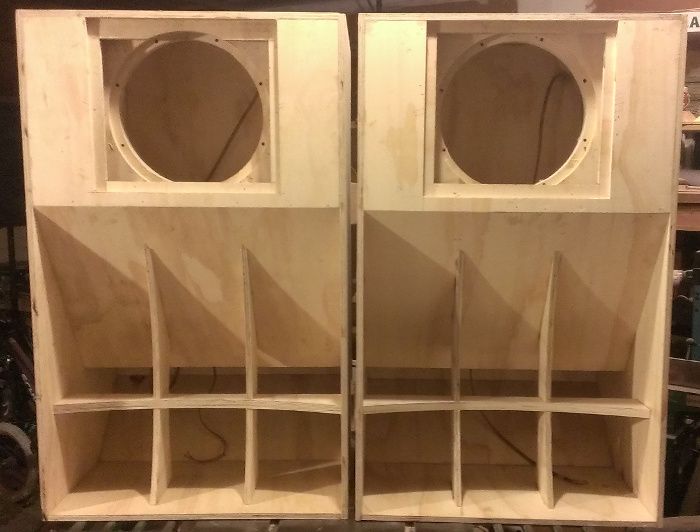
I had a really productive day yesterday. Despite having to make a couple extra trips to the store for supplies, I managed to get the second sub almost completely assembled. I kind of felt like I was rushing, but it seems to have turned out well. I ran out of steam after I got the 2nd side on, so I still need to do the final brace work, but that should go quick tonight. Then loads of fun sanding/filling/sanding/filling/... I feel like I'm on track to actually get these things finished on time.

I had a really productive day yesterday. Despite having to make a couple extra trips to the store for supplies, I managed to get the second sub almost completely assembled. I kind of felt like I was rushing, but it seems to have turned out well. I ran out of steam after I got the 2nd side on, so I still need to do the final brace work, but that should go quick tonight. Then loads of fun sanding/filling/sanding/filling/... I feel like I'm on track to actually get these things finished on time.

Re: Titan 39 Build
Here's how I figured out how to calculate the radius of whatever arc you want on your braces. Just put in whatever numbers you want and solve for r.
You do not have the required permissions to view the files attached to this post.
Re: Titan 39 Build
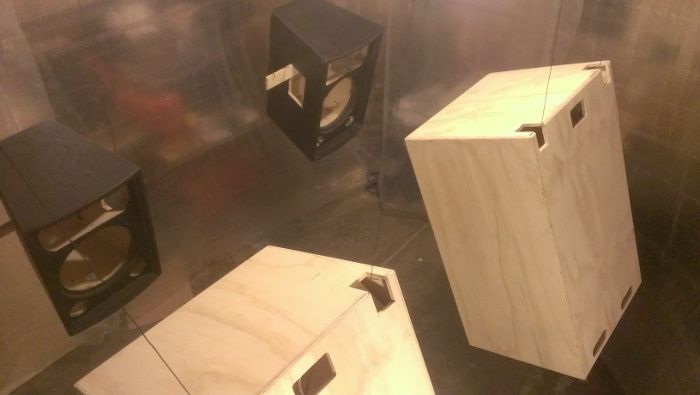
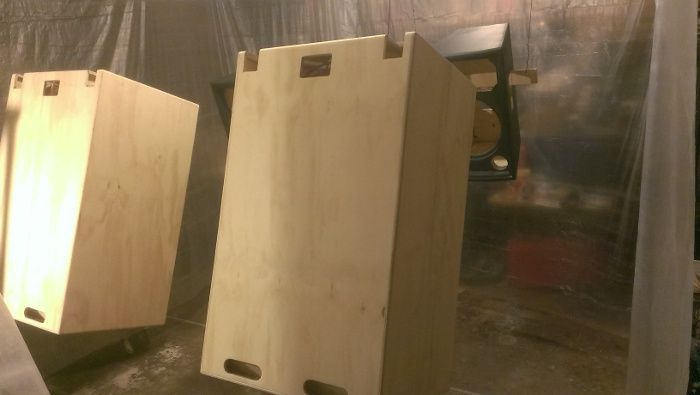
Don't you love it when nothing goes to plan? I was hoping to be doing final assembly today, but instead I'm just about to start spraying. I guess the positive note is that I have the woodworking all finished. All the sanding, filling, sanding, etc took longer than expected, and I ended up with less available time than I expected. I also have the "spray booth" all rigged - looks a bit like a scene from CSI. I have everything hanging from the ceiling, so I should be able to shoot everything quickand easy once I finally start spraying.


Re: Titan 39 Build
The cabs are looking great! Nice pics of the spraybooth. It's always cool to see how others "set up the mess" in their own space...I get tired of seeing my own mess, so it makes me feel better to see your mess too. LOL! I like how you suspended the cabs with a plank of wood through the cab. I may borrow that idea if I decide to spray. Though setting up a spray booth is a bit more difficult for me as my garage is semi-finished. The whole thing is sheetrocked. No exposed beams at the ceiling to hang stuff from. I wish it wasn't semi-finished.
What kind of tops are those? Looks like a 12" woofer with two round ports at the bottom and big old horn up top. Details? And of course, rationale for not going with OTops or DRs?
What kind of tops are those? Looks like a 12" woofer with two round ports at the bottom and big old horn up top. Details? And of course, rationale for not going with OTops or DRs?
T48 build thread: http://billfitzmaurice.info/forum/viewt ... 30&t=20315
OTop12 build thread: http://billfitzmaurice.info/forum/viewt ... 30&t=19214
OTop12 build thread: http://billfitzmaurice.info/forum/viewt ... 30&t=19214
-
mister2walker
- Posts: 50
- Joined: Wed Aug 12, 2009 8:53 am
- Location: Charlotte, NC
Re: Titan 39 Build
So this is the second time I've seen something in a T39 build that makes access to the driver so much easier, but the plans didn't show it this way. The access for his drivers is in the front, and the driver is recessed into the panel rather than mounted from behind and accessed from the top. I had the impression that the space in front of the driver must be braced immediately on each side of the rectangular hole and that the driver was constricted through that hole.
The way these subs are built, there is no rectangle hole, no spacer between the driver and the mount, and no rectangle hole smaller than the face of the driver. Are the characteristics of the sub altered by this approach?
Is there a plan update or some comment in the design that I have not seen?
The way these subs are built, there is no rectangle hole, no spacer between the driver and the mount, and no rectangle hole smaller than the face of the driver. Are the characteristics of the sub altered by this approach?
Is there a plan update or some comment in the design that I have not seen?