That screw is going to grab at least a solid 1/2+" of wood, and the cork shouldn't be the only part of that gasket that compresses. If you begin with that screw to tighten the driver down, you could run into problems. Just make it the last one you tighten for each go-round of screw tightening. Think like tightening lug nuts; star pattern, hand-tight first, then incrementally tighten, leave the wood screw for last on each go-round, once the gasket is compressed evenly and no leaks, AND you have enough pressure to make the lock-washers do their thing, you are good.
The screws that hold my access panel in place are only biting into 1/2" of wood. They are 1" long, and my access panel is 1/2" thick, and so are my flanges.
If you are still having second thoughts about it, order longer screws and have the peace of mind...
JSS
myn's Tuba HT Build Thread
Re: myn's Tuba HT Build Thread
So what's the point of the extra piece of wood below the baffle? If I use the 1 1/8" screw I only think it will be using a very small fraction of the extra wood below the main baffle. And the 1/2" of wood that it does have grip of has been filled with a dowel.maxmercy wrote:That screw is going to grab at least a solid 1/2+" of wood, and the cork shouldn't be the only part of that gasket that compresses.
The screws that hold my access panel in place are only biting into 1/2" of wood. They are 1" long, and my access panel is 1/2" thick, and so are my flanges.
If you are still having second thoughts about it, order longer screws and have the peace of mind...
JSS
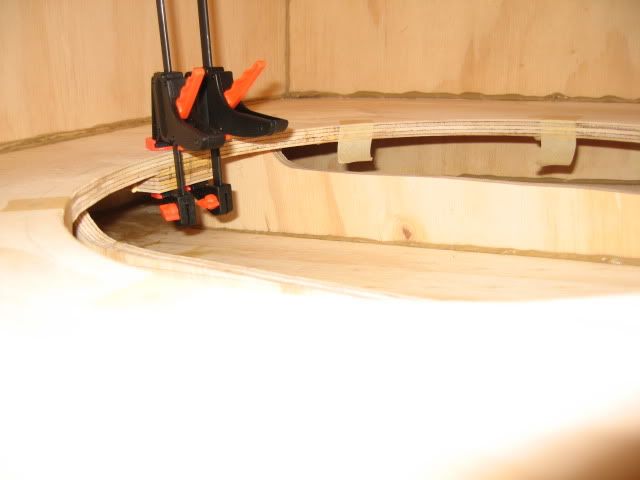
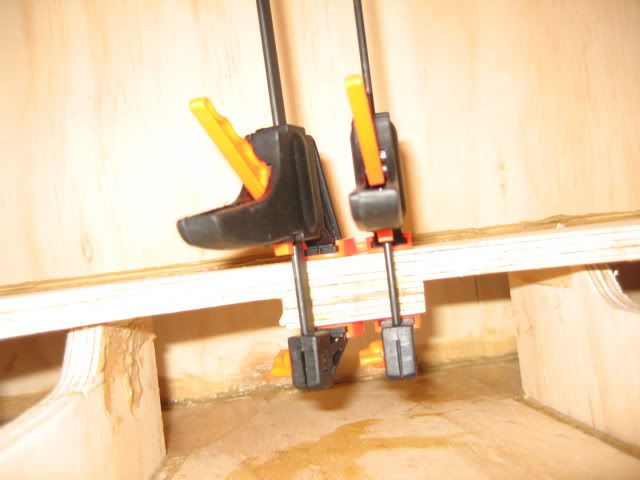
In any case, I glued a small extra piece of 1/2" ply below the baffle to allow for whatever screw I do choose, to use have a a little more grip. I knew those tiny baby clamps would come in handy one day!
While I am waiting for this to dry I may hit Lowes and see if they have a better screw (non slotted).

Re: myn's Tuba HT Build Thread
"So what's the point of the extra piece of wood below the baffle? If I use the 1 1/8" screw I only think it will be using a very small fraction of the extra wood below the main baffle. And the 1/2" of wood that it does have grip of has been filled with a dowel."
The extra wood is there for when the gasket compresses, there will be extra wood for the screw to bite into, as the force on the wood/thread interface will increase as the gasket gets smaller...My guess is that 1-1/8" screw will be halfway into the second piece of wood before all is said and done.
For peace of mind, go with a longer screw, but make sure you can tighten it in those tight quarters. A chapman tool or stubbie screwdriver will only be able to torque so much on a philips screw before you need some real force into the screw head to keep the driver from bouncing out. Not so with hex or torx head screws. If you have a FASTENAL in your area, they carry lots of specialty fasteners that Lowe's/HD won't.....
I would try it the way it is, and if I felt any problems, I'd back off and get a longer screw......even better, get your test piece of wood, and screw the driver onto it with the screw; do a worst case scenario, just put one in as far as it will go before tearing out the wood... If there are any problems, go get a longer one.
JSS
Re: myn's Tuba HT Build Thread
maxmercy wrote:" A chapman tool or stubbie screwdriver will only be able to torque so much on a philips screw before you need some real force into the screw head to keep the driver from bouncing out. Not so with hex or torx head screws. If you have a FASTENAL in your area, they carry lots of specialty fasteners that Lowe's/HD won't.....
I would try it the way it is, and if I felt any problems, I'd back off and get a longer screw......even better, get your test piece of wood, and screw the driver onto it with the screw; do a worst case scenario, just put one in as far as it will go before tearing out the wood... If there are any problems, go get a longer one.
JSS
Excellent suggestions and ideas MaxMercy. Thanks again.
Never heard of FASTENAL but found out today thanks to you we have one local here and they may have exactly what I need.
I really like your idea of testing out the 1 1/8" socket cap screw on a couple of spare pieces of wood before the real deal. That way I can guarantee it will work.
Now as far as the pre-drilling in tight quarters. I was thinking about using my variable speed Dremel using a drill bit. Sound good?

Re: myn's Tuba HT Build Thread
Builder's Note: As Myn has mentioned above, the gasket backing material underneath the cork on the DVC does not compress at all. Indeed, it's a very stiff compressed fiber spacer bonded to the frame. It places the compressible cork gasket just about the height of the foam surround.
Good food, good people, good times.
4 - AT
1 - TT
1 - THT Slim
2 - SLA Pro 4x6 Alphalite
1 - T18
4 - AT
1 - TT
1 - THT Slim
2 - SLA Pro 4x6 Alphalite
1 - T18
Re: myn's Tuba HT Build Thread
"Now as far as the pre-drilling in tight quarters. I was thinking about using my variable speed Dremel using a drill bit. Sound good?"
If it fits, and you can getit perpendicular to the wood. I would have thought you would have needed a right-angle drive....if fastenal carries a screw with serrated threads, you could get by drilling a smaller hole. Fastenal was a lifesaver when I was building my telescope...
According to Radian, looks like that gasket (except the cork) isn't going anywhere, so your test will tell you if you need a longer screw...
JSS
Re: myn's Tuba HT Build Thread
[== 10/14/2009 ==]
This morning before work I added some Elmers wood filler in the area where the dowel was applied to smooth it out.
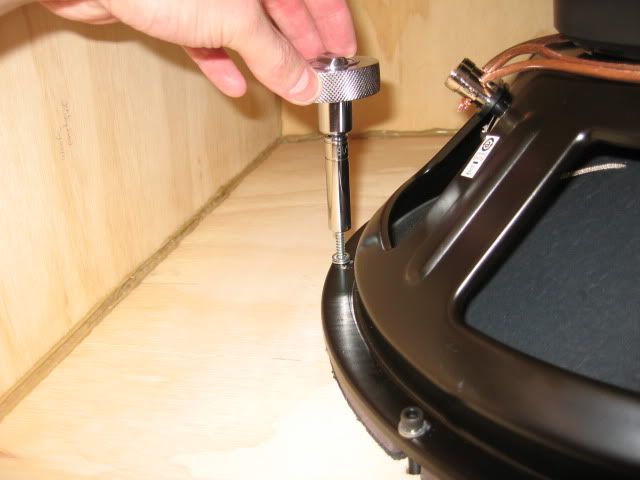
Tonight after work I stopped in at Lowes and ended up buying a #10 x 2" hex head sheet metal screw as a replacement for my bummed out hurricane nut.
Using a Dremel and a drill bit I was easily able to predrill a hole in the baffle to support my new hex head screw. It worked out quite well.
I secured the driver and used a mini-hand-ratchet to secure the hex head. I was overly cautious to not accidentally slip and mame the driver. I also was extremely sensitive to how tight I made the screws. Right now they are all tight but not to the point where I am using serious muscle to tighten them. If I wanted I could probably easily spin them another 5 turns or so. The hex head metal screw definitely has good bite. No stripping what so ever.
Before I installed the access panel I played some test tones (20 - 30hz) and began listening for unexpected noises. I did come across a very slight hissing noise audible in lower frequencies (20hz) which sounds like air is rushing. I was able to pinpoint 1 place where I believe air is leaking which is where the gasket around the driver splits vertically in between the screws. There is a very tiny gap that apparently air can leak through. Interestingly enough the other slits don't seem to be leaking. I used some plasticine to debug where the noise was coming from. Even after I plugged it I still could hear another hissing noise but couldn't figure out where that was coming from. Again, Only audible at the lower frequencies.
I was reluctant to install the access panel until I got some resolution on the minor air leak. Anyone got a solution for this or should I even worry about it? Like I said plasticine was working out okay. Not sure putting another gasket underneight the existing driver gasket will do anything either as it seems like the leak is coming from the vertical slit(s).
With the driver now installed it didn't stop me from playing around putting some music and movies into it to see how it sounded even with no access panel installed and non-ideal placement (non corner/wall loaded). With only 4 volts I couldn't believe how loud it was getting. I can't wait to hear how it sounds once the access panel has been installed and it's corner loaded.
Here's a quick video I made:
http://www.youtube.com/watch?v=kqqKwBSjm5g
http://www.youtube.com/watch?v=kqqKwBSjm5g[/youtube]
Very handly little mini hand rachet
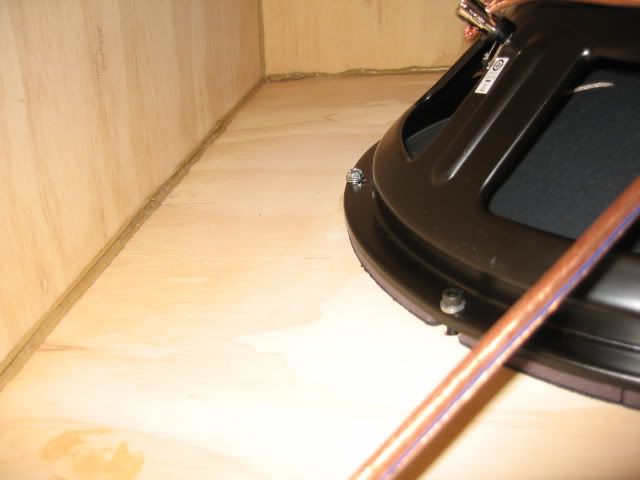
In between the two screws there is a slit in the gasket. This is where some of the minor hissing noise is audible. Perhaps a minor air leak:
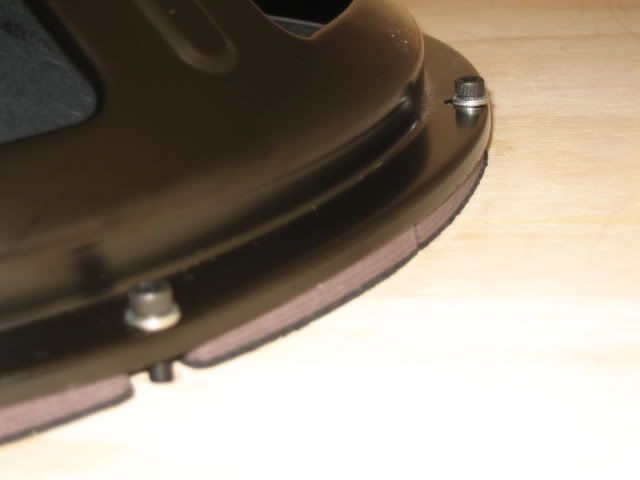
#10 hex head screw installed.
This morning before work I added some Elmers wood filler in the area where the dowel was applied to smooth it out.
Tonight after work I stopped in at Lowes and ended up buying a #10 x 2" hex head sheet metal screw as a replacement for my bummed out hurricane nut.
Using a Dremel and a drill bit I was easily able to predrill a hole in the baffle to support my new hex head screw. It worked out quite well.
I secured the driver and used a mini-hand-ratchet to secure the hex head. I was overly cautious to not accidentally slip and mame the driver. I also was extremely sensitive to how tight I made the screws. Right now they are all tight but not to the point where I am using serious muscle to tighten them. If I wanted I could probably easily spin them another 5 turns or so. The hex head metal screw definitely has good bite. No stripping what so ever.
Before I installed the access panel I played some test tones (20 - 30hz) and began listening for unexpected noises. I did come across a very slight hissing noise audible in lower frequencies (20hz) which sounds like air is rushing. I was able to pinpoint 1 place where I believe air is leaking which is where the gasket around the driver splits vertically in between the screws. There is a very tiny gap that apparently air can leak through. Interestingly enough the other slits don't seem to be leaking. I used some plasticine to debug where the noise was coming from. Even after I plugged it I still could hear another hissing noise but couldn't figure out where that was coming from. Again, Only audible at the lower frequencies.
I was reluctant to install the access panel until I got some resolution on the minor air leak. Anyone got a solution for this or should I even worry about it? Like I said plasticine was working out okay. Not sure putting another gasket underneight the existing driver gasket will do anything either as it seems like the leak is coming from the vertical slit(s).
With the driver now installed it didn't stop me from playing around putting some music and movies into it to see how it sounded even with no access panel installed and non-ideal placement (non corner/wall loaded). With only 4 volts I couldn't believe how loud it was getting. I can't wait to hear how it sounds once the access panel has been installed and it's corner loaded.
Here's a quick video I made:
http://www.youtube.com/watch?v=kqqKwBSjm5g
http://www.youtube.com/watch?v=kqqKwBSjm5g[/youtube]
Very handly little mini hand rachet
In between the two screws there is a slit in the gasket. This is where some of the minor hissing noise is audible. Perhaps a minor air leak:
#10 hex head screw installed.
-
LelandCrooks

- Posts: 7242
- Joined: Thu May 04, 2006 9:36 am
- Location: Midwest/Kansas/Speaker Nirvana
- Contact:
Re: myn's Tuba HT Build Thread
Find the leak. You must. Leaks at the baffle will seriously compromise performance.
If it's too loud, you're even older than me! Like me.
http://www.speakerhardware.com
http://www.speakerhardware.com
Re: myn's Tuba HT Build Thread
Myn,
Well, I am glad you got the fastening thing done no prob. I assume by plasticine you mean modeling/molding clay, right? As long as it's the non-drying type, you should be OK for now while you are finding leaks. If you can tighten another 5 full 360 degree rotations, then the leaks are there because the cork has not compressed enough to fill in the gaps.
One of the best ways to find a leak is a technique posted earlier about using incense, move the burning incense stick around until you see it brighten due to the air flow. Another good one if you are woried about accidents with something that is burning [holla!], is use a piece of tubing as a stethoscope to pinpoint the leak. Use a 20Hz or below tone, find the leak(s), and tighten the driver 1/4 turn at a time (star pattern), until they are all gone (or the cork is paper-flat), and then go back and give them one more 1/8 or 1/4 turn. You should be good.
If this does not work, put the PE speaker gasket tape to good use, adhesive side on the baffle. You will be amazed at the crevices it can get into. It may work...if not, something more durable than plasticine, like silicone.
Almost there....
JSS

Re: myn's Tuba HT Build Thread
+1 on tightening the driver in more. That should resolve the leak by compressing the gasket further.
If it doesn't, one of the tips I picked up on here to find leaks is to take a length of hose/tubing and use it as a sort of stethoscope--hold one end to your ear and use the other end to trace around the driver and all the joints listening for the hissing air sound (while playing a 20hz test tone).
Others have done a better job than I detailing how to remedy the leaks.
Low End Junkie for over 20 years.
4 DR250s
4 Tuba36s @ 30" wide
2 ATs
...and a very serious addiction to the smell of BB sawdust and curing PL.
4 DR250s
4 Tuba36s @ 30" wide
2 ATs
...and a very serious addiction to the smell of BB sawdust and curing PL.
Re: myn's Tuba HT Build Thread
Great suggestions.
Know where can I find hose/tubing?
I am imagining like the flexible latex tubing?
Know where can I find hose/tubing?
I am imagining like the flexible latex tubing?

Re: myn's Tuba HT Build Thread
I have nothing to say but cheers!!!! a 25 page post I have to be in it
good luck and good job
good luck and good job
There is a very thin line between fail and success. It is very thin so, why are you scared???
MADE
4- OT12'S BETAII
4 T39'S 20" 3012LF LOADED
ON THE BENCH: 2 OT212
MADE
4- OT12'S BETAII
4 T39'S 20" 3012LF LOADED
ON THE BENCH: 2 OT212
Re: myn's Tuba HT Build Thread
Any tubing or hose will do. Even a section of garden hose. Check your local hardware store.myn wrote:Great suggestions.
Know where can I find hose/tubing?
I am imagining like the flexible latex tubing?
Low End Junkie for over 20 years.
4 DR250s
4 Tuba36s @ 30" wide
2 ATs
...and a very serious addiction to the smell of BB sawdust and curing PL.
4 DR250s
4 Tuba36s @ 30" wide
2 ATs
...and a very serious addiction to the smell of BB sawdust and curing PL.
-
David Carter

- Posts: 1850
- Joined: Mon Jan 01, 2007 7:20 am
- Location: (East) Tennessee, USA
Re: myn's Tuba HT Build Thread
I got mine from the plumbing section at Home Depot. I got 5 feet of 3/8" inside diameter clear plastic tubing, and it works great.jcmbowman wrote:Any tubing or hose will do. Even a section of garden hose. Check your local hardware store.myn wrote:Great suggestions.
Know where can I find hose/tubing?
I am imagining like the flexible latex tubing?
Dave
Built:
- Omni 10 (S2010 + piezo array)
- 2 x DR250 (DL II 2510 + melded array)
- 2 x Titan 39 (BP102 - 14"W)
- 2 x Titan 39 (3012LF - 20"W)
- 4 x DR200 (Delta Pro 8B + melded array)
Built:
- Omni 10 (S2010 + piezo array)
- 2 x DR250 (DL II 2510 + melded array)
- 2 x Titan 39 (BP102 - 14"W)
- 2 x Titan 39 (3012LF - 20"W)
- 4 x DR200 (Delta Pro 8B + melded array)
Re: myn's Tuba HT Build Thread
WiSounds wrote:I'm looking forward to an SPL measurement of 30v to the Dayton DVC.
Me too