In your case I wouldn't worry too much, the gasket will compress and spread out when you tighten the access lid down. This will easily fill in any gaps between the ends.
myn's Tuba HT Build Thread
-
RubiconProSound

- Posts: 597
- Joined: Sun Aug 27, 2006 3:10 am
- Location: Pollock Pines CA. (between Lake Tahoe and Sacramento...)
Re: myn's Tuba HT Build Thread
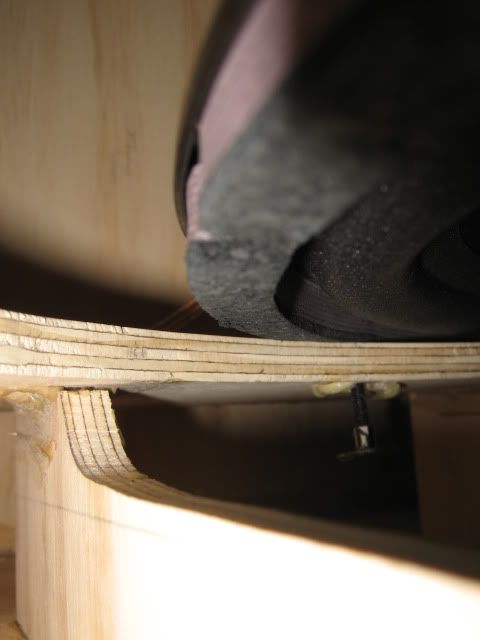
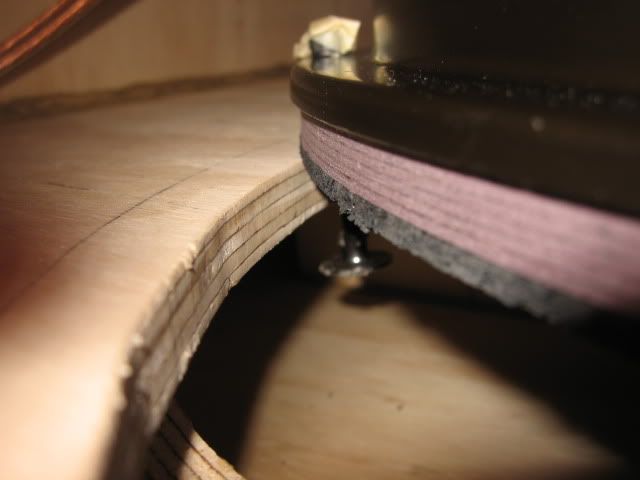
I've always rounded the corners on my access lids and it allows me to curve a 1/4 wide strip of gasket tape around the corner with no problems. Then there is only 1 seam on the tape. Works great except for the additional work to round the corners. 
In your case I wouldn't worry too much, the gasket will compress and spread out when you tighten the access lid down. This will easily fill in any gaps between the ends.
In your case I wouldn't worry too much, the gasket will compress and spread out when you tighten the access lid down. This will easily fill in any gaps between the ends.
Built so far:
AutoTuba. TAT, T18, T30, T39, SLA, SLA Pro, DR200, Omni 12TB, Omni 12 Sub, Omni 10.5,
AutoTuba. TAT, T18, T30, T39, SLA, SLA Pro, DR200, Omni 12TB, Omni 12 Sub, Omni 10.5,
Re: myn's Tuba HT Build Thread
[== 10/9/2009 ==]
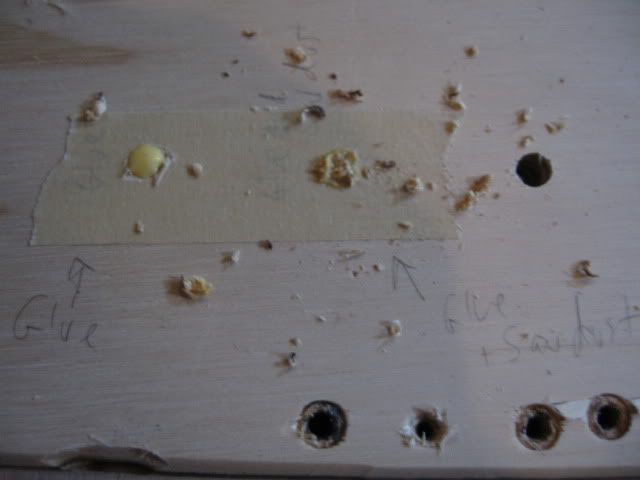
I received my 14 gauge speaker wire from MonoPrice today. I wired up my sub and began securing it inside of the THT with the socket caps. I noticed 1 of the 8 socket caps was having a little bit of a harder time hitting the hole precisely to line up with the hurricane nut so I took it easy and undid it and tried again. Well on the 4th try I heard a squishy noise which I immediately associated with wood and gorilla glue tension.. You can only guess what I am about to say next. The 1 hurricane nut spun loose .
.
Talk about a downer on the entire night. I was so ready to get this THT going. I've had much success with hurricane nuts not spining through thus far. I guess I am not immune to it.
So I have my Dremel plugged in charging the battery so it should be charged ready to use by tomorrow. I'll use the cutting blade and carefully cut the socket cap off. I'm going to cover the speaker with a towel so red hot sparks don't get onto the driver.
Once the screw and hurricane nut is free I am not sure what my next steps are. I suspect a new hurricane nut won't have anything to grab onto inside of the hole? Not to mention there is gorilla glue overspill from the previous hurricane nut install. And working in this small confined space is going to be a royal PITA. Do I just fill the hole and not use it? Using 7/8 screws?
I'd appreciate some feedback and help.

I received my 14 gauge speaker wire from MonoPrice today. I wired up my sub and began securing it inside of the THT with the socket caps. I noticed 1 of the 8 socket caps was having a little bit of a harder time hitting the hole precisely to line up with the hurricane nut so I took it easy and undid it and tried again. Well on the 4th try I heard a squishy noise which I immediately associated with wood and gorilla glue tension.. You can only guess what I am about to say next. The 1 hurricane nut spun loose
Talk about a downer on the entire night. I was so ready to get this THT going. I've had much success with hurricane nuts not spining through thus far. I guess I am not immune to it.
So I have my Dremel plugged in charging the battery so it should be charged ready to use by tomorrow. I'll use the cutting blade and carefully cut the socket cap off. I'm going to cover the speaker with a towel so red hot sparks don't get onto the driver.
Once the screw and hurricane nut is free I am not sure what my next steps are
I'd appreciate some feedback and help.
-
David Carter

- Posts: 1850
- Joined: Mon Jan 01, 2007 7:20 am
- Location: (East) Tennessee, USA
Re: myn's Tuba HT Build Thread
Wait and see what other suggest, but I'd probably fill the hole with PL and get an L-bracket to use on that side of the driver. Secure the L-bracket with a wood screw so you don't have to mess with another hurricane nut. I had a similar thing happen on one of my T39's except I was already using L-brackets to start with. I just filled the hole, moved the L-bracket to the side an inch or so, and screwed it down with a screw. Worked just fine.
That's my $.02. Someone else may have a better suggestion.
That's my $.02. Someone else may have a better suggestion.
Dave
Built:
- Omni 10 (S2010 + piezo array)
- 2 x DR250 (DL II 2510 + melded array)
- 2 x Titan 39 (BP102 - 14"W)
- 2 x Titan 39 (3012LF - 20"W)
- 4 x DR200 (Delta Pro 8B + melded array)
Built:
- Omni 10 (S2010 + piezo array)
- 2 x DR250 (DL II 2510 + melded array)
- 2 x Titan 39 (BP102 - 14"W)
- 2 x Titan 39 (3012LF - 20"W)
- 4 x DR200 (Delta Pro 8B + melded array)
Re: myn's Tuba HT Build Thread
Once you cut the bad bolt and nut, refit with a tee nut that will dig into the wood so as not to spin. Also, use a tap to clean the threads on EVERY hurricane and tee nut before you try to install the driver to make sure nothing goes wrong. This should have been done before you installed the panel into the THT, but I didn't think to mention it. Always test hardware before it becomes difficult to get to, if you can.
JSS
JSS
Re: myn's Tuba HT Build Thread
I've had some really really bad luck with Tnuts which is why I used hurricane nutsmaxmercy wrote:Once you cut the bad bolt and nut, refit with a tee nut that will dig into the wood so as not to spin. Also, use a tap to clean the threads on EVERY hurricane and tee nut before you try to install the driver to make sure nothing goes wrong. This should have been done before you installed the panel into the THT, but I didn't think to mention it. Always test hardware before it becomes difficult to get to, if you can.
JSS
I was thinking more tonight. If I was to use a Tnut I'd have to somehow get all of the residual excess gorilla glue that is still left over on the backside of the baffle where the hurricane nut used to be or else the tnut won't sit correctly nor be able to grab onto the wood.
I do have a bunch of these nice 1.125" Hex Socket Head screws that I was originally going to use on the access cover. Perhaps I fill in the hole and replace it with one of these screws? Now the question remains... What do I fill the hole with that would be strong enough to allow this threaded screw to be secure?


Re: myn's Tuba HT Build Thread
This is post-facto but I found out on my last Table Tuba smearing the screws with paste glue (the lip-stick style kiddy glue) or plain white school REALLY helped those screws find home. I had a difficult H-nut, even after chasing each one with a fluted machinist's tap, due to the slightest alingment mismatch. (just like you)
Respectfully...
Good food, good people, good times.
4 - AT
1 - TT
1 - THT Slim
2 - SLA Pro 4x6 Alphalite
1 - T18
4 - AT
1 - TT
1 - THT Slim
2 - SLA Pro 4x6 Alphalite
1 - T18
Re: myn's Tuba HT Build Thread
1) This is why I refuse to use both Hurricane or T-nuts. I've used #14 wood screws many times, but I'd be a little leery of using only 1/2" wood thickness to thread into. Normally I install a backing ring on the other side of the baffle so the screw has 1 1/4" or 1 1/2" of wood to bite into. Once you remove the jammed bolt it's not too late to change the mounting method even though it would be a pita.myn wrote:gorilla glue overspill from the previous hurricane nut install. And working in this small confined space is going to be a royal PITA. Do I just fill the hole and not use it? Using 7/8 screws?
I'd appreciate some feedback and help.
2) I think David Carter's suggestion would probably be the best and easiest approach if you just quickly want to keep moving ahead.
3) Maybe not of much help at this point, but I'd been threatening to make my own diy threaded H/T Nut replacement that would be bullet proof. I've come up with an idea that'll I'll use from now on for any high power boxes I make. The sub I'm working on now has them but the pictures are still in the camera in the garage. If you're interested I can post them.
Tomorrow I'm going to stop procrastinating - WB
Re: myn's Tuba HT Build Thread
After re-reading your situation...Please concider that the threads on the H-nut failed you...not the Gorilla glue or the function of the nut as a backing material. So... I'd be inclined to install another H-nut that you can absolutely verify threads up nicely. Wash the new H-nut in dish soap and rinse in hot water to remove any oils to help the gorilla glue adhere and seal to the nut. Lightly coat the inner shoulder and the area around the barbs of the nut and using Stan's technique to fish it back around the baffle (avoiding glue on the threads at all costs!). Gingerly press it back into the hole using a 6" or 4" c-clamp. Remove the clamp after 5 minutes.
Let it cure over-night, and try threading it up again making sure the screw is lubed with white glue or stick glue. Loosely install some of the easy fitting screws, if you run across one that doesn't line up exactly or seems to cross thread, Shuffle the speaker about its axis and try again. The more fasteners that drop in the less you'll be able to jockey the driver. Just keep at it using your sense of touch and intuition. If it doesn't engage at all properly you'll be right back here anyways with a fully charged dremel. It's worth a shot and I truly believe the Gorilla glue is more than enough to keep a smoothly threading H-nut from spinning until the fastener pinches everything together. I feel your pains bro..you CAN fix it.
Let it cure over-night, and try threading it up again making sure the screw is lubed with white glue or stick glue. Loosely install some of the easy fitting screws, if you run across one that doesn't line up exactly or seems to cross thread, Shuffle the speaker about its axis and try again. The more fasteners that drop in the less you'll be able to jockey the driver. Just keep at it using your sense of touch and intuition. If it doesn't engage at all properly you'll be right back here anyways with a fully charged dremel. It's worth a shot and I truly believe the Gorilla glue is more than enough to keep a smoothly threading H-nut from spinning until the fastener pinches everything together.
Good food, good people, good times.
4 - AT
1 - TT
1 - THT Slim
2 - SLA Pro 4x6 Alphalite
1 - T18
4 - AT
1 - TT
1 - THT Slim
2 - SLA Pro 4x6 Alphalite
1 - T18
-
LelandCrooks

- Posts: 7242
- Joined: Thu May 04, 2006 9:36 am
- Location: Midwest/Kansas/Speaker Nirvana
- Contact:
Re: myn's Tuba HT Build Thread
Epoxy, epoxy, epoxy. I used gorilla glue twice on other projects. I think it's worthless. 5 minute epoxy on tee nuts, on the barrel and washer part. Pull up snug. Let dry for 10 or 15 minutes, run a tap. Never fails. You have to tear the top ply where the washer is glued and the internal bond to break it loose. I can pull with a 3/8 ratchet with a hex driver, hard, and they never budge.
Cut the tee nut out. Install a new one using EPOXY.
Cut the tee nut out. Install a new one using EPOXY.
If it's too loud, you're even older than me! Like me.
http://www.speakerhardware.com
http://www.speakerhardware.com

Re: myn's Tuba HT Build Thread
+100!LelandCrooks wrote:Epoxy, epoxy, epoxy. I used gorilla glue twice on other projects. I think it's worthless. 5 minute epoxy on tee nuts, on the barrel and washer part. Pull up snug. Let dry for 10 or 15 minutes, run a tap. Never fails. You have to tear the top ply where the washer is glued and the internal bond to break it loose. I can pull with a 3/8 ratchet with a hex driver, hard, and they never budge.
Cut the tee nut out. Install a new one using EPOXY.
Out of the 120+ hurricane nuts I've installed so far I've managed to spin about 15 of them. The worst was the access cover that had 2 spin when I was trying to take it off..... but that's another story. I had some 5-minute epoxy laying around about a month ago when I was trying to fix another one and I figured what's the worst that could happen? Since then I've never had a problem. And if any of the old ones get loose - I'll just epoxy them. problem solved.
Low End Junkie for over 20 years.
4 DR250s
4 Tuba36s @ 30" wide
2 ATs
...and a very serious addiction to the smell of BB sawdust and curing PL.
4 DR250s
4 Tuba36s @ 30" wide
2 ATs
...and a very serious addiction to the smell of BB sawdust and curing PL.
Re: myn's Tuba HT Build Thread
<----Looks like I'll be switching to epoxy for my next build. Makes sense as many others have expressed difficulty or concern about the strength of a polyurethane-to-metal bond.
Regardless of how the nut is fastened in there though, it still S-U-C-K-S to crossthread one of these little bastards right when you're trying to button things up. I've taken notice that the black oxide finish on the socket head cap screws doesn't help when trying to start the threads either.
Regardless of how the nut is fastened in there though, it still S-U-C-K-S
Good food, good people, good times.
4 - AT
1 - TT
1 - THT Slim
2 - SLA Pro 4x6 Alphalite
1 - T18
4 - AT
1 - TT
1 - THT Slim
2 - SLA Pro 4x6 Alphalite
1 - T18
Re: myn's Tuba HT Build Thread
Loaded up the Dremel this morning and cut the screw off. I tied a piece of string around the hurricane nut section so when the cut went through it wouldn't fall down into the Horn labyrinth. That worked out well.
Looking at the binding between the hurricane nut and socket cap now I can say I never stood a chance. It was driven in on a slight angle. That particular hole was a tiny bit off and as you guys all know, hurricane/tnuts need to be in perfect or else your screw will never find the nut correctly.
There still remains a glob of Gorilla glue on the backside of the baffle where the hurricane nut used to reside.
I appreciate everyone's ideas. The BFM helping hand community is something I wish other forums had. Thanks.
Given the accessibility issue (tight place). It would be a PITA to try and scrape off the old gorilla glue and the fact that the same thing may happen with another hurricane nut/t-nut in this perhaps non-perfectly aligned hole I am leaning towards filling it with something that will accept a screw
I am currently thinking about taking some plasticine and placing it on the underside of the hole to close the opening and than use a mixture of Titebond II carpenters glue and some saw dust mixing it into the hole. Unless someone knows of a better filling agent? Maybe some 5 min epoxy?
Thanks again guys
Re: myn's Tuba HT Build Thread
" I am leaning towards filling it with something that will accept a screw
I am currently thinking about taking some plasticine and placing it on the underside of the hole to close the opening and than use a mixture of Titebond II carpenters glue and some saw dust mixing it into the hole. Unless someone knows of a better filling agent? Maybe some 5 min epoxy?"
No...I mean, HELL NO. No filler material will ever stand up to a sheet metal screw, not even JB Weld... No matter what, first thing you must do is scrape off the old PL on the underside of the baffle. This is non-negotiable, unless you are willing to use L-brackets, in which case, fill the hole and use an L-bracket. If L-brackets are not in your future....
Then you have one of two options. Put in a tee nut that will potentially have the same alignment problem again, or glue a 1/2" or 3/4" backing piece to the underside of the baffle so that your sheet metal screw will have a chance at biting into something that won't crumble (a filler-glue combo). You can then drill a pilot hole into the backing piece, put the screw in with some mold release on the threads that are above the backing, and backfill with epoxy and filler (I'd use chopped fiberglass and fumed silica/cabosil to fill). When it cures (FULLY), back out the screw carefully, It should back out because of the mold release (use PVA or vaseline, VERY LIGHT COAT), and then clean out the mold release on the female threads (the epoxy/filler/cabosil combo) and on the screw (or just use a new screw), and install the driver.
That should give you a pretty strong installation. When threading that sheet-metal screw in again, be very careful to go into the threads that are already there in the cured epoxy.
If you can, I'd make the hole a little bigger and go with tee-nut and epoxy, it's easier, as long as you can get good alignment. If not, you have to go the sheet-metal screw route.
JSS
Re: myn's Tuba HT Build Thread
Hrm.
Where do I get L-Brackets? Would HD or Lowes sell them?
Immediately after I cut the socket cap I set up a test piece of wood with a few 1/4" holes in them. 1 is filled with pure titebond II, The other is filled with Titebond + arauco sawdust. My thought was to test and ensure there wouldn't be any issues.
I am going to head out and get some 2 part 5 min epoxy too. Perhaps I should pick up some L-brackets if they are available locally.
Re: myn's Tuba HT Build Thread
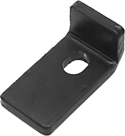
You can make L-brackets with some angle iron, a drill and a coping saw for a quick fix. For anything that will involve threads, very good of you to to run a test panel. You are realizing that the THT will not be done anytime soon due to glue curing and test panel issues if you take the threaded route... Take your time, you as have done so far very well. Another option you may want to consider is how I did mine: threaded inserts:

They have to be epoxied in, and well-stocked hardware stores carry them. Otherwise, I get mine from mcmaster-carr. You can get them with a hex driver pattern on top so that you can install them in tight spaces, like the ones I used:

Here's a good pic of what an L-bracket looks like:
So, to recap the options:
1. Tee-nut/Threaded insert, but only if you will have good alignment.
2. Glue backing material and your sheet-metal screw as described above.
3. Make/buy a speaker clamp/L-bracket and use your sheet metal screw. Tighten the l-bracket last.
JSS
They have to be epoxied in, and well-stocked hardware stores carry them. Otherwise, I get mine from mcmaster-carr. You can get them with a hex driver pattern on top so that you can install them in tight spaces, like the ones I used:
Here's a good pic of what an L-bracket looks like:
So, to recap the options:
1. Tee-nut/Threaded insert, but only if you will have good alignment.
2. Glue backing material and your sheet-metal screw as described above.
3. Make/buy a speaker clamp/L-bracket and use your sheet metal screw. Tighten the l-bracket last.
JSS