Nope. You're not alone. I've done it four times now on subs alone, and I still feel like I'm stepping off a cliff every time I lay that second side down on a bed of PL.myn wrote:Am I the only one that feels anxiety about attaching the other side panel, closing the enclosure?
myn's Tuba HT Build Thread
-
David Carter

- Posts: 1850
- Joined: Mon Jan 01, 2007 7:20 am
- Location: (East) Tennessee, USA
Re: myn's Tuba HT Build Thread
Dave
Built:
- Omni 10 (S2010 + piezo array)
- 2 x DR250 (DL II 2510 + melded array)
- 2 x Titan 39 (BP102 - 14"W)
- 2 x Titan 39 (3012LF - 20"W)
- 4 x DR200 (Delta Pro 8B + melded array)
Built:
- Omni 10 (S2010 + piezo array)
- 2 x DR250 (DL II 2510 + melded array)
- 2 x Titan 39 (BP102 - 14"W)
- 2 x Titan 39 (3012LF - 20"W)
- 4 x DR200 (Delta Pro 8B + melded array)
Re: myn's Tuba HT Build Thread
Been there when building my AT, so I know what you mean. But, it's all about trusting that you followed the plans down to the Tee.David Carter wrote:Nope. You're not alone. I've done it four times now on subs alone, and I still feel like I'm stepping off a cliff every time I lay that second side down on a bed of PL.myn wrote:Am I the only one that feels anxiety about attaching the other side panel, closing the enclosure?
TomS
Re: myn's Tuba HT Build Thread
Regarding the application of Duratex. Do I need to sand down the external AraucoPly panels or are they rough enough as is for adhesion?
How about the PL squeeze out? Does it stick to that?
How about the PL squeeze out? Does it stick to that?
-
LelandCrooks

- Posts: 7242
- Joined: Thu May 04, 2006 9:36 am
- Location: Midwest/Kansas/Speaker Nirvana
- Contact:
Re: myn's Tuba HT Build Thread
Scrape off the squeeze out. Prime with something cheap. If it's just the line between a joint it's fine. If it's smeared it needs a primer. It will stick, but not like it does to the wood. I always sand my boxes with 60 g before duratex.
If it's too loud, you're even older than me! Like me.
http://www.speakerhardware.com
http://www.speakerhardware.com
Re: myn's Tuba HT Build Thread
LelandCrooks wrote:Scrape off the squeeze out. Prime with something cheap. If it's just the line between a joint it's fine. If it's smeared it needs a primer. It will stick, but not like it does to the wood. I always sand my boxes with 60 g before duratex.
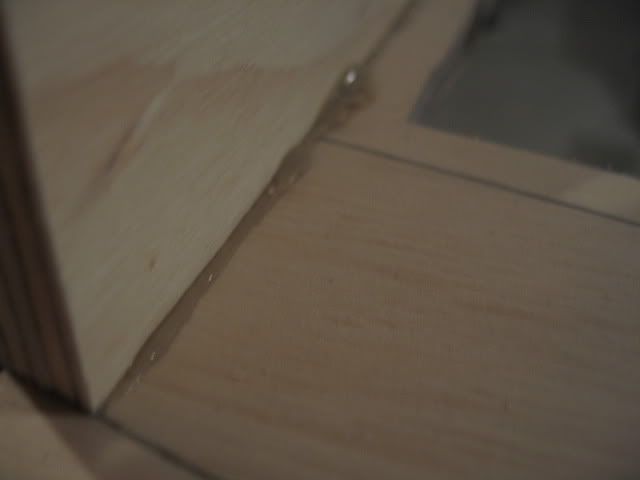
Ahh. When you say "If it's just the line between a joint it's fine." Are you referring to the minimal line that is exposed after you scrape off the PL bead or are you referring to the little bit of squeeze out like the image below:
-
bgavin
- Posts: 5738
- Joined: Thu May 04, 2006 10:58 am
- Location: Sacramento, Moderator/Licensed BF Builder
- Contact:
Re: myn's Tuba HT Build Thread
No.myn wrote:Am I the only one that feels anxiety about attaching the other side panel, closing the enclosure?
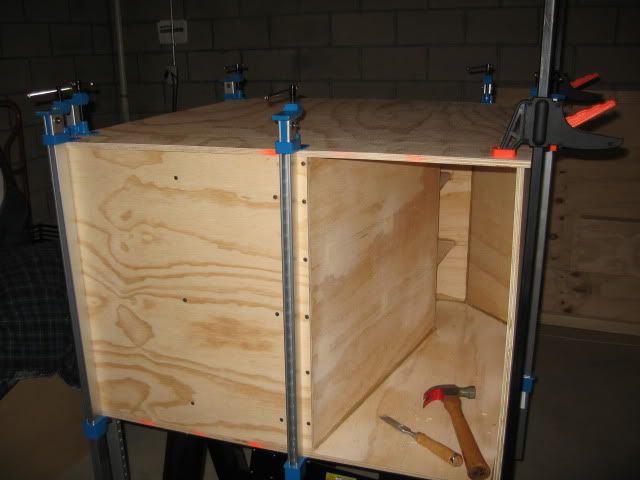
When I get ready to drop on the final side, I have an assistant.
The side is already predrilled and known to fit.
I use two drill bits for registration pins. One each at diagonal corners.
Typically these are 7/64" which is the same size I use to drill the pilot holes.
Registering the side by dropping it over the bits saves no end of grief and mess from slideing the panel around until you find the holes.
My biggest worry is that when I'm dead and gone, my wife will sell my toys for what I said I paid for them.
-
David Carter
- Posts: 1850
- Joined: Mon Jan 01, 2007 7:20 am
- Location: (East) Tennessee, USA
Re: myn's Tuba HT Build Thread
I use a very similar procedure, and I don't have any anxiety about the second side itself going on well. The anxiety is more from being afraid that after it's sealed I'll realize I forgot to do something in a location that I can no longer reach. I double and triple check everything first, but I still get butterflies when I drop that second side on. Luckily, all my fears have been unfounded to date.bgavin wrote:No.myn wrote:Am I the only one that feels anxiety about attaching the other side panel, closing the enclosure?
When I get ready to drop on the final side, I have an assistant.
The side is already predrilled and known to fit.
I use two drill bits for registration pins. One each at diagonal corners.
Typically these are 7/64" which is the same size I use to drill the pilot holes.
Registering the side by dropping it over the bits saves no end of grief and mess from slideing the panel around until you find the holes.
Dave
Built:
- Omni 10 (S2010 + piezo array)
- 2 x DR250 (DL II 2510 + melded array)
- 2 x Titan 39 (BP102 - 14"W)
- 2 x Titan 39 (3012LF - 20"W)
- 4 x DR200 (Delta Pro 8B + melded array)
Built:
- Omni 10 (S2010 + piezo array)
- 2 x DR250 (DL II 2510 + melded array)
- 2 x Titan 39 (BP102 - 14"W)
- 2 x Titan 39 (3012LF - 20"W)
- 4 x DR200 (Delta Pro 8B + melded array)
-
LelandCrooks
- Posts: 7242
- Joined: Thu May 04, 2006 9:36 am
- Location: Midwest/Kansas/Speaker Nirvana
- Contact:
Re: myn's Tuba HT Build Thread
Scrape that. Just the line left between the panels.myn wrote:Ahh. When you say "If it's just the line between a joint it's fine." Are you referring to the minimal line that is exposed after you scrape off the PL bead or are you referring to the little bit of squeeze out like the image below:
If it's too loud, you're even older than me! Like me.
http://www.speakerhardware.com
http://www.speakerhardware.com
-
bgavin
- Posts: 5738
- Joined: Thu May 04, 2006 10:58 am
- Location: Sacramento, Moderator/Licensed BF Builder
- Contact:
Re: myn's Tuba HT Build Thread
If it is an inside panel, leave it alone.
My biggest worry is that when I'm dead and gone, my wife will sell my toys for what I said I paid for them.
Re: myn's Tuba HT Build Thread
The PL Squeeze out on the panels that make up the horn mouth opening is what I am referring to. Should I get rid of the bead of PL in these areas or keep it and apply some cheap flat black paint and duratex over it? See pic below (where chisel is pointing to)
Another pic closer up:

Another pic closer up:
Last edited by myn on Sat Aug 08, 2009 8:26 pm, edited 1 time in total.
Re: myn's Tuba HT Build Thread
[== 8/8/2009 ==]
So today I tested out the replacement router Skil/Bosch sent me via warranty service. I decided to add a roundover on the front edge of the braces that are exposed. I ended up using a 3/16" roundover bit. The 1/4" roundover didn't work so well as the ply is only 1/2" and doint both sides yields pretty crappy results. I prefit the exposed braces enduring they fit well and both are horizontally even in the recess. This came to 4 1/2" inches from the front edge of the born mouth.
I decided on doing a 3/8 roundover on the external edges. I went through my router bit collection and couldn't find a 3/8" roundover. I guess this gives me an excuse to get one .
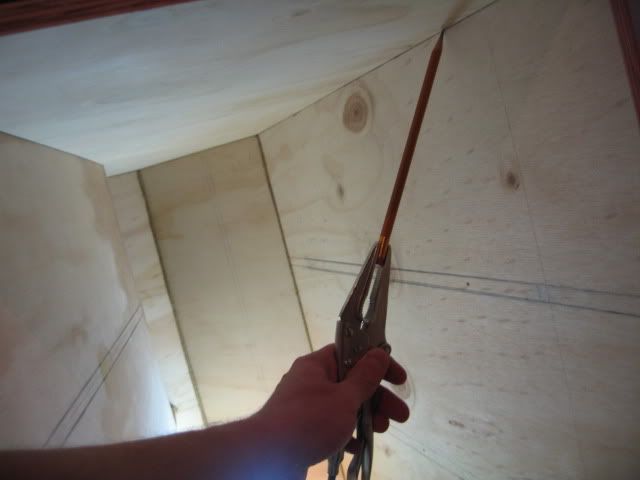
I also secured the top with clamps temporarily and marked the external overhang and inside panels that I could reach. This was a pretty big challenge for me as I could barely reach the internal panels where the driver was and some of the panels going through the mouth of the horn. I decided I needed a longer pencil so I used some vice grips. This ended up working well. I have a feeling my back is going to be aching tommorow though. I'm a pretty small guy too. I can't imagine how someone larger than me could do it.
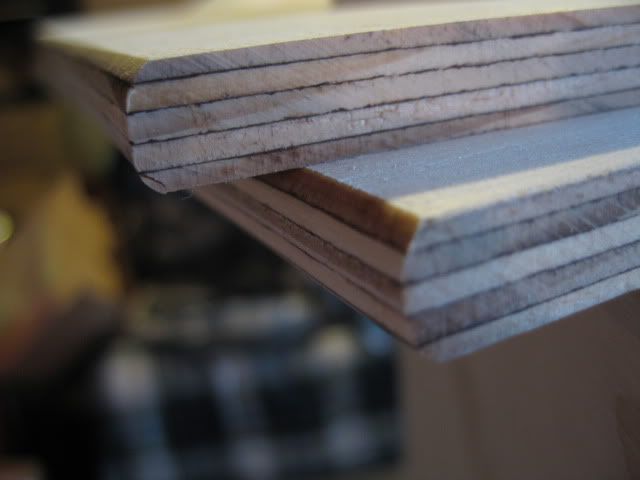
So today I tested out the replacement router Skil/Bosch sent me via warranty service. I decided to add a roundover on the front edge of the braces that are exposed. I ended up using a 3/16" roundover bit. The 1/4" roundover didn't work so well as the ply is only 1/2" and doint both sides yields pretty crappy results. I prefit the exposed braces enduring they fit well and both are horizontally even in the recess. This came to 4 1/2" inches from the front edge of the born mouth.
I decided on doing a 3/8 roundover on the external edges. I went through my router bit collection and couldn't find a 3/8" roundover. I guess this gives me an excuse to get one .
I also secured the top with clamps temporarily and marked the external overhang and inside panels that I could reach. This was a pretty big challenge for me as I could barely reach the internal panels where the driver was and some of the panels going through the mouth of the horn. I decided I needed a longer pencil so I used some vice grips. This ended up working well. I have a feeling my back is going to be aching tommorow though. I'm a pretty small guy too. I can't imagine how someone larger than me could do it.
-
LelandCrooks
- Posts: 7242
- Joined: Thu May 04, 2006 9:36 am
- Location: Midwest/Kansas/Speaker Nirvana
- Contact:
Re: myn's Tuba HT Build Thread
Get one of these. http://www.freudtools.com/t-quadra-cut.aspx
Awesome. Leave the sander at home. I use 1/2 set just a tad shallow.
Awesome. Leave the sander at home. I use 1/2 set just a tad shallow.
If it's too loud, you're even older than me! Like me.
http://www.speakerhardware.com
http://www.speakerhardware.com
Re: myn's Tuba HT Build Thread
"I also secured the top with clamps temporarily and marked the external overhang and inside panels that I could reach. This was a pretty big challenge for me as I could barely reach the internal panels where the driver was and some of the panels going through the mouth of the horn. I decided I needed a longer pencil so I used some vice grips. This ended up working well. I have a feeling my back is going to be aching tommorow though. I'm a pretty small guy too. I can't imagine how someone larger than me could do it."
Then don't, I didn't... Just use enough clamps and weight, and you will not need screws...or need to fill screw holes later if you plan on finishing it pretty...
JSS
Then don't, I didn't... Just use enough clamps and weight, and you will not need screws...or need to fill screw holes later if you plan on finishing it pretty...
JSS
Re: myn's Tuba HT Build Thread
So whats the final answer on removing the PL in the horn mouth before applying Duratex?
Scrape it off?
or keep it, painting it with flat black than apply Duratex over it?
See pics below (where chisel is point)
Closeup:
Scrape it off?
or keep it, painting it with flat black than apply Duratex over it?
See pics below (where chisel is point)
Closeup:
Re: myn's Tuba HT Build Thread
keep it, sand/rough it, primer/flat black, duratex....if the look really bugs you, scrape it first...
JSS
JSS