Jack 10 Lite build

Post your build odyssey here.
Post Reply
Message
Author
morticiaskeeper
Posts: 67
Joined: Thu Dec 28, 2006 11:43 am

Jack 10 Lite build

#1 Post by morticiaskeeper »

Now that my wife has got used to the Omni 10.5 (covered in living room carpet so she won't notice!) I thought I'd have a go at a Jack 10 Lite.


I bought an old table saw and made a sled, but then remembered that my brother now owns a company that makes composite moulds for Formula 1 racing teams, so his workshop would be better than mine!

I used Goodreader to annotate the PDF plans with metric measurements, then drew every part in qCAD. Sent the DXF files to my brother, where he extruded then I to 3d. No angles were included, although the CNC machine would easily do it, it was quicker to cut them on the table saw, rather than me learning to code in 3d.


It was beginning to look like we wouldn't be able to do the build for a while, when the call came - "tomorrow"!


We had two nail guns fail and the machine refused to pickup tools, but I came away from a long day with a square box.


Image
Setting up the vacuum bed to hold the MDF substrate.

Image
The spacers ready to be cut.


http://youtu.be/hoHH_jE4Ic0[/youtube]
Cutting the horn braces.


Image
Sanding the baffle. Look at that mahoosive sanding wheel!


Image
Lots of clamps and mould blocks to hold the baffle square.


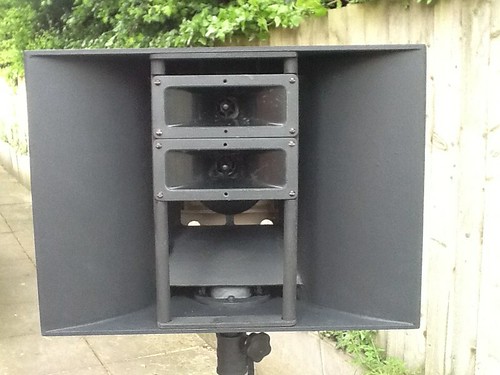
As we finally put the box together, we hit the first snag. The baffle was about 3mm short :-(. A quick decision was made - finish the box and sort out the baffle later.


Image
Back at home the next day, the baffle had tight fitting spacers glued.


Then the next snag - the top hat was sitting too high. I wondered about changing the duct length to clear, but, after consulting Bill, I'm just going to let it stick out, maybe with a little housing (thanks Bruce).


Image
Test bending the sheath.

Various ideas were tried before gluing the sheathes. I eventually went for three spacer blocks against the baffle to hold the sheathes tight, then a couple of cheap "rat shit" straps to hold it all tight.as we were bending, I put a lot of staples in, everyone hitting the mark.


The straps seemed to hold the sheath well, so I did the second side without staples, and it was a much cleaner job.


Image
All the staples removed.

User avatar
LelandCrooks
Posts: 7242
Joined: Thu May 04, 2006 9:36 am
Location: Midwest/Kansas/Speaker Nirvana
Contact:

Re: Jack 10 Lite build

#2 Post by LelandCrooks »

Nice. Green with envy at that shop.
If it's too loud, you're even older than me! Like me.
http://www.speakerhardware.com

User avatar
Hackomatic
Posts: 400
Joined: Thu Jun 25, 2009 8:11 am
Location: West TN

Re: Jack 10 Lite build

#3 Post by Hackomatic »

That sanding wheel is scary . . . Just scary.

:shock:
Dave H

morticiaskeeper
Posts: 67
Joined: Thu Dec 28, 2006 11:43 am

Re: Jack 10 Lite build

#4 Post by morticiaskeeper »

You can hardly see the shop in those photos!

2m vacuum bed 5 axis with heat shrink tool holder
1m bed 5 axis
1m bed milling machine
Double sided linishing wheel
Bandsaw
2m bed table saw

The offices are being knocked down to accommodate a new 3m Sahos Dynamic Machining centre.

The sanding wheel takes about 5 mins to run down, unless you push a mold block against it with all your weight, then it only takes a minute, but the dust extractor can't cope!

All this for making molds for parts to go on wind tunnel models so 20 cars can go round and round :-)

Only 2 staff.

morticiaskeeper
Posts: 67
Joined: Thu Dec 28, 2006 11:43 am

Re: Jack 10 Lite build

#5 Post by morticiaskeeper »

The short horns are now in. The top had to be shaped in place with a craft saw. I realised the problem is with the BB. The nearest we could get is 4mm, which is more difficult to bend.

The lower small horn had to have a cutout for the top hat, so while doing that, I scored the underside with a knife to ease the bending process. The top hat pokes through by about 2mm, so after a bit of filler, it won't be noticed.

For those who like machines, another CNC video.

http://youtu.be/Uwm5JkPZ1VA[/youtube]

Note that the cut is done in two stages. The first is a rough cut 0.5mm short. The tool then jumps up and goes back in for the final cut. This allows the final cut to be more accurate as there is less material to cut through.

This is also why round holes are cut rather than drilled with the right sized bit. In drilling, the whole bit is subject to friction which may cause judder. Using a smaller bit and cutting the hole reduces this friction.

Jools4001
Posts: 154
Joined: Fri Apr 12, 2013 7:33 am
Location: London
Contact:

Re: Jack 10 Lite build

#6 Post by Jools4001 »

LelandCrooks wrote:Nice. Green with envy at that shop.
It's better equipped than my kitchen for sure :lol:
2 x 3012 HO Jack 12 Lites
2 x Delta Pro 8b Wedgehorn 8 Monitors
Subs? Big question mark!

morticiaskeeper
Posts: 67
Joined: Thu Dec 28, 2006 11:43 am

Re: Jack 10 Lite build

#7 Post by morticiaskeeper »

Unfortunately, that shop is closer to jools than me, and will have a lot of traffic today, it's a stones throw from Silverstone.

Now I've had my one day in a pro shop, I'm back to my 10' x 8' shed :-( If I want to use the table saw, I have to go outside!

The work table is covered with the tools I'm using, plus a fretsaw and pillar drill. The cab is stood on a tripod.

The good idea of the day consists of an external tophat, screwed to a bit of timber, strapped to the top of the cab. I can now put the cab on the stand upside down :clap:

morticiaskeeper
Posts: 67
Joined: Thu Dec 28, 2006 11:43 am

Re: Jack 10 Lite build

#8 Post by morticiaskeeper »

The first coat of paint

Image

The two tweeters have come from the Omni 10.5 and will be in there until I have the time and money to put something else in!

Jools4001
Posts: 154
Joined: Fri Apr 12, 2013 7:33 am
Location: London
Contact:

Re: Jack 10 Lite build

#9 Post by Jools4001 »

Nice work...

I'm a massive fan of duratex (or Blue Aran Tuff Cab, that's the equivalent over here). One moment you have a pair of cabs with pencil marks, filler, PL fingerprints and sundry blemishes, 30 minutes and 2 coats of magic paint later you have professional looking cabs.
2 x 3012 HO Jack 12 Lites
2 x Delta Pro 8b Wedgehorn 8 Monitors
Subs? Big question mark!

morticiaskeeper
Posts: 67
Joined: Thu Dec 28, 2006 11:43 am

Re: Jack 10 Lite build

#10 Post by morticiaskeeper »

I found a few bits I wasn't happy with this morning, so out came the sander :-)

Now I'm waiting for the rollers to dry out so I can have another go.

morticiaskeeper
Posts: 67
Joined: Thu Dec 28, 2006 11:43 am

Re: Jack 10 Lite build

#11 Post by morticiaskeeper »

Driver installed, filter panels bypassed. The HF bypass is 1.5mm cable, the rest of the cab is 2.5mm cable.
Image

When funds allow, a compression horn will be fitted with the filters.

Testing with a tone generator & 300w PA amp
Image

I set a 30Hz tone at 10 volts and used a pipe to listen for leaks around the driver. The back panel is a bit too tight now it's been painted, so the full leak test will have to wait.

The tweeters vibrated together at 71.9 Hz, I will hot glue a gasket between them.

Playing music through the open backed cab, 2.3 volt was the limit before it got painful!


Front view.
Image

Post Reply