The journey begins.. 16 T60's and 12 DR280's!!

Post your build odyssey here.
Message
Author
Rich4349
Posts: 881
Joined: Wed Jul 30, 2008 10:18 am
Location: Kankakee, IL

Re: The journey begins.. 16 T60's and 12 DR280's!!

#46 Post by Rich4349 »

hifibob wrote:... I can honestly say I've built 100s speakers over the last 20 years using glue and silicone w great success...
BUT, were any of those folded horns? The air pressures in the horn path make and or break them (literally, as well as figuratively) I would run the risk of saying a STRAIGHT horn could be made using wood glue with much less risk, since air leaking <out> of any spot wouldn't be leaking <into> another portion of the horn. That pressure's gotta go SOMEWHERE! An internal air leak is a dead short of sorts, bypassing the bit of horn between the out leak and the in leak.

As for being a neat freak, I can relate. There are a couple of different approaches you can take.
1. Glob on the PL, with a nice fat rope of a bead. This will allow squeezeout, and as the PL expands and dries, it will squeeze out even more. If the squeezeout is allowed to sit unmolested until dry, you can go back with an x-acto knife and slice parallel to one panel, then parallel to the other, and at the contact points of the slices the bead comes out quite nicely, sometimes in long strips. (This is probably the most reliable method, IMHO.)

2. Finger it in (STOP IT!) like you would caulk around a tub, moving the slight excess down as you go. This gets rid of the initial squeezeout, but does not help with the expanded bit later on. You can take a rag, dampen it with mineral spirits, cover your finger and wipe off the excess. The spirits will cut through it well, but you must re-wipe it several times to really get down to the wood. If you are going to stain it, repeat even more, as even the thinnest layer of PL will be visible through the stain. If you're just going to paint or duratex it, this will get it down to a low level for that. But you'll still have more squeezeout later on (thicker and harder to deal with) that you'll have to figure out what to do with.
2 DR250s, 2 27" Lab15 T-60s, 2 30" Neo Titan 39s, 1 Autotuba...and looking for more!

hifibob
Posts: 405
Joined: Sun Jan 20, 2013 5:53 pm
Location: Boston MA

Re: The journey begins.. 16 T60's and 12 DR280's!!

#47 Post by hifibob »

Thanks for the PL tips guys.. So it sounds like i'll just let it dry and cut the rest out.. Have you guys had good success in reaching deep into the horn mouth and getting good results? Remember Im going to be lighting the mouths up so perfection is a must for me..

biggerrigger
Posts: 560
Joined: Sun Jan 28, 2007 6:32 am
Location: ohio

Re: The journey begins.. 16 T60's and 12 DR280's!!

#48 Post by biggerrigger »

Glob on as much Pl as you feel necessary and (DO NOT TOUCH IT) let it cure about an hour then take a sharp wood chisel and scrape the semi hard PL off of any area that you do not want it.
If you do it this way you will end up with a sharp, clean, paint or stain ready joint with minimal effort.
Don't try to scrape too early or you will smear wet PL but do not wait to long or it will become hard and more difficult to remove.
With a little practice and good timing you will be able to have a paint or stain ready joint on a cab in a matter of seconds.
Built
4-25" Lab12 loaded T39's
2-DR250's Melded array
2-DR250's Flat array

User avatar
racertomtom
Posts: 112
Joined: Tue Sep 11, 2012 5:14 pm
Location: Southern, Illinois
Contact:

Re: The journey begins.. 16 T60's and 12 DR280's!!

#49 Post by racertomtom »

I suspect you're well versed with a caulking gun. You will quickly learn how wide of a uniform bead you need for minimum but sufficient squeeze out. These joints look pretty good as is and I leave them alone. When putting a joint in a corner or cleaning outside edges, a sharp, professional grade gasket scraper cuts through PL like butter, nice and square.
4 - WH8
2 - T39 24" Lab12
2 - OT12 3012HO/NSD2005

Rich4349
Posts: 881
Joined: Wed Jul 30, 2008 10:18 am
Location: Kankakee, IL

Re: The journey begins.. 16 T60's and 12 DR280's!!

#50 Post by Rich4349 »

hifibob wrote:Thanks for the PL tips guys.. So it sounds like i'll just let it dry and cut the rest out.. Have you guys had good success in reaching deep into the horn mouth and getting good results? Remember Im going to be lighting the mouths up so perfection is a must for me..
If you leave the mouth braces un-installed until the very end, and aren't the size of a gorilla, you can get down in there fairly far. Maybe you could borrow a neighbor's child, and push him down in there? :slap:

I HAVE done carpet knife on a stick, too, with decent results.
2 DR250s, 2 27" Lab15 T-60s, 2 30" Neo Titan 39s, 1 Autotuba...and looking for more!

hifibob
Posts: 405
Joined: Sun Jan 20, 2013 5:53 pm
Location: Boston MA

Re: The journey begins.. 16 T60's and 12 DR280's!!

#51 Post by hifibob »

Rich4349 wrote:
hifibob wrote:Thanks for the PL tips guys.. So it sounds like i'll just let it dry and cut the rest out.. Have you guys had good success in reaching deep into the horn mouth and getting good results? Remember Im going to be lighting the mouths up so perfection is a must for me..
If you leave the mouth braces un-installed until the very end, and aren't the size of a gorilla, you can get down in there fairly far. Maybe you could borrow a neighbor's child, and push him down in there? :slap:

I HAVE done carpet knife on a stick, too, with decent results.
Haha I have packed on a few pounds of recent.. I think I'll be able to fit in there without the braces. I guess i'll have to rethink the painting process then since I was planning on painting the mouth and the braces before I installing the last panel..

User avatar
AntonZ
Posts: 2687
Joined: Sun May 14, 2006 6:00 am
Location: NL

Re: The journey begins.. 16 T60's and 12 DR280's!!

#52 Post by AntonZ »

hifibob wrote:Haha I have packed on a few pounds of recent.. I think I'll be able to fit in there without the braces. I guess i'll have to rethink the painting process then since I was planning on painting the mouth and the braces before I installing the last panel..
That is a good plan. Just mark the exact places where the braces will go and leave them bare wood. The PL glue needs the open pores of unpainted wood to expand into. That is a big part of what makes it so strong for these builds. It does not only fill the gap (if any), but works by getting into the wood through the natural pores. These pores will be filled through painting.

The expanding helps to make it airtight, too, but for a strong joint you must have bare wood (both sides).

Here's an example of a side panel on my Autotuba build. Note that there is no paint on surfaces that will be joined, only the visible part of the horn mouth was painted.
Image

And the slots for the braces were clear of paint because they were routed after painting (dado joint), which incidentally also helps keeping the braces in place during construction.
Image

My Autotuba is not meant to be seen, so I have no problem with the squeeze out after glue up. But most of what you see here was neatly cut away using the sharp chisel method. Nobel prize for whomever proposed that, it does indeed work very well. As long as you don't touch it before it has set long enough to not contain fluid glue anymore, rock hard on the other hand means you waited too long.
Image

As always: try on a few scrap pieces of ply to get the hang of it.

miked
Posts: 1209
Joined: Fri Oct 23, 2009 4:18 am
Location: San Antonio, TX

Re: The journey begins.. 16 T60's and 12 DR280's!!

#53 Post by miked »

Hifibob: You got the "Crash Course in PL Usage"...probably thousands of cumulative hours worth of PL using/scraping experience distilled down into a 3-hour seminar. ALL the advice given is solid and worthwhile; you would do well to take advantage of it. :clap:

Now, if you're thinking "Geez man, this PL stuff sure adds a lot of extra work!" , first, you'd be correct and second, welcome to the club, brother! :mrgreen: What PL adds in "building steps" it also adds in strength/air-tightness of build. A solid PL joint simply will not come apart or leak. The stuff is pure gold for our application.

hifibob
Posts: 405
Joined: Sun Jan 20, 2013 5:53 pm
Location: Boston MA

Re: The journey begins.. 16 T60's and 12 DR280's!!

#54 Post by hifibob »

Good lookin AT AntonZ and thanks for the tips!

Today I finished up all the bracing and I have all templates and jigs for every part for the Tuba 60. Im gonna try to assemble another one in 1 days time hopefully.

Image

wall of T60 jigs!

Image

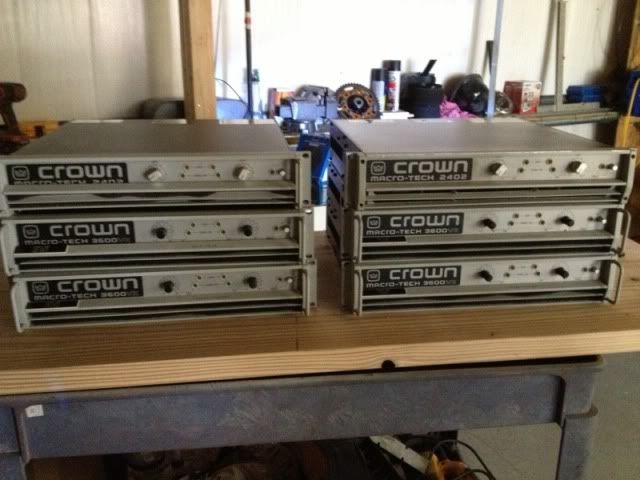
and the rest of my speakers came in :hyper:

Image

miked
Posts: 1209
Joined: Fri Oct 23, 2009 4:18 am
Location: San Antonio, TX

Re: The journey begins.. 16 T60's and 12 DR280's!!

#55 Post by miked »

Image

:shock: Dayum. That is some serious skill right there. If ever an in-progress shot qualified as "Damn Sexy" this one certainly does. Did you freehand the curves for the braces or use some kind of pencil-on-a-string or protractor or something? Well done, Sir. :clap:

Titanium Hand
Posts: 559
Joined: Mon Sep 05, 2011 4:32 am
Location: Sydney, Australia

Re: The journey begins.. 16 T60's and 12 DR280's!!

#56 Post by Titanium Hand »

FairDinkum! You appear to be a speaker building machine. The jigs are brilliant and going to make life so easy for you 8)

I noticed that you have run panel 8 full length of the cab, I'm contemplating doing this myself.

I guess that a permanent installation only requires one pair (dependent upon proposed wiring configuration) of jacks, which is likely determined by the cabs ultimate placement. Where will you mount your jacks?

I'm thinking one pair on panel 9 and a second recessed into panel 10 behind 13. I'm racking my brain regarding aesthetics and functionality.

Looking forward to watching your fleet come together :hyper:
Built 2 x T39 Lab 12 loaded 457mm wide, 29inch Wide Dual Lab 12 Loaded T60 and 2 x OTop 112 2512 Melded. Powered by N.I.TRAKTOR Pro 2.6 (2.6.1 has too many issues) TRAKTOR KONTROL S2 Crown XTi2000

byacey
Posts: 947
Joined: Thu Jun 14, 2012 9:09 am
Location: Edmonton, Alberta, Canada

Re: The journey begins.. 16 T60's and 12 DR280's!!

#57 Post by byacey »

Great job! You're workmanship and attention to detail is second to none.

In the violin making world there's a saying: The first 90% of the build is easy; it's obsessing over the last 10% details that can kill you.
Built
T48s
WH8s
SX212

byacey
Posts: 947
Joined: Thu Jun 14, 2012 9:09 am
Location: Edmonton, Alberta, Canada

Re: The journey begins.. 16 T60's and 12 DR280's!!

#58 Post by byacey »

hifibob wrote: Especially since these came in :hyper:

Image
Those are great amps, probably some of the best ever built.
Built
T48s
WH8s
SX212

User avatar
AntonZ
Posts: 2687
Joined: Sun May 14, 2006 6:00 am
Location: NL

Re: The journey begins.. 16 T60's and 12 DR280's!!

#59 Post by AntonZ »

hifibob wrote:Good lookin AT AntonZ and thanks for the tips!
You are welcome, and thanks for the compliment. Means a lot coming from you, I am far from the "wood working machine" that you appear to be. My toolset is modest and amateur grade, and I work soooooo much slower than you do. Some sexy curved braces you are building there :clap:

Grant Bunter
Posts: 6912
Joined: Mon Nov 28, 2011 11:12 am
Location: Ilfracombe Queensland Australia
Contact:

Re: The journey begins.. 16 T60's and 12 DR280's!!

#60 Post by Grant Bunter »

byacey wrote:Great job! You're workmanship and attention to detail is second to none.

In the violin making world there's a saying: The first 90% of the build is easy; it's obsessing over the last 10% details that can kill you.
Ha ha :clap:
The version I know is a little different.
"The first 90% takes 90% of the time, and the remaining 10% takes the other 90% of the time"...
Built:
DR 250: x 2 melded array, 2x CD horn, March 2012 plans.
T39's: 4 x 20" KL3010LF , 2 x 28" 3012LF.
WH8: x 6 with melded array wired series/parallel.
Bunter's Audio and Lighting "like"s would be most appreciated...

Post Reply