Arrays are looking goodmiked wrote:
Continued with the arrays.
I hope I don't skip anything accidentally.
If you're worried about missing something, just come back to your thread, and tick it off lol...
Arrays are looking goodmiked wrote:
Continued with the arrays.
I hope I don't skip anything accidentally.

I never put cement on the front of arrays. I put masking tape over the joints, then add cement to the back of the array. The cement will seep into the joints. I seldom need more than two coats to do the job. I also put cutoffs from the piezos into the cement. They dissolve in it, tinting it black, while the additional solids make it thicker.miked wrote:Thanks, Grant. So far, so good. I can definitely tell that I'll need several coats of cement, front and back on the melded arrays.
Mike, your melded arrays are starting to look good. You may want to rotate the elements in your melded arrays by 120 degr. That way the connections will line up more naturally, making it easier to wire the arrays correctly.miked wrote:
Thanks for the tips, Bill. So, I guess you use the masking tape to hold the array together while applying glue? Not sure if I'm that capable at this point. We'll find out how good of a bond is on there later today when I flip the array over to see how much glue if any I need in the front. Being that nobody will ever see them, I'm predisposed to carefully applying some glue on the front of the arrays. Where there's little danger to the elements themselves when gluing the back, that danger is much higher when gluing the fronts at the meeting point b/t the left and right sides. I'll be careful.Bill Fitzmaurice wrote:I never put cement on the front of arrays. I put masking tape over the joints, then add cement to the back of the array. The cement will seep into the joints. I seldom need more than two coats to do the job. I also put cutoffs from the piezos into the cement. They dissolve in it, tinting it black, while the additional solids make it thicker.miked wrote:Thanks, Grant. So far, so good. I can definitely tell that I'll need several coats of cement, front and back on the melded arrays.
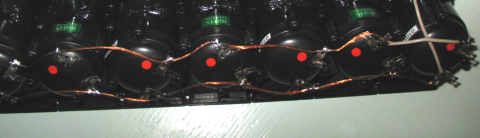
If you look at the picture in the middle of this thread , you may get an idea.miked wrote: Looking at your pic: Did you completely remove insulation from the total length of the wire? I'd imagine it's no big deal as the plastic pizzers are non-conductive.
I was thinking of doing something similar, b/c cutting 24+ 3-inch pieces of wire and stripping the ends is going to suck. Would be easier to strip the wire completely, thread it through each terminal tab and hit it with solder. Although your wire appears to be solid-core; I bought 16ga stranded. Now I'm not sure.
I initially glue them together, using a thin bead of cement, let them set, then apply the tape to the front faces. Then since it can't get past the tape I can glob it on really thick on the back.miked wrote: Thanks for the tips, Bill. So, I guess you use the masking tape to hold the array together while applying glue?
You are probably referring to this one:Tom Smit wrote:If you look at the picture in the middle of this thread , you may get an idea.miked wrote: Looking at your pic: Did you completely remove insulation from the total length of the wire? I'd imagine it's no big deal as the plastic pizzers are non-conductive.
I was thinking of doing something similar, b/c cutting 24+ 3-inch pieces of wire and stripping the ends is going to suck. Would be easier to strip the wire completely, thread it through each terminal tab and hit it with solder. Although your wire appears to be solid-core; I bought 16ga stranded. Now I'm not sure.


I did my tweeter wires like that, but FYI, you don't need to 'remove' the insulation. Just use your wire strippers and pull the insulation apart 1/4-1/2", put the bare wire on the speaker terminal, and solder it. The insulation is flexible enough you can bunch it up to expose the wire rather than cutting those 1/4-1/2" pieces of insulation out of the wire.Hopefully that makes sense. Nice and quick.miked wrote:You are probably referring to this one:Tom Smit wrote:If you look at the picture in the middle of this thread , you may get an idea.miked wrote: Looking at your pic: Did you completely remove insulation from the total length of the wire? I'd imagine it's no big deal as the plastic pizzers are non-conductive.
I was thinking of doing something similar, b/c cutting 24+ 3-inch pieces of wire and stripping the ends is going to suck. Would be easier to strip the wire completely, thread it through each terminal tab and hit it with solder. Although your wire appears to be solid-core; I bought 16ga stranded. Now I'm not sure.
That would work too, though it's a real PITA to remove the insulation from the middle of the wire like that. I've used that technique in the past and it's OK for wiring up a few drivers together...12 elements, not so sure. But thanks for the suggestion!!! I'm uploading some pics now.
Funny should should mention that stuff; I had a container in my hand at Home Depot yesterday for about 15 mins while I looked at all the other similar products. I thought it's a nifty idea, the color-changing spackle. But I decided against it, just b/c we are using spackle in a non-traditional application to begin with, and I didn't want to mix "new technology" with that non-traditional usage. I was afraid of shrinkage, chipping, etc. In the end I bought plain old-fashioned spackle.bmf wrote:Should of mentioned this when I recommended the spackle but it can be useful to buy fadding spackle. It goes on pink and fades to white when it is dry. Lets you know when you can sand without worry of hitting it to early. Letting it dry overnight is a better situation anyway though as you can still get shrinkage even after the material is dry enough to sand. If you wait overnight it should sand flat and not shrink in later.
Thanks for this tip; I didn't know about that. I will try that and see how it works out.67baja wrote:I did my tweeter wires like that, but FYI, you don't need to 'remove' the insulation. Just use your wire strippers and pull the insulation apart 1/4-1/2", put the bare wire on the speaker terminal, and solder it. The insulation is flexible enough you can bunch it up to expose the wire rather than cutting those 1/4-1/2" pieces of insulation out of the wire.Hopefully that makes sense. Nice and quick.
miked wrote:bmf wrote: Last night I got the rear panesl predrilled for the mounting holes. I erred on the side of caution and put 9 screws across and 6 on the sides; every 2 inches, basically. There will be no air leakage from the back panel, no way.
|
|
|
|

