SLA center

Re: SLA center
Thanks Bas. I use "Soudal 60A Constructielijm". Available at Hornbach, at some €7 per tube last time I bought. It is by far the cheapest expanding glue that I have found over here. Works fine.
Re: SLA center
Sanded the joints of the baffle today with 80 grit, then added yet another clear coat layer. Ho ho ho we are on the move 
Re: SLA center
Still moving as fast as ever 
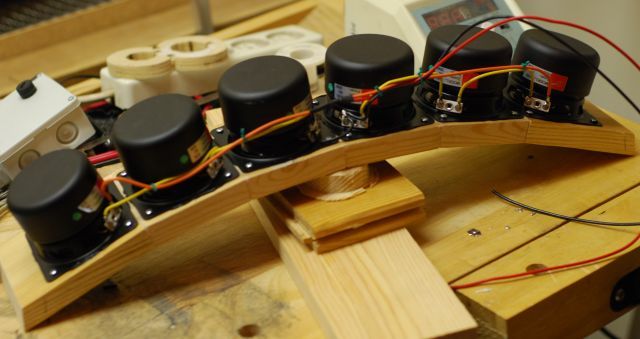
Normal procedure would be to put the box together, apply one's choice of finish, then install drivers. Because of the somewhat unusual construction of this one, with rear mounted drivers and a deep yet small box, part of the screws for the drivers will not be accessible once the baffle is glued into position. That is why I chose to mount the drivers on the completed baffle, then put the box together. And that is also why the baffle has already received its' clear coat.
So, here is the baffle with six tiny 3" drivers. To my surprise, the complete assembly as pictured is stupid heavy. Sturdy little buggers these drivers are. It will be a challenge to properly glue the baffle with drivers in the box because of the weight. I am not looking forward to that part of the build process. And this bridge needs a support pillar in the middle for now. I must be careful not to break it before it is mounted into the box.
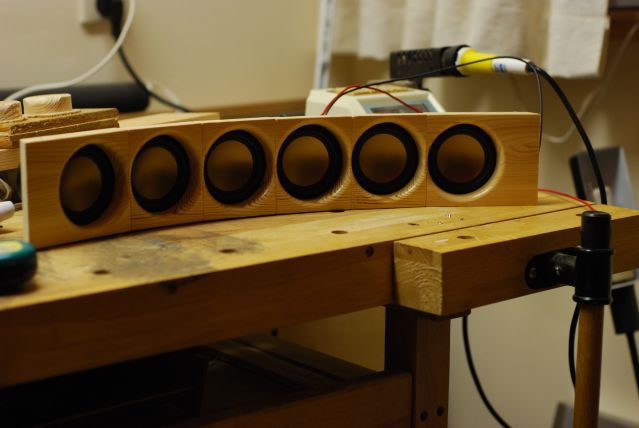
Here is a preview of the front. These drivers lend them selves very much to rear mounting. I think it works well with the wood grain.
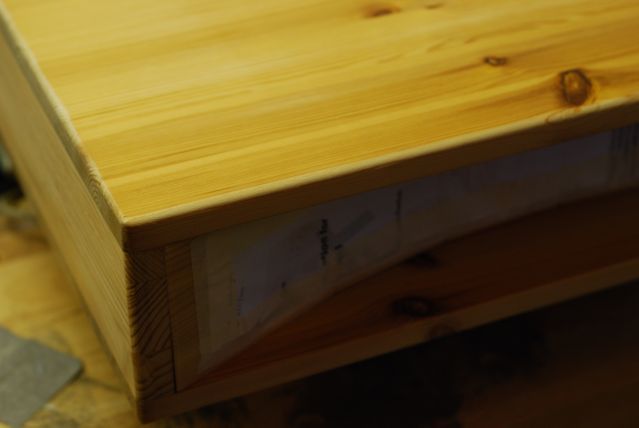
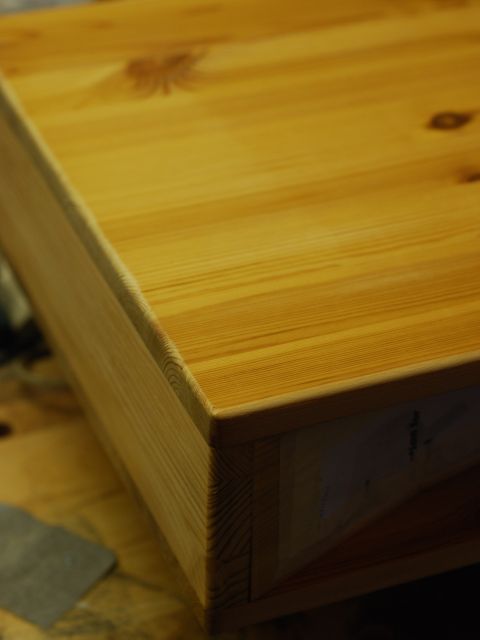
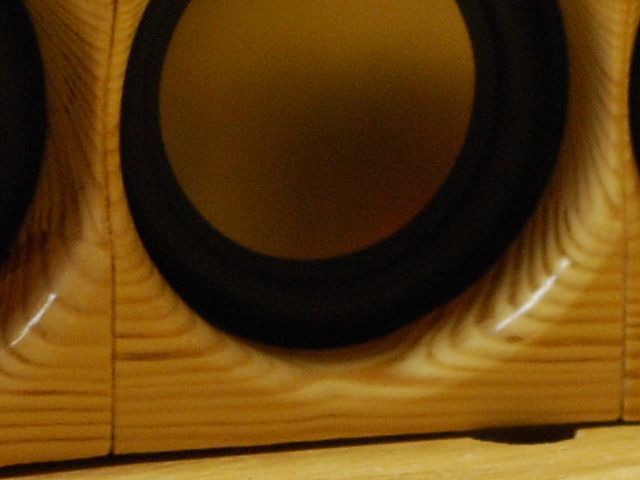
Detail shot of the somewhat glossy finish on the rounded edges.
Normal procedure would be to put the box together, apply one's choice of finish, then install drivers. Because of the somewhat unusual construction of this one, with rear mounted drivers and a deep yet small box, part of the screws for the drivers will not be accessible once the baffle is glued into position. That is why I chose to mount the drivers on the completed baffle, then put the box together. And that is also why the baffle has already received its' clear coat.
So, here is the baffle with six tiny 3" drivers. To my surprise, the complete assembly as pictured is stupid heavy. Sturdy little buggers these drivers are. It will be a challenge to properly glue the baffle with drivers in the box because of the weight. I am not looking forward to that part of the build process. And this bridge needs a support pillar in the middle for now. I must be careful not to break it before it is mounted into the box.
Here is a preview of the front. These drivers lend them selves very much to rear mounting. I think it works well with the wood grain.
Detail shot of the somewhat glossy finish on the rounded edges.
-
LelandCrooks

- Posts: 7242
- Joined: Thu May 04, 2006 9:36 am
- Location: Midwest/Kansas/Speaker Nirvana
- Contact:
Re: SLA center
Very Noice!
If it's too loud, you're even older than me! Like me.
http://www.speakerhardware.com
http://www.speakerhardware.com
Re: SLA center
looks very good.
way better than my temporary center i have now.
way better than my temporary center i have now.
building BFM speakers isn't a hobby , it's an addiction
1 x THT
1 x autotuba
2 x dr250 melded
2 x wedgehorn 10
2 x tlah
1 x THT
1 x autotuba
2 x dr250 melded
2 x wedgehorn 10
2 x tlah
Re: SLA center
Thanks for the kind words, encouragements to me to make this a visually appealing source of noise!
And here is the first shot where it starts to look somewhat like a box.

In the background the plate where the connectors will go. Recessed, naturally . Not going to make that one as smooth as the front though. I did this one quick & dirty with the hole saw. But I could not resist the urge to round the corners with the router
And here is the first shot where it starts to look somewhat like a box.
In the background the plate where the connectors will go. Recessed, naturally
-
Harley

- Posts: 5758
- Joined: Mon May 08, 2006 2:45 pm
- Location: Christchurch, New Zealand - Authorised BFM Cab Builder
Re: SLA center
From the bottom, grains # 7 to about 10 don't line up properly. I thought you would have been more careful!AntonZ wrote:Detail shot of the somewhat glossy finish on the rounded edges.
......Just kidding
Nice job
 Semi-retired: Former Australia and New Zealand Authorised BFM cab builder.
Re: SLA center
You almost got me there, Harley
Thanks. Very nice to get thumbs up from you guys.
Tonight the last side got installed.

No nails, screws, brads, biscuits or dowels so far in the box structure, it is glue only. Which is a first for me. Of course I do use screws for drivers, connectors and casters.
I did not trust the gaskets that came with the drivers. So I used a tube of silicon gasket that I had left from motorbike maintenance last summer. It is black, goes together well with the driver frames and since I won't have to open the box again after construction (driver screws not accessible anyway), I want to be very sure about not having a leak around the drivers on the baffle. Must not break drivers on this one
Re: SLA center
Connectors installed, check. All drivers working, check. Eggcrate foam inside, check.
So out again with the caulk gun one more time on this one and the lid is on.
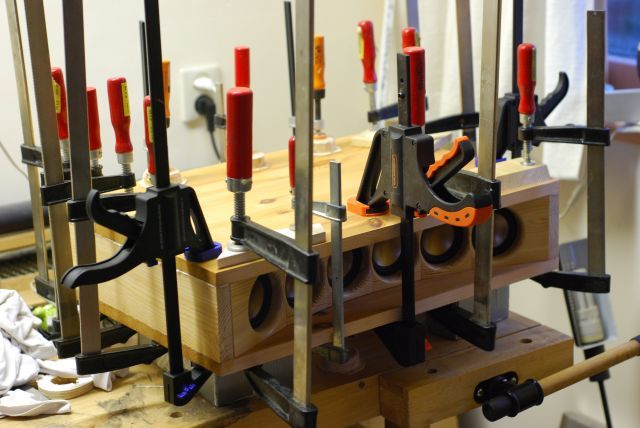
Don't know who was the first to bring it up, but here goes again:
"Ain't no such thing as having enough clamps in the shop"
So out again with the caulk gun one more time on this one and the lid is on.
Don't know who was the first to bring it up, but here goes again:
"Ain't no such thing as having enough clamps in the shop"
Re: SLA center
So we are now on the home stretch, the finishing stage. It is hard not to take the raw wood box downstairs and install it. But I want this to look good. So there's still a bit of work to do. Inspired by PublicIdaho and his big stationary belt sander, I hit the ever so slightly overhanging panels with the handheld belt sander. Would never have thought of using this on a cab build, but it does work. Extreme care is advised though. Keep that sander moving at all times. No moving left to right, just back and forth. Attempting to keep the pressure even so one end does not dig in. Powerful tools they are. Not as scary as a table saw or router. But they can be equally destructive on our treasured woodworking projects when not handled with a careful hand and eye. Near the end the belt broke. I didn't have any spares left (it has been years since I used this tool). So I did the last bit with the random orbit sander. Then put a round off bit in my tiny router table. I find it hard to get a consistent edge near the corners with the handheld router. This is almost too big to pass over this router table. Then hit the edges with sand paper, wipe off the dust. First clear coat applied. Some 3 or 4 more coats to follow over the next few days, and sanding with fine grit paper.