Thanks for that Roger - I was thinking some Titebond in small strategic locations should do okay. I'll take your hint and apply in the cab, instead of on the foam - sounds cleaner.
More progress:
Cutting the tweets. If (when) I do this again, it'll be against the fence. The alternating reversed position doesn't require a high blade height. I already has the sled, which I ONLY use to cut kerfed linings for my instruments. Lining them up as I cut reminded me of which side, and which ones, I need not cut.
Here's one of those pics that irritate me - all the glue squeeze out. Its staying (meaning, I'm not cleaning it up). Used the Center Finding Ruler again to center the driver against the mounting holes and marked for drilling.
I had no idea the driver was going to be that close to the back. I actually made another back, prior to actually having the driver in hand. Suffice to say, this one fits through the back. I thought I'd save some weight on this non-load bearing piece, so this is made out of 3/8" ply which is left over from my quasi ATA amp rack.
I'm just having fun on this one. Yeah, I had some Koa I wasn't using. Not perfect, but hopefully good enough for a 1st build. Nobody will see this, but I'll know its there. What for? Nothing - just to say its there. Been thinking about inlaying the BF logo in the Koa out of shell and/or Dix gold, but, I think I just may want to finish the Jack first, and use it. Hopefully the access panel is not detrimental to anything. I weighed this, and its actually lighter than the 1/2" ply it replaced.
Seems like I'll need a washer when the actual install is done?
Got good squeeze out all over the place. What a mess, on the inside anyway.
I think I'm almost there. This feels like when the fretboard goes on an instrument - its all downhill, but its often a big hill.
LelandCrooks wrote:No washer needed. It will pull through the gasket to the frame just fine.
Okay, that is very good to know.
AntonZ wrote:I like the straps for keeping the pieces together while the glue sets. Good thinking, nice alternative for huge clamps.
I use what I have. I do have two heavy 24", which I use, and I was going to buy more. Then I had an epiphany (while I was visualizing how to put the box together square), and I thought about how I join the top and back plates of my instruments - Spanish style, with rope and wedges (to tighten). So I was going to do that - wrap rope around, and tighten it tourniquet style, then I thought about my straps in my truck. I'm loosely thinking about how to do this with a different type of joint (just so I don't have to cut all those fingers, even if there's only 3 of them). BUT, I still gotta figure out the wiring.
Anyone got a good shot of a schematic for full wiring from speakon (or 1/4") to drivers (woofer and tweets)? I think I got the crossover and filters down, I just need to make sure I'm wiring my 4 pole speakon (in and through) correctly. I know this may seem basic, but I want to be sure before I break out my soldering gun.
If you are installing two speakons (for daisy chaining):
Connect both speakons like so:
+1 to +1
-1 to -1
+2 to +2
-2 to -2
Connect crossover inputs like so:
+input to +1 on a speakon
-input to -1 on a speakon
(doesn't matter to which of both speakons you connect the crossover: they are wired identical).
If you use piezo tweeters: they only need thin wire as there is minimal current there. Woofers and signal from speakon to filter need a bit thicker. Refer to plans for minimum gauge for internal wiring.
Thanks Anton, just as I thought and planned, but wanted to be sure.
When I cut the tweets on the sled, it didn't come out, well, perfect. Not because of the technique, but because of the sled itself (not being perfectly square). This is why I'll go straight against the fence next time (so I don't have to build another sled). I had to mix & match the bodies so they came out even on both sides, then I glued them together, one side at a time. I cut off the excess as a single unit, then glued them against a screwed jig. I didn't follow the plan on this one because I needed to make adjustments in the fit. Next one, I'll be able to do it like the plan. Used ABS instead of PVC, because I had it. I'm actually thinking of ordering another set to put together, and keeping this one on the side as a backup. . .
Gluing up the melded array supports with the help of a mini jig that I copied (call it flattery). This is the first joint that I used nails driven from the top and bottom, just so they wouldn't slide. I found a cheap cap for the PL in the foreground. I wish I had this earlier, it would've saved a LOT of trouble. Yeah, $2, but worth it.
I actually held the jig in place with clamps when setting the supports, then I hit the nails, and removed the jig to let the glue set.
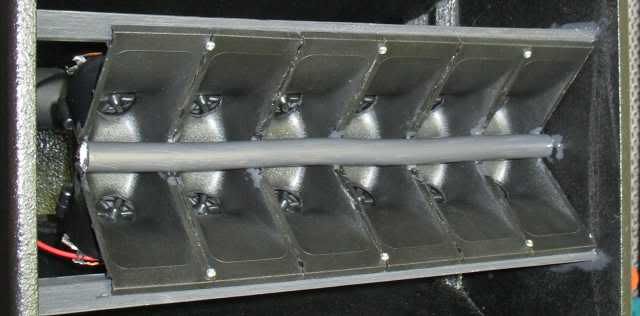
Because the array wasn't perfectly straight, the dowel didn't nicely fit. It is touching as many surfaces as possible with the use of cam clamps and spring clamps.
I'm only just in front of where you are and just had an amazing chat with a mate of mine who explained exactly how the crossover networks actually work.
So much to learn, so little time.
Stupidity should be painful
2 * SLA, 2 * Curved SLA, 2 * Tuba 18, 1 * XF212, 4 * Jack12, 2 * SLA Mini
kekani wrote:Because the array wasn't perfectly straight, the dowel didn't nicely fit. It is touching as many surfaces as possible with the use of cam clamps and spring clamps.
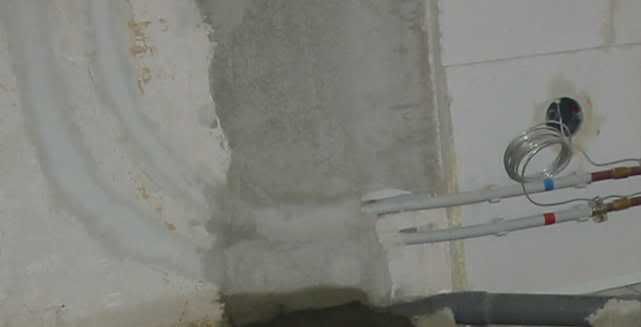
For that reason I was looking for a somewhat flexible diffuser option. I had some scraps left of copper pipe for water runs. We have a type that is flexible and has an outer layer of some flexible plastic material around a copper pipe core. This stuff can be bended manually and poured into concrete walls/floors or stuffed right into a slot that one cuts in a brick wall. It is called "wicu" locally. Don't know if a similar product exists in other countries.
Example use of installed wicu pipes in a brick wall:
From a scrap piece just about the right lenght I pulled out the copper pipe core. What was left was light, the exact right diameter, flexible and glued right to my melded arrays. Before gluing in I roughed up the surface with some sandpaper. After gluing, a little dark paint was all that was needed to make it blend in.
Okay, my camera battery died, and I didn't realize I needed to keep the cover closed to charge it (still love the camera though, Nikon Coolpix - I'm a Canon guy, but this one is good for me). Anyway, since the last pic, I realized I was almost done. Well, I finished it, and didn't take much more pics unfortunately, so I'll just narrate (as the crickets come to life) my ins and outs of a Jack 112.
Following the last pic, I realized that its time to finish. I was really hesitant on dropping the $$ on Duratex, so I got the sample size, which covered the whole cab, and then some. I'm SO glad I did this, and when I do subsequent builds, it'll be the same finish. I'm not sure why I'm suprised - its not as if it hasn't been covered over and over here before. What I didn't know is that it cleans with water (when wet). Also, fortunately, I came across this:
I also downloaded a tone generator and went to town at 30hz. Pretty cool to watch.
One of the issues I had to figure out was the side handles (with offset for weight distribution, right as the plans said). There's a little bump on the center bottom that I had to route deeper - did it freehand, a little over 1/16th inch. I also didn't think the screws would hold. Still don't really, but until I get black nuts with tee nuts (or hurricanes), I'll stick this out. Cab IS light though (more on this later).
Although I got the schematics for the crossover and filters, with the DPDT switch, I STILL had to study them in length. Next build, I'm getting the Circuit Board - this is TOO easy. http://www.speakerhardware.com/2_way_ci ... CB55TB.php
For my purposes, I don't need any tweets. With it, the midrange on this is very strong, and eq does help on the cab. Even the preamp on my bass was good enough to adjust tone, but it needed some cut and boost to suit me. I'm not really happy that you can see the wires, so I like Neil's fins. I'll probably put a speaker grill cover at some point to retro it a little.
Of course, here's the 3/4 shot (in car speak). Its big, and square, but not too big, and not too heavy. I weighed it today, and it seems my weight cutting measures worked - 34.1 lbs. The phase plug is almost hollow, and the side braces are drilled to death, seen in an earlier pic. Also, the back is not per plan spec - the "frame" is 5/16th ply, with the access panel 1/4" Koa (more on this too).
And here's the oiled back, for a natural looking finish. It looks better, and no so out of place in person.
I know the plans say anyone with simple tools can build it. Also says the Jack is a little more difficult. The latter I agree with. Well, yes, the plans are well laid out, and if you read the plans as it says to do (I read it WAY more than 2x through, but that's me), then I guess if you have basic skills, you can make a pretty good cab. I had the woodworking down, and some electrical, but not electronics, so I took my time. Can anyone do this? I wouldn't suggest it unless you got the tools, and know how to use it. If you're expecting perfection and everything square, you gotta have tools, and know how to use them. Bill is right - the plans are forgiving, but you gotta follow them, and not expect perfection out of the block (even though most of us do). Of course, you could always order the flat kit from Lelend, which pretty much takes the heavy lifting out.
For me, I've learned a LOT from this build. And I couldn't have done it without this Forum - wealth of info. Now I know why Bill has this.
Not that I'm an expert or anything but here are more of my findings:
In future builds for PA cab (or bass), I think I'm going to substitute a few panels with 3/8" in select places - I think I can get it down to under 30" with a Deltalite II. And, I'll probably just follow the plans for the back. I enjoy the Koa, but that was a PITA.
I'll probably stay away from the finger joints on the case, and do bisquits instead (since I have the plate joiner).
Tweets won't be switchable for the PA, and non-existent on any future bass cabs.
For painting the inside - I'll go with Flat black. I did a Hammered finished, just because I had it. No more.
Quick review - this cab has a lot more punch than my JBL JRX115 (cheap ass stuff), and with the P/J pickups, its really growl oriented - I'll eq to adjust for what I need. As a PA, the JBL sounded warm compared to some Mackie's (in a good way) I've had side to side, but they didn't sound too good next to the Jack 112. Both of my older sons, at different times, described the sound as "clearer". I think I now know what distortion sounds like in a cab. And I know what a clean cab sound like. The JBLs are so, muddy, comparatively speaking. This Jack has ruined me. Can't wait to play the gig this Friday. I'll try to post a YouTube comparo in the Review section.
And before I forget, thank you all for your guidance, and patience.
-Aaron
Last edited by kekani on Wed Dec 14, 2011 5:01 pm, edited 1 time in total.
Especially love the "I had it lying around so I used it" attitude. That's why I almost never throw anything out and also why my wife thinks I'm a little bit nuts!!!
Stupidity should be painful
2 * SLA, 2 * Curved SLA, 2 * Tuba 18, 1 * XF212, 4 * Jack12, 2 * SLA Mini
NeilD321 wrote:Especially love the "I had it lying around so I used it" attitude. That's why I almost never throw anything out and also why my wife thinks I'm a little bit nuts!!!
Thanks for the nice comments guys. I can't wait to put this next to my friends EV's - mine are only 3 lbs heavier!
I've been playing through it a little, and I think I know why the statement "two are better" is said. Don't get me wrong, this thing sounds clear, almost to a fault, but I can imagine what two in a stack, or two as a PA would sound like.
Looks like I'd better do my taxes early, or build more `ukulele to fund more builds.