Page 7 of 12
Re: Titan 48x8 build
Posted: Thu Oct 25, 2012 5:48 am
by Grant Bunter
chenry78 wrote:
Thanks for the info Grant, much appreciated. Ill finish breaking the rest in then ill look into trying to actually dissemble them! Just to clarify MEK is butanone correct?
No worries at all.
MEK by proper name is Methyl Ethyl Ketone as the active ingredient. Trade names where you are I am unsure of.
Re: Titan 48x8 build
Posted: Thu Oct 25, 2012 6:10 am
by Gregory East
Hopefully it is just the tinsel leads, sure does sound like that.
MEK is some gnarly nasty stuff, be very careful about not breathing it in or getting it on you.
Re: Titan 48x8 build
Posted: Fri Oct 26, 2012 10:28 am
by byacey
Stay away from MEK or any other solvents if you can. A good friend of mine who in the past did thousands of recones recently passed away from leukemia. he felt the exposure to MEK might have been responsible.
In listening to your Youtube video, it sounds more like compliance tic to me. If you don't apply glue to the very inside edge of the basket rim, the cone will tend to flex there and create a ticking noise by slapping against the basket edge. you may be able to locate the source of the tic by lowering the frequency to around 10 or 15 Hz and gently press gently down on the surround at various points around the perimeter until the tic noise disappears. Once you find the spot(s) you need to try and work some glue in there. A glue syringe with a needle extension can be a useful thing for this.
Re: Titan 48x8 build
Posted: Sun Oct 28, 2012 9:41 pm
by chenry78
byacey wrote:Stay away from MEK or any other solvents if you can. A good friend of mine who in the past did thousands of recones recently passed away from leukemia. he felt the exposure to MEK might have been responsible.
In listening to your Youtube video, it sounds more like compliance tic to me. If you don't apply glue to the very inside edge of the basket rim, the cone will tend to flex there and create a ticking noise by slapping against the basket edge. you may be able to locate the source of the tic by lowering the frequency to around 10 or 15 Hz and gently press gently down on the surround at various points around the perimeter until the tic noise disappears. Once you find the spot(s) you need to try and work some glue in there. A glue syringe with a needle extension can be a useful thing for this.
that is good advice as well, I will defiantly try that as well. that sort-of makes since with at least one of the speakers simply because when i started the break in the speaker was tic-less, after about 6 hrs its began ticking. Thanks for the advice!!

Re: Titan 48x8 build
Posted: Wed Dec 12, 2012 6:34 am
by chenry78
Been silent for a while, but I haven't been sleeping. Got a few things done. Sorry for the wait!
Dont forget, there's eight of these going on!
Re: Titan 48x8 build
Posted: Sun Jan 06, 2013 2:30 am
by chenry78
Slowly but shurely, putting panel 9 and the bottoms on now (panel 10). Thus far this has been a very enjoyable proect. Although I should have been done last month....Im getting too many coals in the fire.

Re: Titan 48x8 build
Posted: Sun Jan 06, 2013 8:15 am
by Bas Gooiker
chenry78 wrote:Slowly but shurely, putting panel 9 and the bottoms on now (panel 10). Thus far this has been a very enjoyable proect. Although I should have been done last month....Im getting too many coals in the fire.
Projects like this always take longer and cost more then you initially thought. Hang in there, you'll have a killer rig when your done.
Re: Titan 48x8 build
Posted: Sat Mar 23, 2013 3:32 am
by chenry78
Re: Titan 48x8 build
Posted: Sat Mar 23, 2013 3:24 pm
by DJPhatman
I'm sorry to tell you this so late, but your speakon connectors are the wrong type. You used the type that are supposed to be mounted on steel or plastic jack plates. They will most likely pull out of the wood due to being screwed in so close to the mounting hole. The good news is it's an easy fix. Just order some steel jack plates from Leland along with the mounting screws. He can hook you up and get them to you quick.

This is the one you should have used.
These, minus the actual speakons, are what you should use.

Re: Titan 48x8 build
Posted: Sat Mar 23, 2013 3:36 pm
by Ryan A
I've used the small speakon jacks before on wood as well. Instead of relying on the screws alone, I layed a generous amount of PL on the wood cutout and then pressed the speakon jacks in, then screwed them in and wiped off the excess PL. They haven't come loose yet. The metal jack plate is the more secure option though.
Re: Titan 48x8 build
Posted: Sun Mar 24, 2013 10:19 pm
by miked
The PL around the Speakon is a good idea, though if the jack ever went bad (highly unlikely), you'd have to cut the whole thing out. I am in the same boat with the 4 OTops I'm building. I didn't want to deal with having to recess the big jack plate and spending the additional money on it, and just went with countersunk holes like this:
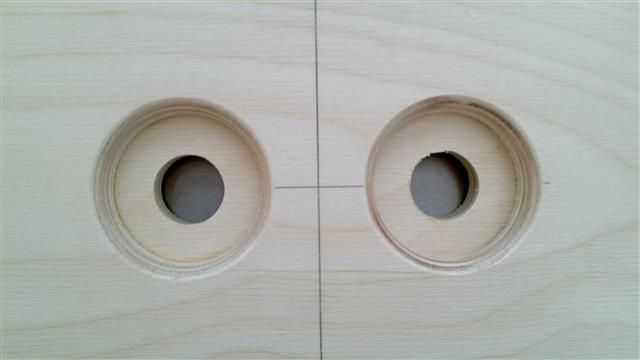
However, the screws I have for the Speakons are the proper #4 size and they are 1/2" long, so they will get a very sold bite on the mounting location. Should be just fine.
So I guess I've got to think about possibly PLing mine in as well. The plan was to just put bathtub silicone on the inside of the panel, all around the jack. That would seal it up and give some additional holding strength. I might go with that and see what happens. Worse comes to worst, I wind up cutting a hole for a proper jack plate.
*edit*
Now that I think about it, I can't remember offhand what the diameter is on the countersunk hole in this pic. The outer flange of the round, flange-type Speakon is 2.0"
http://www.neutrik.com/zoolu-website/me ... ing+NL4MPR
If the hole I cut is at least 2.25" (the inner hole is not exactly centered on all the cutouts, so I need wiggle room), I may go ahead and order the round type. I'm already about $150 over budget, so what's another $25? If the cutout is only 2.0", I'm not going to worry about it.
Re: Titan 48x8 build
Posted: Mon Mar 25, 2013 7:22 pm
by chenry78
it has been very helpfu throughout thi throughout this project I shoul I should have used the bigger jacks honestly the thought never crossed my mind I had these laying aroond so I use them , i sealed them with pl too, i think they will be ok. the real question is whether or not i wired the jacks together properly. if you refer to my earlier pics youll note that they are wired pos to pos and neg to neg or in para, shouldnt they have beem wired in series or did i do it right. seems if i daisey chain two together my ohms will double not half. thoughts?

Re: Titan 48x8 build
Posted: Tue Mar 26, 2013 7:06 am
by miked
So you have two Speakons in each cab, correct? And only one driver in each cab, correct? If you wired the +'s together and the -'s together from both jacks, you have wired them for parallel wiring. Hope that's what you wanted!
So, if you have them wired like above, and your drivers are 8 ohms each and you connect:
Amp--->Cab 1 first speakon--->Cab 1 second speakon--->Cab 2
You then have a 4-ohm load.
Hope this helps.
Re: Titan 48x8 build
Posted: Tue Mar 26, 2013 8:16 am
by chenry78
miked wrote:So you have two Speakons in each cab, correct? And only one driver in each cab, correct? If you wired the +'s together and the -'s together from both jacks, you have wired them for parallel wiring. Hope that's what you wanted!
So, if you have them wired like above, and your drivers are 8 ohms each and you connect:
Amp--->Cab 1 first speakon--->Cab 1 second speakon--->Cab 2
You then have a 4-ohm load.
Hope this helps.
yeah thats what i wanted, just didnt seem right for some reason. thanks miked!
Re: Titan 48x8 build
Posted: Tue Mar 26, 2013 9:10 am
by byacey
chenry78 wrote: i sealed them with pl too, i think they will be ok. the real question is whether or not i wired the jacks together properly.
A little too late, but this is exactly why it's not a good idea to PL anything that you might have to remove for servicing. In the future, if you do put the jacks on a dished plate, or even fastening the jacks directly to the wood with screws, ensure you have about a 4 inch loop of wire inside so the assembly can be pulled out and away from the box for soldering, etc.