Page 7 of 8
Re: DR 200 build, yep even the shameful pictures
Posted: Wed Nov 30, 2011 11:34 pm
by hilo4noff
Thanks to both posters, I've got an idea now... I think I'll permanently attach a small chuck of the 1" dowel on the bottom fronts and drill / route small recesses on the top sides to catch the feet. Like lego blocks but upside down. I'm also kind of liking the clean look of no protective corners but realistically with the amount of pack time these will get, they're going to need at least something like what Niel posted.
I'll get the pics posted as I do them, but my time in the unheated garage is almost done for the year. I may be able to sneak them back into the house for some bondo curing after the holidays and such.
Will duratex set up at 60 degrees or will it become a sticky, dog hair attracting mess for a month?
Re: DR 200 build, yep even the shameful pictures
Posted: Thu Dec 01, 2011 3:59 am
by Dave Non-Zero
I don't have corners on my DRs and I would recommend a strengthening block at those front corners. Everything else is solid enough unless you are getting really rough with them.
Re: DR 200 build, yep even the shameful pictures
Posted: Thu Dec 01, 2011 9:11 am
by el_ingeniero
hilo4noff wrote:Will duratex set up at 60 degrees or will it become a sticky, dog hair attracting mess for a month?
Works fine at 65 degrees, which is what my 'stat is set for. The instructions say it works down to 45 degrees.
I had a stack of cabs take a tumble, and everything came out fine.
I do moisten the wood at the join before laying down a bead of PL on principle. That might help.
Re: DR 200 build, yep even the shameful pictures
Posted: Thu Dec 01, 2011 10:43 am
by 88h88
If Duratex is anything like the 'Tuffcab' stuff we get here in the UK then it'll be fine at that temp. I painted our cabs in a hoodie and a woolly hat, I could see my breath that day... It was pretty nippy. Note it's not been that cold since.

Re: DR 200 build, yep even the shameful pictures
Posted: Thu Dec 01, 2011 10:53 am
by el_ingeniero
el_ingeniero wrote:hilo4noff wrote:Will duratex set up at 60 degrees or will it become a sticky, dog hair attracting mess for a month?
Works fine at 65 degrees, which is what my 'stat is set for. The instructions say it works down to 45 degrees.
I had a stack of cabs take a tumble, and everything came out fine.
I do moisten the wood at the join before laying down a bead of PL on principle. That might help.
Gah, nevermind. You wrote "duratex", I read "PL". Sorry, I hadn't had my second cup of joe today.
Re: DR 200 build, yep even the shameful pictures
Posted: Thu Dec 01, 2011 12:37 pm
by DanielNY
I believe the Duratex formula was changed some time ago for curing in low temperature. May take a little longer to cure but the finish is the same!
Re: DR 200 build, yep even the shameful pictures
Posted: Fri Dec 02, 2011 4:11 am
by Dave Non-Zero
88h88 wrote:If Duratex is anything like the 'Tuffcab' stuff we get here in the UK then it'll be fine at that temp. I painted our cabs in a hoodie and a woolly hat, I could see my breath that day... It was pretty nippy. Note it's not been that cold since.
Until today that is! Proper frosty here.
Re: DR 200 build, yep even the shameful pictures
Posted: Fri Dec 02, 2011 4:55 am
by 88h88
It hit 0 here today and I decided to cycle to work.

But yes, if this continues then no painting is going to get done unless we bust out the heater.
Re: DR 200 build, yep even the shameful pictures
Posted: Fri Dec 02, 2011 8:29 am
by Bill Fitzmaurice
88h88 wrote:It hit 0 here today and I decided to cycle to work.
Your 0 is our 32, and we call 32 a comfortably cool day.
Re: DR 200 build, yep even the shameful pictures
Posted: Fri Dec 02, 2011 9:07 am
by LelandCrooks
Duratex. Relative humidity, below 70%. Temp, 65 or above. And you have to account for evaporative cooling of the finish as it dries.
Re: DR 200 build, yep even the shameful pictures
Posted: Fri Dec 02, 2011 9:29 am
by hilo4noff
I need to clarify my definition of garage... I believe that a garage should have at least ONE permanently installed 120volt 15 amp circuit. (with at least one up to code and grounded outlet affixed to building) I believe a garage should have a human access door besides the 50 year old heavy wood roll up. (that even a wife desperate to save her kerosene heater / carbon monoxide exposed husband, would be able to operate) With, no less than 8, of the 10 to 12 track rollers present and rolling in the track. I think a garage should have at least one window bigger than a book. I believe a garage should have a roof that keeps it's contents protected from the weather. A garage should have a lock on the door. (pulling one of the overhead door springs and pullys from operation, does not count as a lock)
Of the above list of my minimal prerequisites of a building space, my current rental "garage" meets only the non-leaking roof requirement. Basically, meaning that I'm working in a meatlocker / cellar that someone forgot to bury. Even a meat locker wouldn't need an extension cord run out of the kitchen window to power the coolers.
I'm not complaining though, I'm just pointing out that normal solutions to such... usually trivial notions such as climate control entail other implications when your already this far off the "normal" reservation.
My neighbors are amazed that my 3 horsepower table saw will even work on a 50 foot extension cord... I just tell them one tool at a time! A space heater would really complicate the arrangement. Moving the whole operation into my 400 square-foot house complicates other areas of life and the house roof leaks like a sieve anyway. (also a rental)
The great news is that between the blazing 110 degree temperatures of August this year, up until about a week ago, I had the short window needed to build the drs and the t48's. In the only "garage" available to me. At this point of about 98 percent done, the rest of the soldering work, final assembly and finish will be no problem throughout the winter. So even with the situational difficulties I still think it's been a fantastic success.
I spent the better part of yesterday resolving the stacking and foot issues. Pictures on the way...
Re: DR 200 build, yep even the shameful pictures
Posted: Fri Dec 02, 2011 10:09 am
by 88h88
Bill Fitzmaurice wrote:88h88 wrote:It hit 0 here today and I decided to cycle to work.
Your 0 is our 32, and we call 32 a comfortably cool day.
True but we're used to fairly boring temperate weather so when it gets 'cold' here people start whining. I only mind cycling in winter when it gets through my gloves and socks, cold hands and feet are miserable.
Re: DR 200 build, yep even the shameful pictures
Posted: Fri Dec 02, 2011 10:40 am
by hilo4noff
The bottom cabinets just got a coin's (1/8 inch maybe) thickness pellet cut to the right angle and surface glued on the front foot's location. As per quick foot template made from 1/8" ply. I marked one side top and the other side of it "bottom" to also locate the recesses needed.
The funny thing about making a template and then marking the cabinet, is that the first thing to disappear from the work surface under the router bit is that oh soo carefully drawn circle. I'm glad I planned on going bigger anyway.
So, with that little height increase, just a thin layer of 1/8" sheet rubber or even the 1/8" baltic birch addition to the already complete rear legs,will keep the "level" mark in the notches true.
Then on the upper guys I installed a half inch thickness scrap into the routed recesses (no angle cutting here) the recess is angled. Then sanded them down to get an even 3/8" elevation from the table saw deck. Then cut four more to that 3/8 " measurement to add to the rear legs. (remember the level slot is already cut in the adjuster)
Now repeat the procedure for stacking and extend the added on to dowel to the surface of the recess in the lower cabinets' top. Mark bottom of cab on extended dowel.
Measure from bottom of cab to original dowel's length and transfer that measurement onto elevator gauge, (from "closed" or "retracted" marking line). Drill / route additional stop to join to rest of movement channel.
Reinstall dowel, lock in new position and mark extra length at top for removal. Cut, reinstall, lock into "level" position and install interior angled brace, glue, clamp.
I was fighting the springboard and then it dawned on me to just lay them face down on the deck of the table saw for the alignments and measurements.
Re: DR 200 build, yep even the shameful pictures
Posted: Fri Dec 02, 2011 11:02 am
by hilo4noff
Here's a close up of the channel with stops, FINALLY complete. The surfaces with the + sign are the only ones trimmed back with the bit shown. One one stack on the bench and the other on the table saw. They work really nice and now with the levels worked out, I think just painting the dowels and duratexing the bottoms and recesses with the rest of the cabinet will eliminate me having to buy any glides or anything.
A good portion of yesterday was wondering if I measure to the new extended part of the rear dowels or to the original length. I marked the dowels extension twice before realizing that I had to compensate for the new front legs also or the "level" notch would be off. The elevation to the front had to be incorporated into the length of the rear's also! And the closed position now has all legs about 3/8" exposed... like rubber feet would be if it had 4 of them screwed on.
The last question you really have to ask yourself when starting something like this is... do I have more patience to spend or an extra 150 bucks for two more speaker stands.
Re: DR 200 build, yep even the shameful pictures
Posted: Fri Dec 02, 2011 11:47 am
by N.Webber
Nice.
This doesn't look like Baltic birch, and even if it was I would fear for those delicate edges of the bolt slots (marked red):
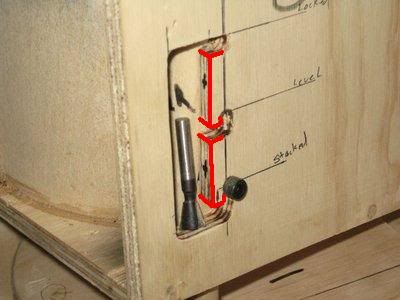
One option I would recommend for strengthening these corners is simply soaking them with Super-Glue (AFTER all fitting and sanding is done)
Curing of the Super-Glue can then be accelerated by applying water vapor.
