Hey mike I run a screw through all the T-nut's first. Sometimes there's a lot of resistance and I think its from wood fibers getting caught up in the threads. I just power through that and some times it ruins the threads on the screw but not on the T-nut luckily. After that I just use a fresh screw and its smooth as silk.
btw.. very clean professional work bud!
T48 Build Thread
Re: T48 Build Thread
My build thread.. 11 T60's and 10 DR280's http://billfitzmaurice.info/forum/viewt ... 30&t=19854
My Review! http://billfitzmaurice.info/forum/viewt ... 13&t=20567
My Review! http://billfitzmaurice.info/forum/viewt ... 13&t=20567

Re: T48 Build Thread
Using some type of thread "lube" can help in this situation. I've used a drop of plain white glue or a healthy dollop of rubber cement in the past with excellent results.miked wrote:I really hate t-nuts.
Good food, good people, good times.
4 - AT
1 - TT
1 - THT Slim
2 - SLA Pro 4x6 Alphalite
1 - T18
4 - AT
1 - TT
1 - THT Slim
2 - SLA Pro 4x6 Alphalite
1 - T18
WHEW!
I'm happy, no OVERJOYED to report that all is well in Baffleville. That first baffle must've been some kind of sick test the universe was throwing at me. I was very confused b/c I know how to use t-nuts. If I had to estimate, this is somewhere around my 20th or so time using them in a build. I ran a bolt through every t-nut in both directions before I installed it. I kept the threads clean, etc. That first one was a PITA. I had to widen a few holes on the spacer ring, but then it was fine. On the other three baffles I only had to widen one more hole. The bolts went in easily, for the most part. WHEW!
Baffles - COMPLETE
Last pic of the night.
One driver/baffle undergoing slap testing. Fed it 21V @30Hz. No slap. None of the others did either.
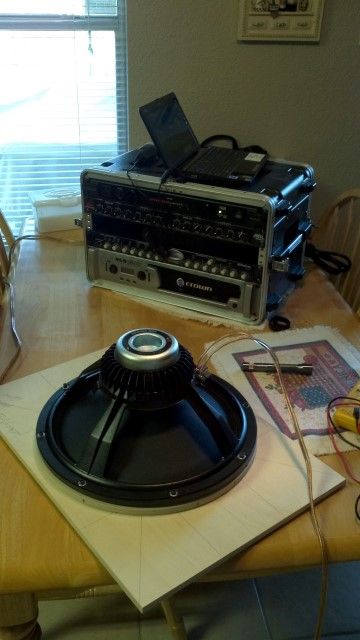
Tomorrow I will layout the first side panel to determine how wide my one-piece flange needs to be. Sketchup says 10-1/8 at the widest part that sits right against the top, but I want to measure and make sure. The only cutting of wood I want to do for the rest of this build is putting the angles on the inner panels. Actual building will start soon! More tomorrow.
Baffles - COMPLETE
Last pic of the night.
One driver/baffle undergoing slap testing. Fed it 21V @30Hz. No slap. None of the others did either.
Tomorrow I will layout the first side panel to determine how wide my one-piece flange needs to be. Sketchup says 10-1/8 at the widest part that sits right against the top, but I want to measure and make sure. The only cutting of wood I want to do for the rest of this build is putting the angles on the inner panels. Actual building will start soon! More tomorrow.
T48 build thread: http://billfitzmaurice.info/forum/viewt ... 30&t=20315
OTop12 build thread: http://billfitzmaurice.info/forum/viewt ... 30&t=19214
OTop12 build thread: http://billfitzmaurice.info/forum/viewt ... 30&t=19214
Re: T48 Build Thread
Thanks for the compliments, hifibob. Coming from you, that is high praise! I feel much better now! You could do better than me blind drunk, I'm sure. LOL! Your epic build thread showcases some true works of art. I have...some works, at least. I have come a long way in the past year and with every build, I'm multiplying my skill set.  Now that the baffles are behind me, I feel very optimistic about the rest of the build.
Radian: Before attempting to mount the driver, I blew compressed air at 90 PSI thru the t-nuts. They were clean. I do think maybe some lube is a good idea. I was at Lowes...I should've looked for "screw wax." Rubber cement makes me nervous so I try not to huff it too much. Just kidding. It does make me nervous...it might turn into Red Loctite or something.
I have "powered through" with t-nuts in the past and wound up with hard lessons from The School of Hard Knocks. At least back then, I wasn't epoxying the t-nuts in, and I could reach the other side of them, so installing a new one was easy (cutting the stripped screw, was not). In the case of Titans; you strip a t-nut and you are screwed.
I dunno WTH was up w/the first baffle, but it's fixed now.
T48 build thread: http://billfitzmaurice.info/forum/viewt ... 30&t=20315
OTop12 build thread: http://billfitzmaurice.info/forum/viewt ... 30&t=19214
OTop12 build thread: http://billfitzmaurice.info/forum/viewt ... 30&t=19214
Re: T48 Build Thread
NO!!!!!miked wrote: It does make me nervous...it might turn into Red Loctite or something.
Way too permanent!
A tiny dab of silicone on the bolt threads will be enough to keep it still.
TomS
Re: T48 Build Thread
Don't worry; I know all about Loctite. I'd be hesitant to even use the blue stuff on my driver bolts. I will be using lock washers (either star or split-type) on all the driver bolts. The Big Worry, if you will, in most BFM cabs is that you cannot get to the other side of the baffle once the cab is completed. IOW, once you have chosen your method of driver installation, t-nuts or screws, that's what you are stuck with.
Though thinking ahead...If you started with t-nuts, you could always use screws later, but not the other way around.
Going against conventional thinking: I plan on making my access panel, and it's flange as LARGE as possible. That will give me as much room as possible to get my hands and tools in the chamber to mount the driver or to effect a repair, should it be necessary. I got a great seal on my OTops with a pieced-together flange (didn't know about the rising cut TS method, else I'd have used it), and the T48 flange is smaller than the OTop flange and is 1-piece vs. 4 pieces.. So, with a 1-piece flange, it should be easy to get a highly effective seal, even with a large access panel on a T48.
ps
Do people really put silcone on the driver mounting bolts? Seems to me that absolutely ruins the t-nuts and the bolts. Especially the t-nuts. If you ever remove the driver you are left with traces of crusty silicone in the t-nut threads, and you cannot get to them in order to clean them out. Bolts would be the same, but you could clean or replace them.
T48 build thread: http://billfitzmaurice.info/forum/viewt ... 30&t=20315
OTop12 build thread: http://billfitzmaurice.info/forum/viewt ... 30&t=19214
OTop12 build thread: http://billfitzmaurice.info/forum/viewt ... 30&t=19214
Re: T48 Build Thread
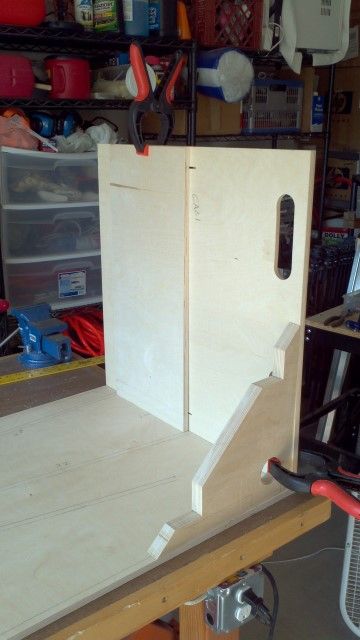
First side drawn out. After cutting all the panels to size and laying out the lines, it all makes sense now. And BTW; the top edge of the 1-piece flange is indeed 10-1/8. (NOTE: Turned out to be 10-1/16"...see update further along in this thread). Will layout the other 3 panels, then do up the top/flange.

Last edited by miked on Sat Aug 17, 2013 9:36 pm, edited 1 time in total.
T48 build thread: http://billfitzmaurice.info/forum/viewt ... 30&t=20315
OTop12 build thread: http://billfitzmaurice.info/forum/viewt ... 30&t=19214
OTop12 build thread: http://billfitzmaurice.info/forum/viewt ... 30&t=19214
-
Michael Murphy
- Posts: 343
- Joined: Sun Dec 30, 2012 2:17 pm
- Location: Trinidad
Re: T48 Build Thread
Im not trying to take anything from you guys, (miked + hifibob), you are both excellent builders and documenter's, however Id like to point out that in your case hifi you have been lucky that the threads on the T nut were not damaged by powering through them, most likely because the bolt/screw was of a softer material than the T nut ending up in the bolt/screw threads being damaged and not the T nut's. If it were a harder bolt like a grade 6 allen head bolt it would have damaged the T nut. The 100% way is to clear the threads with the appropriate thread tap, metric or English correct TPI as per the bolt. Also when sizing your bolt if the driver screw opening is 1/4" use a 3/16" T nut and bolt or 6mm hole and 4mm T nut bolt this will allow a lil wiggle room for the chance a T nut is not quite installed flat or off a lil bit. Ive used silicon on the head of the bolt to give a lil extra protection from it working loose after the final torque downs have been done. Don't know if Id want to put silicone on the threads. And finally if turning in a bolt and it gets hard and you don't have a tap you can turn it in a 1/2 turn and then back it back out and then turn it in again to the hard spot add another half turn and the back out again. Repeat till it runs up by hand, this way your chasing the threads and less likely to gall up either the bolt threads or T nut threads. Better to be safe than sorry, no one like a damaged T nut.hifibob wrote:Hey mike I run a screw through all the T-nut's first. Sometimes there's a lot of resistance and I think its from wood fibers getting caught up in the threads. I just power through that and some times it ruins the threads on the screw but not on the T-nut luckily. After that I just use a fresh screw and its smooth as silk.
btw.. very clean professional work bud!
Proceed with the epic builds!
Just my 2c
Re: T48 Build Thread
I have found that drilling the t-nut holes on a drill press eliminates the possibility of the nut not going in perfectly straight. Of course, that assumes you have a drill press and it is deep enough for a baffle of this size to fit into it. The baffles for my OTops barely fit. The baffle for the T48 does not. My little drill press only has a 4" throat, so I was only able to get 4 out of 8 holes drilled in my baffle. THe rest I did by hand. And of course, they weren't straight which is why I had the issues I did getting the bolts in.
I have been meaning to buy a tap/die set for a long time now...guess I should invest. They are typically about $40 at HF when they have a coupon. /note to self
The sides are all drawn out and now I'm working on the top/baffle. Being that there is zero wiggle room with the 1-piece flange, it's a bit nerve-wracking.
T48 build thread: http://billfitzmaurice.info/forum/viewt ... 30&t=20315
OTop12 build thread: http://billfitzmaurice.info/forum/viewt ... 30&t=19214
OTop12 build thread: http://billfitzmaurice.info/forum/viewt ... 30&t=19214
-
David Raehn
- Posts: 676
- Joined: Tue Apr 30, 2013 5:56 pm
- Location: Colonial Beach VA
Re: T48 Build Thread
Old shop hack:
Depending on the brand of the 'little' drill press, you may be able to swing the head 180 degrees from the foot. Put a counterweight (cinder block) on the foot, lower the head and you have an unlimited-throat drill press.
This may or may not be portable enough to be helpful, just give it some consideration.
BFM rig:
6 OT12
4 T48
4 WH8
Other:
56 box Electrotec LabQ rig
Way too many cables

6 OT12
4 T48
4 WH8
Other:
56 box Electrotec LabQ rig
Way too many cables
The progress! It is major, yes? YES.
@draehn: I have a Craftsman model something or other...it's got a 4" throat. I bought it more than 15 years ago. It appears to be the same drill press that HF and even Grizzly sell as their ultra-low-end mini-drill press. It has a miniature-horse-horsepower motor and bogs down drilling holes with anything bigger than a 1" bit. It is great for small, light work, but for cutting nice holes say, for handholds, you would be better served nibbling the hole out with your teeth.  I've tried changing speeds on it, depending on the work to be done...the motor is the (really) weak link. I have it set at it's mid-speed (2200 rpm or something like that)...it is the best compromise. I think I know what you mean about reversing the head. Won't work for my tool; everything only bolts on one way. Thank you for the suggestion though!
THE PROGRESS...IT IS MAJOR? YEEEESSSSS!
I got a lot done today and I am freaking beat. Feet hurt, back hurts, legs hurt...but am grateful that I had the time to do it all. This is what the weekends are for! I wanted to say that I have followed the plans very closely as far as laying out all the lines and clearly marking everything goes. It really helps you keep track of what goes where. I find that adding additional little scribbles like "TOP -->" or "Cut to this line" really helps. Whatever works for you, but lay out all the lines/panel numbers. After awhile it is difficult to keep things straight. Your mind gets tired, but written notes last forever.
I got all the side panels marked out; posted a pic of that earlier today. I still need to clamp the other side to each panel and drill the screw placement holes though. /note to self
I got all the tops cut out and the 1-piece flanges cut out (angled sides too) and mounted the baffles. Today was a milestone for me. It marks the most complicated thinking I've ever had to do for a woodworking project. Go ahead and chuckle if you want; if I had the skills that some of you have, I'd probably be chuckling too. But we all had to learn the hard way...and today was hard.
Figuring how deep to make the 1-piece flange, then cutting the flange to width with the correct angles on the correct sides...it was draining for me. There is so much measuring and checking and fitting and measuring again to do, especially when you go the 1-piece flange route. The flange butts up against panels 2 and 3 and the flange has to be exactly "this wide" and the angled ends have to be right, else panels 2&3 won't sit properly...like I said, nerve wracking. Pics or no progress, right?
Marking a top for the cutout.

Cutting it out on the TS using the "rising cut"method. I really wish I knew about this earlier. Could've saved me a lot of grief on past projects. Another "Thanks, Bruce!" for this one.

Here is the access panel cut out of the top. Note that I marked the cab and access panel with a number, and which way it faces, so I can install an access panel to the top it came from. And yes; when I paint the cabs, the writing is gone. And that's why I also marked both pieces on the backs.

Stack of tops and their access panels.

Once you have seen the Smiley Face, you cannot unsee the Smiley Face!

A top and a 1-piece flange mocked up on a side to get the flange lined up with panels 2&3. There was a lot of measuring done before cutting the flange to size. It wound up at 10-1/16" on my TS.
Lining up the flange with panel 2/3 marks. I took this opportunity to draw alignment lines (not shown) on the top, so when I secured the flange to the top, I got it positioned correctly.
Panel 3 side.

Panel 2 side.
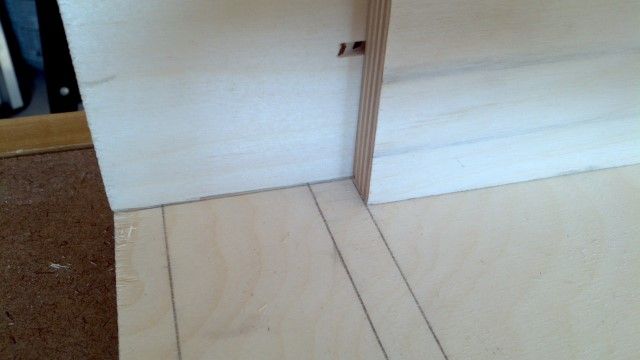
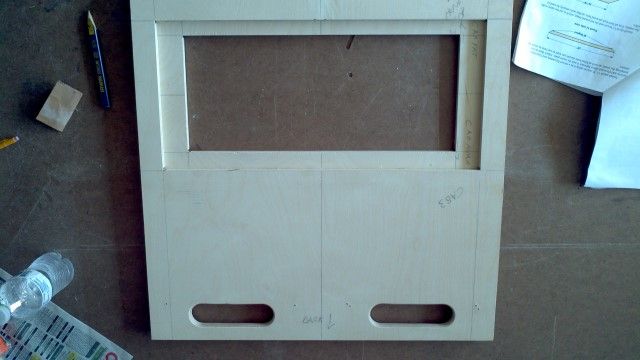
1-piece flange has been cutout. You can see how I marked the outside edges of where the flange sits on the top.

Shot of the top/flange combo. There's 1-1/2" on the sides and 1" on the top/bottom of the flange. The opening is 17"x7-1/4". The 3015LF is 7-1/8" from front gasket to top of magnet. I did not want to deal with nibbling away wood in the middle of the flange to get the magnet in there. I will use tons of screws and a double-row of gasket tape on the access panel; a seal will not be an issue.

Two of the four top/flange pieces drying, post PL/nailing.

"Why the clamps?" you ask? Gotcha. This is how much space there is b/t the edge of the top opening closest to the back, and the edge of the flange.
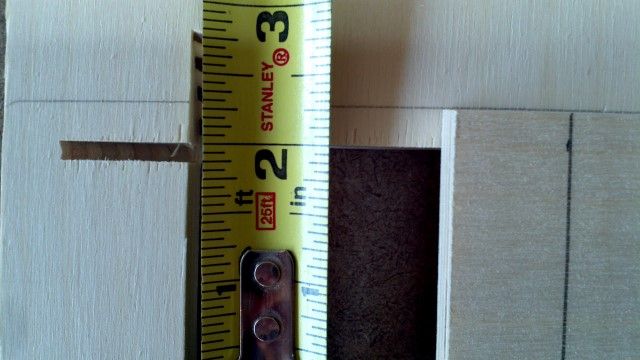
So yeah, that's why the clamps. Not enough room to nail it, even with 18-gauge brads. Didn't want to risk the brads busting thru the edge of the flange. Panel 3 butts right up against the flange, so there will be plenty of reinforcement. I most definitely will have some PL scraping to do tomorrow before assembly, but PL squeeze out is a beautiful thing. And speaking of PL: Here's how I keep an opened tube minty-fresh. Not the best pic but there is a #10 woodscrew threaded (not jammed in, screwed in) into the nozzle, and then a plastic baggie rubber-banded on top of it.

Whew...and I'm DONE. I guess tomorrow starts actual assembly! PL scraping will take awhile, then I have to drill the screw alignment holes in the sides...I should get at least the tops on tomorrow. It's been a good weekend so far. Thanks for looking.
THE PROGRESS...IT IS MAJOR? YEEEESSSSS!
I got a lot done today and I am freaking beat. Feet hurt, back hurts, legs hurt...but am grateful that I had the time to do it all. This is what the weekends are for! I wanted to say that I have followed the plans very closely as far as laying out all the lines and clearly marking everything goes. It really helps you keep track of what goes where. I find that adding additional little scribbles like "TOP -->" or "Cut to this line" really helps. Whatever works for you, but lay out all the lines/panel numbers. After awhile it is difficult to keep things straight. Your mind gets tired, but written notes last forever.
I got all the side panels marked out; posted a pic of that earlier today. I still need to clamp the other side to each panel and drill the screw placement holes though. /note to self
I got all the tops cut out and the 1-piece flanges cut out (angled sides too) and mounted the baffles. Today was a milestone for me. It marks the most complicated thinking I've ever had to do for a woodworking project. Go ahead and chuckle if you want; if I had the skills that some of you have, I'd probably be chuckling too. But we all had to learn the hard way...and today was hard.
Figuring how deep to make the 1-piece flange, then cutting the flange to width with the correct angles on the correct sides...it was draining for me. There is so much measuring and checking and fitting and measuring again to do, especially when you go the 1-piece flange route. The flange butts up against panels 2 and 3 and the flange has to be exactly "this wide" and the angled ends have to be right, else panels 2&3 won't sit properly...like I said, nerve wracking. Pics or no progress, right?
Marking a top for the cutout.
Cutting it out on the TS using the "rising cut"method. I really wish I knew about this earlier. Could've saved me a lot of grief on past projects. Another "Thanks, Bruce!" for this one.
Here is the access panel cut out of the top. Note that I marked the cab and access panel with a number, and which way it faces, so I can install an access panel to the top it came from. And yes; when I paint the cabs, the writing is gone. And that's why I also marked both pieces on the backs.
Stack of tops and their access panels.
Once you have seen the Smiley Face, you cannot unsee the Smiley Face!
A top and a 1-piece flange mocked up on a side to get the flange lined up with panels 2&3. There was a lot of measuring done before cutting the flange to size. It wound up at 10-1/16" on my TS.
Lining up the flange with panel 2/3 marks. I took this opportunity to draw alignment lines (not shown) on the top, so when I secured the flange to the top, I got it positioned correctly.
Panel 3 side.
Panel 2 side.
1-piece flange has been cutout. You can see how I marked the outside edges of where the flange sits on the top.
Shot of the top/flange combo. There's 1-1/2" on the sides and 1" on the top/bottom of the flange. The opening is 17"x7-1/4". The 3015LF is 7-1/8" from front gasket to top of magnet. I did not want to deal with nibbling away wood in the middle of the flange to get the magnet in there. I will use tons of screws and a double-row of gasket tape on the access panel; a seal will not be an issue.
Two of the four top/flange pieces drying, post PL/nailing.
"Why the clamps?" you ask? Gotcha. This is how much space there is b/t the edge of the top opening closest to the back, and the edge of the flange.
So yeah, that's why the clamps. Not enough room to nail it, even with 18-gauge brads. Didn't want to risk the brads busting thru the edge of the flange. Panel 3 butts right up against the flange, so there will be plenty of reinforcement. I most definitely will have some PL scraping to do tomorrow before assembly, but PL squeeze out is a beautiful thing. And speaking of PL: Here's how I keep an opened tube minty-fresh. Not the best pic but there is a #10 woodscrew threaded (not jammed in, screwed in) into the nozzle, and then a plastic baggie rubber-banded on top of it.
Whew...and I'm DONE. I guess tomorrow starts actual assembly! PL scraping will take awhile, then I have to drill the screw alignment holes in the sides...I should get at least the tops on tomorrow. It's been a good weekend so far. Thanks for looking.
T48 build thread: http://billfitzmaurice.info/forum/viewt ... 30&t=20315
OTop12 build thread: http://billfitzmaurice.info/forum/viewt ... 30&t=19214
OTop12 build thread: http://billfitzmaurice.info/forum/viewt ... 30&t=19214
Re: The progress! It is major, yes? YES.
miked wrote: Once you have seen the Smiley Face, you cannot unsee the Smiley Face!
What I laugh I had when I read that
TomS
Re: T48 Build Thread
Started the day off with everyone's favorite task; PL scraping. For once, I timed it right. Roughly 12 hours from application to scraping in my 95F garage worked out well. PL was cured, but not rock hard yet...about as good conditions as it gets for PL scraping, I guess.
Just for those folks that don't know why you have to scrape PL off: Either b/c you need to butt up another panel against the panel you attached with PL, or for looks. In this case, it's the former. I had PL squeeze out on both side of the top/1-piece baffle. On the top, the access panel sits in the opening, so that has to be flat. On the bottom, inner panels 2&3 butt right up against the 1-piece flange, so it has to be smooth and flat too.
Typically, I chop off PL using a chisel and hammer. First I chop down.
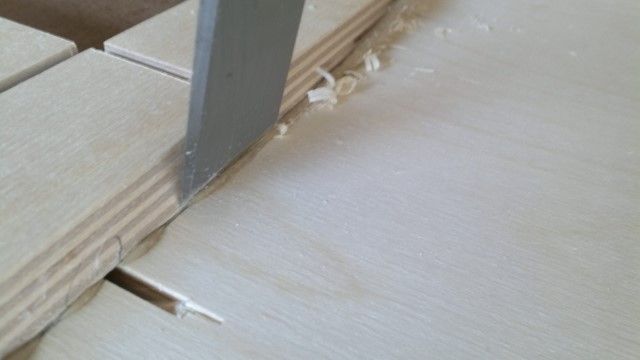
Then I chop under.
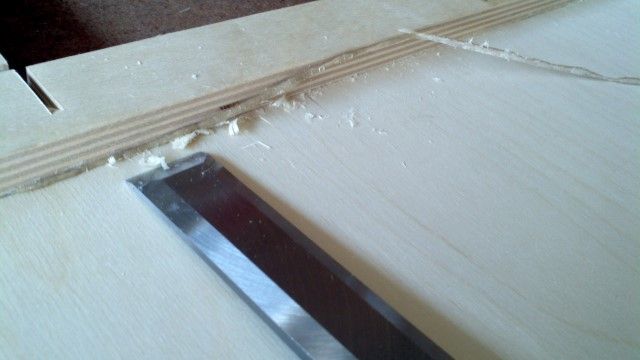
And ideally, it peels off in one long strip like this. You can see how nice and clear of PL the workpiece is (to the right of the chisel) vs. to the left of it, which hasn't been scraped yet.
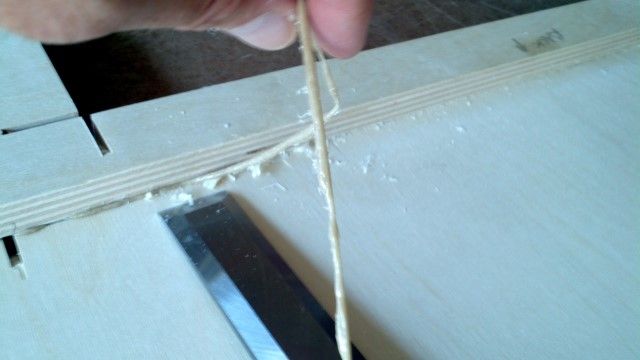
Figured that might be useful for someone.
Nice clean top/access panel area.
And the back where the flange sits.

When I rough cut all the panels for all four boxes, that's all I did; I rough cut them to the length stated in plans. Yeah, I sorta forgot about that minor detail!!! Another day lost to "prep work." I had not yet cut the angles on the panels b/c I wanted to lay out the sides first to get a no-kidding real length measurement for all the panels and I'm glad I did. Panel 3 in particular wound up being exactly 1/4" shorter than stated in the plans. I checked all four side panels to make sure I didn't mis-mark the one side I was using for reference. Nope. Needed to trim 1/4" off it. I laid out the sides exactly as shown in the plans and triple checked EACH measurement on each panel. I even mocked them up to check for fit. That was fun...would've taken a picture, but both hands and feet and elbows were busy trying to hold all those panels up and in place.
So, I spent a few hours cutting AWESOME ANGLES!!! I am so_glad_it_is_done. Building 4 of these things at once means a LOT of panels.


I still need to drill the screw holes through the sides. That's next on the hit list. After that, I think I will call it a day. So by the end of the day today, I will REALLY be ready to start assembly. About time.
Just for those folks that don't know why you have to scrape PL off: Either b/c you need to butt up another panel against the panel you attached with PL, or for looks. In this case, it's the former. I had PL squeeze out on both side of the top/1-piece baffle. On the top, the access panel sits in the opening, so that has to be flat. On the bottom, inner panels 2&3 butt right up against the 1-piece flange, so it has to be smooth and flat too.
Typically, I chop off PL using a chisel and hammer. First I chop down.
Then I chop under.
And ideally, it peels off in one long strip like this. You can see how nice and clear of PL the workpiece is (to the right of the chisel) vs. to the left of it, which hasn't been scraped yet.
Figured that might be useful for someone.
Nice clean top/access panel area.
And the back where the flange sits.
When I rough cut all the panels for all four boxes, that's all I did; I rough cut them to the length stated in plans. Yeah, I sorta forgot about that minor detail!!! Another day lost to "prep work." I had not yet cut the angles on the panels b/c I wanted to lay out the sides first to get a no-kidding real length measurement for all the panels and I'm glad I did. Panel 3 in particular wound up being exactly 1/4" shorter than stated in the plans. I checked all four side panels to make sure I didn't mis-mark the one side I was using for reference. Nope. Needed to trim 1/4" off it. I laid out the sides exactly as shown in the plans and triple checked EACH measurement on each panel. I even mocked them up to check for fit. That was fun...would've taken a picture, but both hands and feet and elbows were busy trying to hold all those panels up and in place.
So, I spent a few hours cutting AWESOME ANGLES!!! I am so_glad_it_is_done. Building 4 of these things at once means a LOT of panels.
I still need to drill the screw holes through the sides. That's next on the hit list. After that, I think I will call it a day. So by the end of the day today, I will REALLY be ready to start assembly. About time.
T48 build thread: http://billfitzmaurice.info/forum/viewt ... 30&t=20315
OTop12 build thread: http://billfitzmaurice.info/forum/viewt ... 30&t=19214
OTop12 build thread: http://billfitzmaurice.info/forum/viewt ... 30&t=19214
-
Grant Bunter
- Posts: 6912
- Joined: Mon Nov 28, 2011 11:12 am
- Location: Ilfracombe Queensland Australia
- Contact:
Re: T48 Build Thread
Really enjoying this build Mike.
Loving your work and detailed progress...
Loving your work and detailed progress...
Built:
DR 250: x 2 melded array, 2x CD horn, March 2012 plans.
T39's: 4 x 20" KL3010LF , 2 x 28" 3012LF.
WH8: x 6 with melded array wired series/parallel.
Bunter's Audio and Lighting "like"s would be most appreciated...
DR 250: x 2 melded array, 2x CD horn, March 2012 plans.
T39's: 4 x 20" KL3010LF , 2 x 28" 3012LF.
WH8: x 6 with melded array wired series/parallel.
Bunter's Audio and Lighting "like"s would be most appreciated...
Re: T48 Build Thread
Thanks, Grant. I know how much I really enjoy detailed threads; especially when I'm doing research for a potential build. I hope this thread helps somebody down the line. This forum really is an incredible resource for anyone building BFM cabs. The community is quite knowledgeable and helpful.
OK, so I posted a lunchtime-update earlier; got all the angles cut on all the panels/cut all panels to finished length. IMO, you don't need to cut each panel to finished size as you build, but you DO NEED TO layout the panel locations on the side panel(s) first, and then you measure for length/fit for each panel as you go (cut). This saved me some agony as Panel 3 wound up needing to be 1/4" shorter than the plans showed.
What I did after lunch was clamp each marked-out side panel to a blank side and drill the mounting screw locations for the whole cab.
Here's a marked-out side, clamped on top of a blank side. I aligned the front-upper corner first, then the lower front. The back edges were secondary but (not boasting) being that I cut all the panels on a TS without moving the fence, the backs lined up within about a 32nd of each other anyway. Even if they didn't line up, that's what flush trim bits are for.
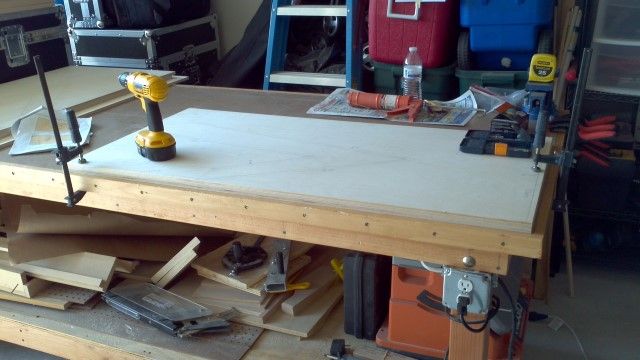
And yes; I did wind up drilling into my workbench. I knew that would happen. Wound up with 140-ish, 1/8" holes about 1/8" deep. Not a problem as the workbench was designed with a replaceable, harboard top for this very reason.
Holes drilled through both panels. Hadn't yet hit panel 11 at the upper left...dont' know why I took the pic when I did. Rest assured, all holes are in place ATM.

I labeled all "pairs of sides" the same so that there is zero confusion later. Not shown: I also labeled the blank side with "Bottom --->", "Front --->", "This end up", etc. The more notes you write on the panels, the easier it will be for you later, especially if you are building multiples of the same cab.

And finally; I won't win any Harley's, but being that all cutting/chopping/drilling is done, I cleaned the shop in preparation for glue-up which hopefully will start tomorrow. There was sawdust everywhere...it's all clean and pristine (kinda) now. Note the stack of boards on the floor next to the table saw. That's 4 backs with 8 sides stacked on top of them. Trying hard to keep them as flat as possible.

So all the "prep work" is finally finished. There is nothing else to measure/cut/drill/trim/grind/cuss at. Next time I'm in the shop, I'll be gluing up some Tops to some Side Panels!
OK, so I posted a lunchtime-update earlier; got all the angles cut on all the panels/cut all panels to finished length. IMO, you don't need to cut each panel to finished size as you build, but you DO NEED TO layout the panel locations on the side panel(s) first, and then you measure for length/fit for each panel as you go (cut). This saved me some agony as Panel 3 wound up needing to be 1/4" shorter than the plans showed.
What I did after lunch was clamp each marked-out side panel to a blank side and drill the mounting screw locations for the whole cab.
Here's a marked-out side, clamped on top of a blank side. I aligned the front-upper corner first, then the lower front. The back edges were secondary but (not boasting) being that I cut all the panels on a TS without moving the fence, the backs lined up within about a 32nd of each other anyway. Even if they didn't line up, that's what flush trim bits are for.
And yes; I did wind up drilling into my workbench. I knew that would happen. Wound up with 140-ish, 1/8" holes about 1/8" deep. Not a problem as the workbench was designed with a replaceable, harboard top for this very reason.
Holes drilled through both panels. Hadn't yet hit panel 11 at the upper left...dont' know why I took the pic when I did. Rest assured, all holes are in place ATM.
I labeled all "pairs of sides" the same so that there is zero confusion later. Not shown: I also labeled the blank side with "Bottom --->", "Front --->", "This end up", etc. The more notes you write on the panels, the easier it will be for you later, especially if you are building multiples of the same cab.
And finally; I won't win any Harley's, but being that all cutting/chopping/drilling is done, I cleaned the shop in preparation for glue-up which hopefully will start tomorrow. There was sawdust everywhere...it's all clean and pristine (kinda) now.
So all the "prep work" is finally finished. There is nothing else to measure/cut/drill/trim/grind/cuss at. Next time I'm in the shop, I'll be gluing up some Tops to some Side Panels!
T48 build thread: http://billfitzmaurice.info/forum/viewt ... 30&t=20315
OTop12 build thread: http://billfitzmaurice.info/forum/viewt ... 30&t=19214
OTop12 build thread: http://billfitzmaurice.info/forum/viewt ... 30&t=19214