Curved Grill WH10

Post your build odyssey here.
Message
Author
User avatar
N.Webber
Posts: 244
Joined: Wed Nov 22, 2006 1:17 pm
Location: ISRAEL
Contact:

Re: Curved Grill WH10

#61 Post by N.Webber »

The past two weeks or so were slow re. the WH10 as I was busy with gigs.
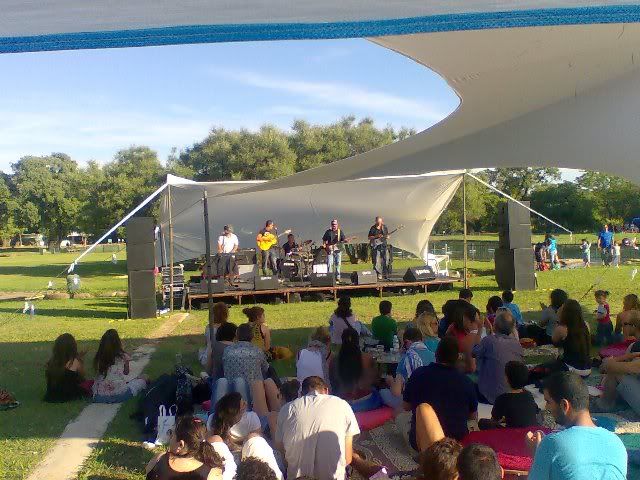
… Such as this one on last Saturday (DR290s over LABhorns):

Image

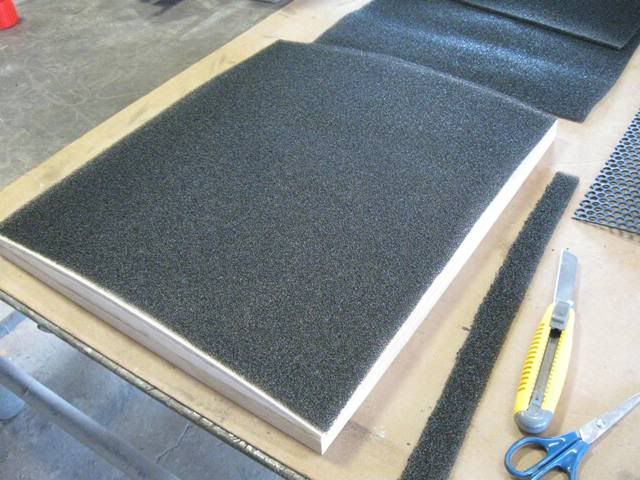
So, last week I got the Padded covers. The man took the liberty to change my design a little
but they turned out really nice and fit perfectly, easy to dress onto the wedges and wide Velcro closing on all edges:

Image

Another view:

Image

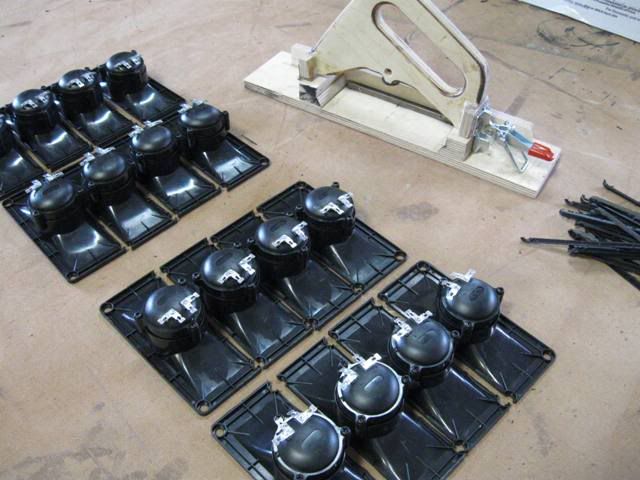
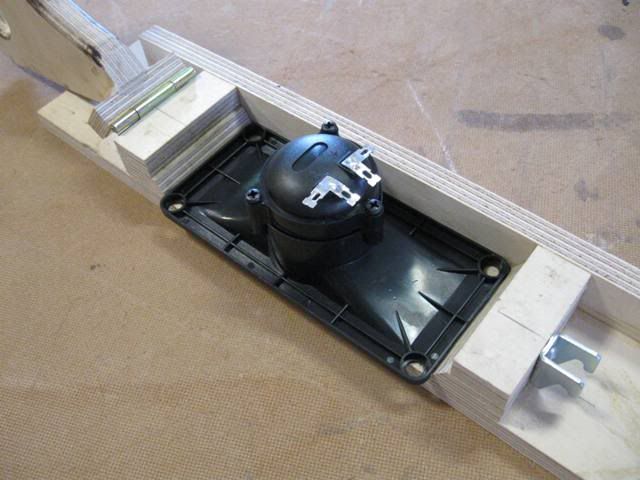
Yesterday and today I spent some time building a jig for cutting the piezos.
The Jig in open/empty position:

Image

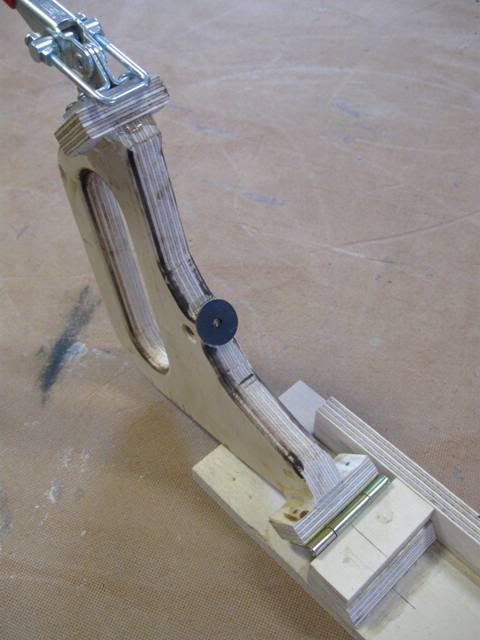
The 1016 piezo located inside the jig:

Image

And here closed, clamped and ready for cutting:

Image

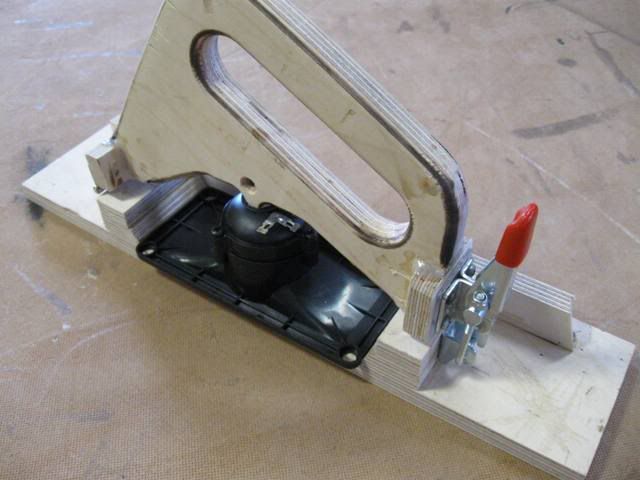
This setup is for the array end piezos that are cut only on one side.
The rest will be trimmed on the other side also by rotating them and a spacer inserted into the jig.

Hopefully tomorrow…

:)
Authorized Builder
- 6 DR290
- Omni10.5
- AT, TAT
- Tuba 48
- 2 WH10
- Truck Tuba
http://www.boniton.co.il
http://www.bt-12.com Balanced Tilting Sounds Better...

User avatar
N.Webber
Posts: 244
Joined: Wed Nov 22, 2006 1:17 pm
Location: ISRAEL
Contact:

Re: Curved Grill WH10

#62 Post by N.Webber »

Piezos are cut:

Image

I'll be using Bill's black ABS glue…
Some of the scraps were chopped into a jar and topped with MEK.
We'll see how it works.
Authorized Builder
- 6 DR290
- Omni10.5
- AT, TAT
- Tuba 48
- 2 WH10
- Truck Tuba
http://www.boniton.co.il
http://www.bt-12.com Balanced Tilting Sounds Better...

User avatar
N.Webber
Posts: 244
Joined: Wed Nov 22, 2006 1:17 pm
Location: ISRAEL
Contact:

Re: Curved Grill WH10

#63 Post by N.Webber »

BFM's DIY ABS glue ready:

Image

Tested on scraps of the Piezos...

Image

This stuff is the real thing! Applied only a thin bead on the mating surfaces,
left to set for a few hours and the bond is as strong as the original material.

Here is the result of trying to break the bond with pliers…

Image

Next: gluing the arrays

:)
Authorized Builder
- 6 DR290
- Omni10.5
- AT, TAT
- Tuba 48
- 2 WH10
- Truck Tuba
http://www.boniton.co.il
http://www.bt-12.com Balanced Tilting Sounds Better...

bzb
Posts: 1567
Joined: Mon Oct 05, 2009 4:16 pm
Location: Atlanta, GA

Re: Curved Grill WH10

#64 Post by bzb »

Your jig looks nicer than my builds.

Knowing how meticulous you are, how do you plan on touching up the arrays? I'm thinking of grabbing some of those circle labels at Office Max to cover up the center hole.

Image
Bobby Shively
Purveyor of fine aged hip hop
Traktor S4 - Vestax VCI-100 - TTX - MOTU Ultralite - Yamaha 01V

Built:
T39 13" BP102, 24" 3012LF - AT - OT12 2512 - SLA Pro - T24 - Jack 10
Powered by XTi 1000 & 2000

Bruce Weldy
Posts: 8538
Joined: Fri Nov 27, 2009 11:37 am
Location: New Braunfels, TX

Re: Curved Grill WH10

#65 Post by Bruce Weldy »

bzb wrote:Your jig looks nicer than my builds.

Knowing how meticulous you are, how do you plan on touching up the arrays? I'm thinking of grabbing some of those circle labels at Office Max to cover up the center hole.

Image
If you use grills and foam behind them, you don't have to touchup.....they can be as ugly as your mother-in-law and nobody knows! :clap:

6 - T39 3012LF
4 - OT12 2512
1 - T24
1 - SLA Pro
2 - XF210


"A system with a few knobs set up by someone who knows what they are doing is always better than one with a lot of knobs set up by someone who doesn't."

User avatar
N.Webber
Posts: 244
Joined: Wed Nov 22, 2006 1:17 pm
Location: ISRAEL
Contact:

Re: Curved Grill WH10

#66 Post by N.Webber »

Bruce Weldy wrote: If you use grills and foam behind them, you don't have to touchup...
+1

But if you must, I think a circular sticker will be difficult to place because of the throat plug shape, unless you pick a bigger diameter and make a cone of it…
I am planning on using foam/sponge plugs just tucked into the throats while cutting the 45 deg. to keep the business area clean.
The same can be done for touchup. Or, you may find (or make) paper/cardboard cylinders of the right diameter that fit snugly in there.

:)
Authorized Builder
- 6 DR290
- Omni10.5
- AT, TAT
- Tuba 48
- 2 WH10
- Truck Tuba
http://www.boniton.co.il
http://www.bt-12.com Balanced Tilting Sounds Better...

matthewmdn
Posts: 10
Joined: Tue May 10, 2011 11:02 pm

Re: Curved Grill WH10

#67 Post by matthewmdn »

The DIY ABS glue is cool, but is there any reason not to just use the ABS glue I already have? Is it just a better match or is there something chemically different?

User avatar
Bill Fitzmaurice
Site Admin
Posts: 28916
Joined: Tue May 02, 2006 5:59 pm

Re: Curved Grill WH10

#68 Post by Bill Fitzmaurice »

matthewmdn wrote:The DIY ABS glue is cool, but is there any reason not to just use the ABS glue I already have? Is it just a better match or is there something chemically different?
DIY is thicker and the color matches. You can drop shavings into a standard multipurpose clear glue to tint and thicken it too. Give them overnight to dissolve. If it gets too thick add some thinner/cleaner.

User avatar
N.Webber
Posts: 244
Joined: Wed Nov 22, 2006 1:17 pm
Location: ISRAEL
Contact:

Re: Curved Grill WH10

#69 Post by N.Webber »

matthewmdn wrote:The DIY ABS glue is cool, but is there any reason not to just use the ABS glue I already have? Is it just a better match or is there something chemically different?
The main reason was I couldn't find (locally) reasonably priced ABS glue in bigger quantity.
The only other option was model glue at hobby shops, that come in small and fancy packages and is pricy.

Also, with the DIY glue, you can control and optimize its viscosity to your liking and the application by adding scrap pieces or MEK.
And finally, it chemically matches perfectly to the materials to be glued, ...and is black.

:)
Authorized Builder
- 6 DR290
- Omni10.5
- AT, TAT
- Tuba 48
- 2 WH10
- Truck Tuba
http://www.boniton.co.il
http://www.bt-12.com Balanced Tilting Sounds Better...

bzb
Posts: 1567
Joined: Mon Oct 05, 2009 4:16 pm
Location: Atlanta, GA

Re: Curved Grill WH10

#70 Post by bzb »

Bruce Weldy wrote:
bzb wrote:Your jig looks nicer than my builds.

Knowing how meticulous you are, how do you plan on touching up the arrays? I'm thinking of grabbing some of those circle labels at Office Max to cover up the center hole.

Image
If you use grills and foam behind them, you don't have to touchup.....they can be as ugly as your mother-in-law and nobody knows! :clap:
But my mother-in-law is pretty hot for a 55 year old. I was told that was the best way to figure out how hot your potential wife will be ;)

I'm just jealous of all these dudes on here with cool looking blue/red/hot pink arrays.
Bobby Shively
Purveyor of fine aged hip hop
Traktor S4 - Vestax VCI-100 - TTX - MOTU Ultralite - Yamaha 01V

Built:
T39 13" BP102, 24" 3012LF - AT - OT12 2512 - SLA Pro - T24 - Jack 10
Powered by XTi 1000 & 2000

User avatar
Dave Non-Zero
Posts: 1939
Joined: Thu Jul 13, 2006 4:59 am
Location: Dundee, Scotland
Contact:

Re: Curved Grill WH10

#71 Post by Dave Non-Zero »

bzb wrote:Your jig looks nicer than my builds.
+1
:clap: :chainsaw:
-1 for thought terminating cliches.

Built and/or own:
8 x T48 24" 3015LF
6 x DR280
2 x DR250 old style beta10
2 x T36s 20" delta15L
1 x TAT
1 x dual Lab12 30" T60

In Progress:
2 x DR280

User avatar
N.Webber
Posts: 244
Joined: Wed Nov 22, 2006 1:17 pm
Location: ISRAEL
Contact:

Re: Curved Grill WH10

#72 Post by N.Webber »

The Piezo quartets are ready:

Image

Next: chopping at 45 deg.

------------

I made this jig for gluing the backing foam to the pre-curved grills.

Here are the parts before assembly: base, ribs and bendy-ply for the curved top.

Image

Jig ready:

Image

Checked to match the grille’s curvature:

Image

The grill foam is placed on the jig:

Image

The grill back is sprayed generously with slow drying black car underbody spray.
The grill is then immediately placed on top of the foam, with light and even pressure
applied to insure full contact with the foam throughout the contact area.
Left to dry overnight (pictured are both grills drying together):

Image

This morning – the foam backed grills are ready:

Image

:)
Authorized Builder
- 6 DR290
- Omni10.5
- AT, TAT
- Tuba 48
- 2 WH10
- Truck Tuba
http://www.boniton.co.il
http://www.bt-12.com Balanced Tilting Sounds Better...

User avatar
Dave Non-Zero
Posts: 1939
Joined: Thu Jul 13, 2006 4:59 am
Location: Dundee, Scotland
Contact:

Re: Curved Grill WH10

#73 Post by Dave Non-Zero »

only you would get the curves precurved. the rest of us would just screw em down. :wink:
-1 for thought terminating cliches.

Built and/or own:
8 x T48 24" 3015LF
6 x DR280
2 x DR250 old style beta10
2 x T36s 20" delta15L
1 x TAT
1 x dual Lab12 30" T60

In Progress:
2 x DR280

User avatar
N.Webber
Posts: 244
Joined: Wed Nov 22, 2006 1:17 pm
Location: ISRAEL
Contact:

Re: Curved Grill WH10

#74 Post by N.Webber »

Dave Non-Zero wrote:only you would get the curves precurved. the rest of us would just screw em down. :wink:
Unless one uses really thin material for the grill, the screws holding the curve down would then need to supply a considerably higher fastening force.
This would probably also make attaching and removing the grill from the cab somewhat tricky.

:)
Authorized Builder
- 6 DR290
- Omni10.5
- AT, TAT
- Tuba 48
- 2 WH10
- Truck Tuba
http://www.boniton.co.il
http://www.bt-12.com Balanced Tilting Sounds Better...

User avatar
Dave Non-Zero
Posts: 1939
Joined: Thu Jul 13, 2006 4:59 am
Location: Dundee, Scotland
Contact:

Re: Curved Grill WH10

#75 Post by Dave Non-Zero »

yeah but the point is - you thought about that before doing it. :clap:
-1 for thought terminating cliches.

Built and/or own:
8 x T48 24" 3015LF
6 x DR280
2 x DR250 old style beta10
2 x T36s 20" delta15L
1 x TAT
1 x dual Lab12 30" T60

In Progress:
2 x DR280

Post Reply