T48 Build Thread

Post your build odyssey here.
Message
Author
miked
Posts: 1209
Joined: Fri Oct 23, 2009 4:18 am
Location: San Antonio, TX

Re: T48 Build Thread

#46 Post by miked »

Hi Tom: Those are interesting measurements...I don't have the Nov11 plans...I guess there was an incremental update of some kind? And at this time of the evening I'm not going out to the sauna...garage to measure. Heheheh. Having only 1/2" b/t the front edge of the bottom and the top edge of the handhold would worry me. These cabs are light (AFA subs go) but not THAT light so you could lift them with only a half inch of wood holding the cab up.

This is one of those "After I built this cab, I realized that..." (insert epiphany here) moments. :? Ugh. I hate those! These cabs aren't an erector set where if you put the wrong length piece in there, you just unbolt 32 different pieces and bolt in the correct piece and go from there. I've learned a hard lesson; PL IS PERMANENT. LOL!

I'm hoping that a rested brain and a fresh set of eyes will set me on the right path in the AM. Thanks.

User avatar
Tom Smit
Posts: 7566
Joined: Sat Jan 05, 2008 1:24 pm
Location: Sarnia, Ont. Canada

Re: T48 Build Thread

#47 Post by Tom Smit »

You can put a piece of 1/2" half-round at the front lip for extra strength and a more comfortable handle (similar to the quarter-round idea).
TomS

miked
Posts: 1209
Joined: Fri Oct 23, 2009 4:18 am
Location: San Antonio, TX

Re: T48 Build Thread

#48 Post by miked »

I'm no scientist of any kind, but my experience building cabs says "wouldn't that "bump" interfere with the sound being projected out of the horn?" it's a "blockage" right at the end of the horn path. I'm just spouting stuff off the top of my head...but rarely, the stupid question might be valid...

User avatar
Tom Smit
Posts: 7566
Joined: Sat Jan 05, 2008 1:24 pm
Location: Sarnia, Ont. Canada

Re: T48 Build Thread

#49 Post by Tom Smit »

Nope. The object is too small for those large sound waves.
TomS

miked
Posts: 1209
Joined: Fri Oct 23, 2009 4:18 am
Location: San Antonio, TX

Re: T48 Build Thread

#50 Post by miked »

Like I said: "Rarely..." :oops: Thanks, Tom. I guess it really doesn't matter how far into the mouth the 6/10 braces are. You can't mechicanally fasten the angled end anyway. And that's another thing that has me concerned. (Per the plans) If both sides are on before I attach the 6/10 braces and their horizontal brace: How am I supposed to get PL on the ends of a 23" wide piece when the space it fits in is 23" wide? :confused:

sine143
Posts: 3066
Joined: Sat Feb 06, 2010 3:27 pm
Location: Raleigh NC

Re: T48 Build Thread

#51 Post by sine143 »

Slather it up lol. then clean up the mess
Built:
2x Tuba 30s delta12lf loaded (gone)
4x Otop12 d2512 loaded
8x t48s (18, 18, 24, 24, 30, 30) 3015lf loaded
2x AT (1 mcm, 1 gto 804)
2x SLA Pro (dayton pa6, 6 goldwood piezo loaded)
1x bastard XF208

2x OT212 (delta pro 450a loaded, eminence psd)

Bruce Weldy
Posts: 8538
Joined: Fri Nov 27, 2009 11:37 am
Location: New Braunfels, TX

Re: T48 Build Thread

#52 Post by Bruce Weldy »

sine143 wrote:Slather it up lol. then clean up the mess
Exactly.

6 - T39 3012LF
4 - OT12 2512
1 - T24
1 - SLA Pro
2 - XF210


"A system with a few knobs set up by someone who knows what they are doing is always better than one with a lot of knobs set up by someone who doesn't."

Ryan A
Posts: 867
Joined: Thu Mar 01, 2012 11:19 am
Location: Minneapolis, Minnesota

Re: T48 Build Thread

#53 Post by Ryan A »

Or, slather it on, make a mess, let it dry (if u have the time), then clean (chisel) it up :)

User avatar
Radian
Posts: 2032
Joined: Tue Jul 29, 2008 12:56 pm
Location: Tucson, AZ

Re: T48 Build Thread

#54 Post by Radian »

Just a quick note about PL squeeze-out & cracking.

It's nothing to get upset over or worry about. Upon fastening two pieces together, the stuff that oozes out of joint does nothing for the strength of the joint.

The excess adhesive cracks because the outter most surface is curing (skinning) while the inner (uncured portion) is still expanding. In the case of PL Premium, it expands quite a bit.

The more that squeezes out, the more abundant the cracking will occur.

It bears no indication of what's actually taking place along the joint interface.

You can try and smooth the squeeze out with a finger, but that usually leaves a hideous, bubbly mess. :chainsaw:

It's not caulk, so if cosmetics are a concern, just leave it cure then come back with a chisel and slice it off. Once the PL is removed and if you still desire a fillet, lay down a bead of Bondo and smooth that out instead. It might sound like a lot of fuss, but it's actually easier working with filler than trying to sculpt PL.
Good food, good people, good times.

4 - AT
1 - TT
1 - THT Slim
2 - SLA Pro 4x6 Alphalite

miked
Posts: 1209
Joined: Fri Oct 23, 2009 4:18 am
Location: San Antonio, TX

Re: T48 Build Thread

#55 Post by miked »

Thanks for that explanation, Radian. That makes sense. I do plan on lightly misting the joints before I PL; even at daybreak, my garage it 88F this time of year and gets up to 100 on a sunny day. I'm about to post a midday update. :) We're getting there.

miked
Posts: 1209
Joined: Fri Oct 23, 2009 4:18 am
Location: San Antonio, TX

Midday update

#56 Post by miked »

I took a break to grab some lunch. Here's what I've done so far today:

Finished cutting all handholds and jackplate holes.
Cut one new back and one new bottom b/c apparently sometimes I can't read a ruler. Thankfully I had leftover pieces big enough.
Rounded over all handholds.

Have I mentioned I love routing templates? This one was easy to make since the cutout was rectangular. Just used the rising cut method on the TS. (Thanks, Bruce).

Template for jack plate.
Image

Lovely cutout.
Image
Image
Image

Handhold in top rounded over (1/4" roundover, BTW). Just on the top edge as the bottom edge of the hole will butt up against the quarter round. Pic shows rounded over vs. non-rounded over hole.
Image

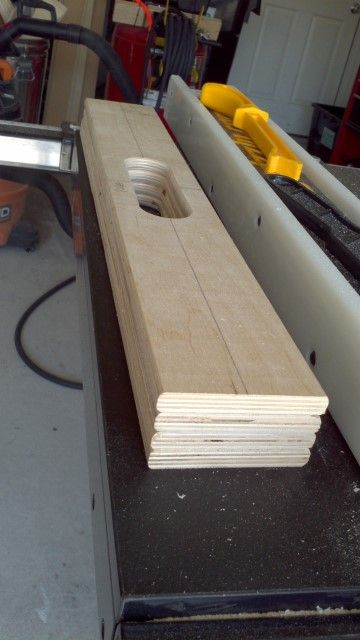
Stack of bottom panels, handholds rounded over on both sides. The center line of the holes are 2" from the edge...I went with that. Hope it works out.
Image

Stack of tops.
Image

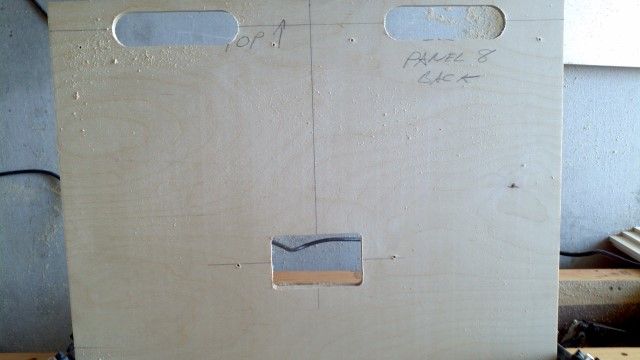
Stack of backs. Even on the backs of the holes, which don't get rounded over, I broke all edges with 220-grit sandpaper. The jackplates may look a little high up, but I put them there by choice. I wanted as short an internal run of wire as possible. Less to tack down, less to vibrate too.
Image

6/10 horizontal braces, handle hole and rounded over.
Image

I realize that I have not cut holes for the casters yet. Bruce advised me to wait until at least the back is on so I will be better able to visualize how the backing plates for the casters will sit, how far to make the cut, etc. It's an easy cut with the circ saw, anyway. Check Bruce's "Old style T39 thread" at the bottom of the first page of "Build Threads" to see his caster backing blocks. I plan on doing something similar if not ripping him off outright. Again. :lol:

So, aside from putting the angles on the internal panels, all cutting is done. This afternoon's task: Mounting the drivers to the baffles to ensure the bolts line up with the tnuts, and checking for cone slap, which I really doubt I'll have, but better to check now than be able to do almost nothing about it later. Devil's In The Details, right? I know I have two or three holes on the driver side that don't line up well with the t-nut, so I'll have a bit of drilling to do, but no biggie, really.

Aside from actually assembling the cab, the only major things left to do for Prep Work are:
Mount drivers to baffles to check for proper bolt fit and cone slap.
Figure out the size of my access panel and one piece flange and get those glued up.

Thanks for looking.

miked
Posts: 1209
Joined: Fri Oct 23, 2009 4:18 am
Location: San Antonio, TX

I hate t-nuts

#57 Post by miked »

I really hate t-nuts. :cussing: You drill things as carefully as possible, etc and they never line up. Threading the bolts in without the driver in place, they are fiddly, but they go it. With the driver there, I can't get half of them to thread and I don't want to push too hard b/c then they will strip. I am concerned. Sheesh, all that wasted time!

I am considering just going with Kreg screws and avoiding all the mis-threaded, stripped out drama completely. I could fill the t-nut holes in the baffles with PL easy enough.

Would these be long enough? I can't remember if I used lockwashers or not when I used these screws on my OTops. Should I use a 2" screw instead? I don't know if they sell 2" Kreg screws? (My local Lowes apparently DOES have 2" Kreg screws...)

Image

Thoughts? Man, am I pissed the heck off right now. :cussing:

Michael Murphy
Posts: 343
Joined: Sun Dec 30, 2012 2:17 pm
Location: Trinidad

Re: T48 Build Thread

#58 Post by Michael Murphy »

Do you think opening up the driver Holes by à mm or so will give you some wiggle room? Or perhaps loosely install the bolts that are able to catch and then run the no. 1. tap to line up the driver hole. Its what i envision id have to do.

miked
Posts: 1209
Joined: Fri Oct 23, 2009 4:18 am
Location: San Antonio, TX

Re: T48 Build Thread

#59 Post by miked »

OK, crisis averted, I think. After widening a couple of the holes and running the bolts thru the nuts numerous times, I got one driver bolted down. Ran 21v @ 30Hz through it and no slap at all. One baffle down, three more to go. Have I mentioned that I HATE T-NUTS? :wall:

Now I just have to hope that I didn't strip anything put them in there, or else I'll be "Kregging It" anyway. :fingers:

These are going to be a royal PITA to actually get bolted in the cab, but nothing clamps down a driver like t-nuts.

miked
Posts: 1209
Joined: Fri Oct 23, 2009 4:18 am
Location: San Antonio, TX

Re: T48 Build Thread

#60 Post by miked »

I can update quickly b/c I have an old laptop in the garage. :D

This is just stupid. First baffle took me hours to get all 8 bolts in. The second? About a minute. :bash: At least things are looking up!!!!

Post Reply