Page 28 of 93
Re: What's to chat about?
Posted: Fri Mar 06, 2020 4:13 am
by Seth
Bryan Cox wrote: ↑Thu Mar 05, 2020 7:21 pm
I use this handle...
I noticed you have handles and wheels at each end. How is the balance when tilting them back and rolling them each way, right-side-up/up-side-down? Seems like it would be better "up-side-down" with the bulk of the weight at the bottom, lower center of gravity. But, is it really noticeable? One way better than the other? If you were to only put wheels on one end, which end would you choose?
Re: What's to chat about?
Posted: Fri Mar 06, 2020 6:55 am
by Bryan Cox
SethRocksYou wrote: ↑Fri Mar 06, 2020 4:13 am
Bryan Cox wrote: ↑Thu Mar 05, 2020 7:21 pm
I use this handle...
I noticed you have handles and wheels at each end. How is the balance when tilting them back and rolling them each way, right-side-up/up-side-down? Seems like it would be better "up-side-down" with the bulk of the weight at the bottom, lower center of gravity. But, is it really noticeable? One way better than the other? If you were to only put wheels on one end, which end would you choose?
I guess I hadn't really thought about it. I guess it is slightly top heavy but that's all relative. My T39s are about 63 lbs each and I consider that feather-light. If I had to choose one location over the other I'd put the wheels on the bottom and handle on the top. I rarely use the top wheels now. But when I need to move all four around I stack them and roll them like a hand truck. That's a feature I wouldn't want to give up.
Re: What's to chat about?
Posted: Fri Mar 06, 2020 10:30 pm
by Seth
5, 3/5 brace, 6, 4/6 braces, and 6 extension installed today. Overall, it's all much smaller and more compact than I imagined it would be.
20200306_182558.jpg
I also realized I made a goof, but I'll play it off as intentional. Because I'm just a wild rebel like that

Anyway, in reading forward, my next steps are to frame the access panel. I'm looking at the two options for the vertical supports I realized I chose a size that is not within the parameters of the plans. Went back and re-read the beginning of the plans again... "You must make a wide cab at least 1½ inches wider than a narrow cab." OOPS! This cab is going to be 16"wide (instead of the minimum 16.5" for anything wider than a 15" narrow model), so I'll have to trim a quarter inch off the vertical supports to get everything to fit properly. Shouldn't be too big of a deal... unless there's something else it will effect too.
Also picked up a bunch of brushes and rollers, a gallon of flat black outdoor latex paint, a gallon of bondo, and a few other odds-n-ends... spreaders and whatnot.
This thing's coming right along.
Re: What's to chat about?
Posted: Fri Mar 06, 2020 10:32 pm
by Seth
Bryan Cox wrote: ↑Fri Mar 06, 2020 6:55 am
I guess I hadn't really thought about it. I guess it is slightly top heavy but that's all relative. My T39s are about 63 lbs each and I consider that feather-light. If I had to choose one location over the other I'd put the wheels on the bottom and handle on the top. I rarely use the top wheels now. But when I need to move all four around I stack them and roll them like a hand truck. That's a feature I wouldn't want to give up.
Thank you Bryan. I appreciate it

Re: What's to chat about?
Posted: Sat Mar 07, 2020 4:45 am
by Seth
So, my Dad's (erm.. bio Dad, not the musician step Dad)... anyway, my Dad's brother, my uncle, has been a carpenter all his life and his son, my cousin, has followed in his Dad's footsteps. I was telling him about the build and he told me he cut his finger on a table saw not too long ago.
His young son bumped the end of the stock, it climbed the blade and rejected, his finger ended up you-know-where.
Note the blade pattern in the skin just past the cuticle, same as the leading edge when cutting wood. Also, the x-ray... cut right down the center of the bone! Precision carpentry at it's finest.
Enjoy.
IMG_9991.jpg
IMG_9992.jpg
Re: What's to chat about?
Posted: Sat Mar 07, 2020 7:59 am
by Bryan Cox
Ewww. That's why I make sure no one is around when I'm using my big saws.
Re: What's to chat about?
Posted: Sat Mar 07, 2020 8:04 am
by Bryan Cox
SethRocksYou wrote: ↑Fri Mar 06, 2020 10:30 pm
5, 3/5 brace, 6, 4/6 braces, and 6 extension installed today. Overall, it's all much smaller and more compact than I imagined it would be.
20200306_182558.jpg
I also realized I made a goof, but I'll play it off as intentional. Because I'm just a wild rebel like that
Anyway, in reading forward, my next steps are to frame the access panel. I'm looking at the two options for the vertical supports I realized I chose a size that is not within the parameters of the plans. Went back and re-read the beginning of the plans again... "You must make a wide cab at least 1½ inches wider than a narrow cab." OOPS! This cab is going to be 16"wide (instead of the minimum 16.5" for anything wider than a 15" narrow model), so I'll have to trim a quarter inch off the vertical supports to get everything to fit properly. Shouldn't be too big of a deal... unless there's something else it will effect too.
Also picked up a bunch of brushes and rollers, a gallon of flat black outdoor latex paint, a gallon of bondo, and a few other odds-n-ends... spreaders and whatnot.
This thing's coming right along.
Looking great, Seth! And you can't really see much warp. Keep em coming.
Re: What's to chat about?
Posted: Sat Mar 07, 2020 2:48 pm
by Seth
Yeah, panel 3 shows a little, but overall... not too shabby.
Thanks Bryan
Re: What's to chat about?
Posted: Sun Mar 08, 2020 1:23 pm
by Seth
SethRocksYou wrote: ↑Thu Mar 05, 2020 12:39 am
The T39 plans don't mention it, but the sketchup shows what looks like 1/4" or 1/2" ply backing behind a couple holes drilled in the outer panel.
I just wanted to acknowledge that I was mistaken, the T39 plans DO mention the method to recess SpeakOn's. I was wrong. Looked for it and didn't see it. But there it is, plain as day, on page 18... "To make a recessed jack mount drill a 1½” diameter hole through the panel, backing the hole with a piece of ¼” plywood"
Re: What's to chat about?
Posted: Sun Mar 08, 2020 2:17 pm
by Bryan Cox
SethRocksYou wrote: ↑Sun Mar 08, 2020 1:23 pm
SethRocksYou wrote: ↑Thu Mar 05, 2020 12:39 am
The T39 plans don't mention it, but the sketchup shows what looks like 1/4" or 1/2" ply backing behind a couple holes drilled in the outer panel.
I just wanted to acknowledge that I was mistaken, the T39 plans DO mention the method to recess SpeakOn's. I was wrong. Looked for it and didn't see it. But there it is, plain as day, on page 18... "To make a recessed jack mount drill a 1½” diameter hole through the panel, backing the hole with a piece of ¼” plywood"
Yep. Figured you'd see it during the course of the build. I only recessed mine because I like the look. Sure, it provides more protection but I'm not overly concerned with it.
Re: What's to chat about?
Posted: Sun Mar 08, 2020 10:13 pm
by Seth
I think I'm at a stand still for a week or so. I got the access panel flange assembled and the next step is panel 8. I think I'm gonna wait for the SpeakOn's and connector dish to arrive before I move forward with putting the back on. Just to keep access to wiring and all that open and easy to do.
I decided that I'm going to do the dish on the back (thanks Bruce), 2 circular surface mount connectors in the mouth (thanks Grant), and one or two recessed square flange connector on the top/panel 1 (thanks Bill and Bryan). I'm also going to put a top hat style pole socket in panel one. In it's intended practice/rehearsal space use, this will allow clean wire placement along the wall, connect in the mouth with the T39 corner loaded, pole mount a shorty 2x6 SLAP, and easy access to just connect the SLAP with a short jumper. That's the thought anyway.
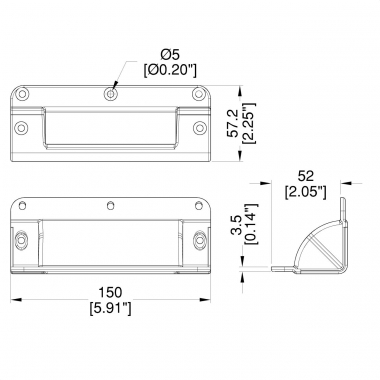
I'm choosing to put the wheels on the bottom with a standard, by the plans, hand hold with quarter round between the wheels. Then put a manufactured handle in the top. I ordered a smaller version of the handle Bryan used from speakerhardware.com,
https://www.speakerhardware.com/small-r ... handle.php
Looking at the dimensions, I'm hoping I can sneak it behind panel 9. If not, I'll shim the handle up/out until it fits.
I've got a spool of 12/4 speaker wire on the way too, along with a bunch of Neutrik NL4FX connectors. Thinking I'll wire from the back (panel 8 ), drill and pass through panel 5, down around the elbow to the mouth connector location in panel 6, then through panel 4 into the rear speaker chamber. I'm open to other options if you guys can think of a wiring route that has some advantage I'm not seeing.
Maybe I'll work on the access cover and mouth braces tomorrow. Just to satisfy my commitment of doing something every day. Tuesday I'm headed out of town for a week.
Re: What's to chat about?
Posted: Sun Mar 08, 2020 10:21 pm
by Seth
Question:
In drilling the 1½" holes for the hand hold and recessed connectors, would you use a spade bit or a Forstner bit?
Re: What's to chat about?
Posted: Mon Mar 09, 2020 3:05 am
by Grant Bunter
I often find spade bits work best if you can use them on both sides of the material.
They tend to chip out a fair bit if used from one side only.
If no, use the forstner bit I reckon...
Re: What's to chat about?
Posted: Mon Mar 09, 2020 6:28 am
by Bryan Cox
SethRocksYou wrote: ↑Sun Mar 08, 2020 10:21 pm
Question:
In drilling the 1½" holes for the hand hold and recessed connectors, would you use a spade bit or a Forstner bit?
What Grant said. I usually use the spade bit because the pilot is a bit longer than on a forstner. As soon as the pilot pokes through the last ply I flip it over and go from the other side. If you can't access both sides then there will be tear out. To minimize it, try not to push so hard thought the final ply. There'll still be tear out but maybe not as bad.
Re: What's to chat about?
Posted: Mon Mar 09, 2020 8:05 am
by himhimself
Definitely better if you can drill from both sides. If not, but you can get a piece of scrap behind the drill location, screw from the front so it's pulled tight on the back side and then drill and it will help minimize the tearout as the spade comes out. Remove the screws and scrap and fill the holes when done.
As for wiring, I just routed independently from each of the 4 jacks into the driver chamber and connected to posts, then from there to the driver. I didn't do the 4 connector speakons, but you could do the same thing, just connecting the wires for the tops to separate posts so they are all tied together. There's a pic on my build thread, not copying in here for some reason...
Finally took the took the time to open my t30s back up and connect all 4 speakons. Used a couple hanger bolts with wing nuts to connect the leads along with another short lead going to the driver. Now I can mix and match between between any of the cabinet inputs depending upon how and where I set them up. Should of done this ages ago. Oh well, better late than never.
Attachments 60199D86-AB65-4983-986E-6A210146408C.jpeg60199D86-AB65-4983-986E-6A210146408C.jpeg (23.5 KiB) Viewed 51 times