Since the angles are all less than 10 degrees, you CAN get away with all right angles, and the PL (especiall since you caulk afterwards) will do the rest. A tip: while PL is still wet, denatured alcohol will take it off your hands.
If you plan on making this sub look pretty, use regular wood glue for all the outer panels and caulk the inner pat of the joints with PL. When you attach the other big side, I used PL to avoid any leaks, but follow bgavin's advice and resist the temptation to wipe it while wet. It scrapes (or routers with a flush-cutting bit) right off when dry.
Remember to clamp your panels straight before gluing up (like you used the MDF). Really badly warped panels can be unwarped by spritzing water on the concave side and placing the convex side sun-up on the ground for a little while. Check it often, you can overshoot, and use it right away.. I only do this for really warped stuff...
JSS
Re: myn's Tuba HT Build Thread
Posted: Mon Jun 15, 2009 10:20 am
by bgavin
It is worth the effort to screw a straight 2x4 to the panel if it is warped.
I did not do that on my first T30, and the warp is cumulative. It required a lot of horsing to get it square.
Re: myn's Tuba HT Build Thread
Posted: Mon Jun 15, 2009 10:23 am
by myn
bgavin wrote:It is worth the effort to screw a straight 2x4 to the panel if it is warped.
I did not do that on my first T30, and the warp is cumulative. It required a lot of horsing to get it square.
What should I do instead? Just install the panel as is or ditch it completely?
Re: myn's Tuba HT Build Thread
Posted: Mon Jun 15, 2009 10:23 am
by bgavin
If you can make it fit, it is good.
Clamp or screw into place until the PL cures.
Re: myn's Tuba HT Build Thread
Posted: Tue Jun 16, 2009 9:16 pm
by myn
[== 6/16/2009 ==]
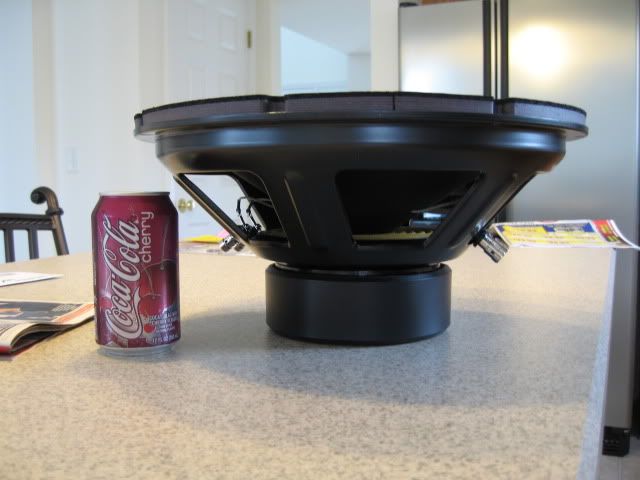
So today the Dayton DVC 15 arrived along with some speaker gasket tape which will be used for the access panel and a terminal cup for the speaker leads.
The driver is alot bigger than I expected. The pictures I've seen don't give it justice. Not as large as my Mach5Audio 18, but pretty hefty none the less. Good bang for the buck I think
Parts Express does an excellent job packing the driver. The driver itself was situated in a box surrounded by self adapting foam.
Despite all of this good packing, I think the driver is defective . I've learned from past projects to always test the individual drivers free-air with a few watts to ensure everything works as it should.
Sporadically a crackling/popping noise is heard. It sounds like something tiny is bouncing off the dust cap. Perhaps from behind? It will go away but comes back randomly. I tipped it upside down thinking it would delodge itself but unfortunately that didn't remedy the issue. Interestingly enough its very very random. It will go away for awhile and then come back.
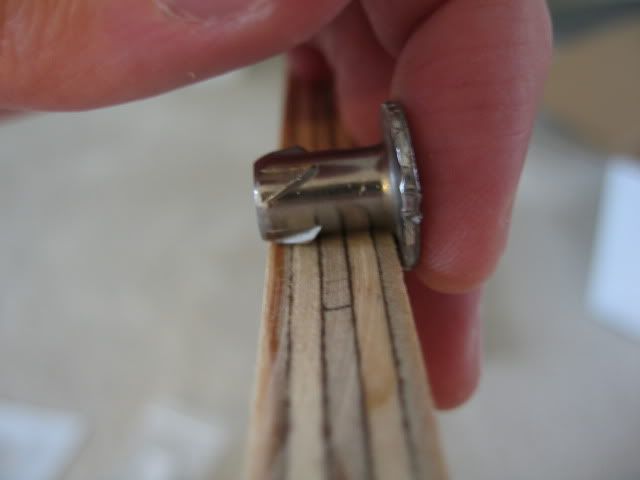
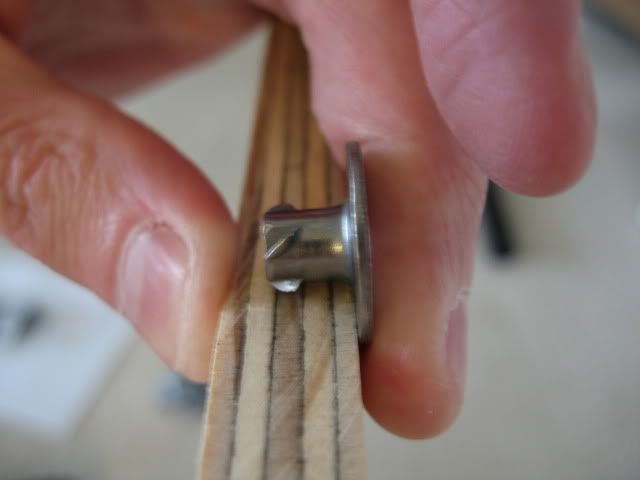
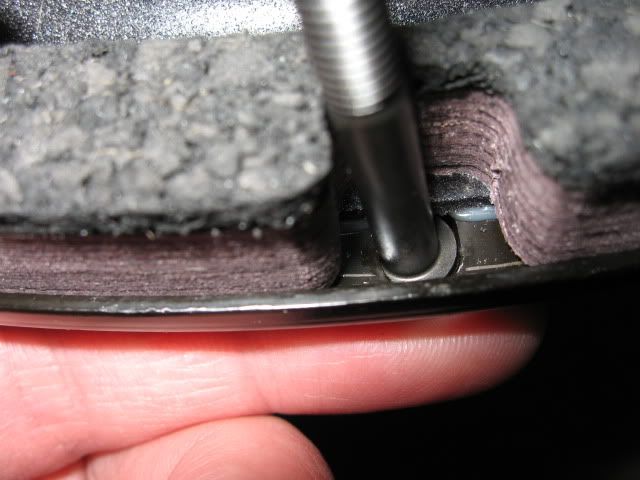
I also have a little contention here regarding the choice of socket cap bolts and hurricane nuts.
* The 1/4-20's fit better but the 1/4-20 hurricane nuts are longer (a tiny bit longer than the width of the 1/2" ply)
* The 10-32's are very loose with the head of the socket cap almost looking like it could slip through given enough force but the 10-32 hurricane nuts are shorter but the base is wider.
thoughts?
(10-32 on the left, 1/4-20 on the right)
1/4-20 hurricane nut profile in 1/2" Arauco ply
10-32 hurricane nut profile in 1/2" Arauco ply
1/4-20 socket cap (note nice fit)
10-32 socket cap (note loose fit)
10-32 hurricane nut top profile to give perspective of how wide it is and clearance needed
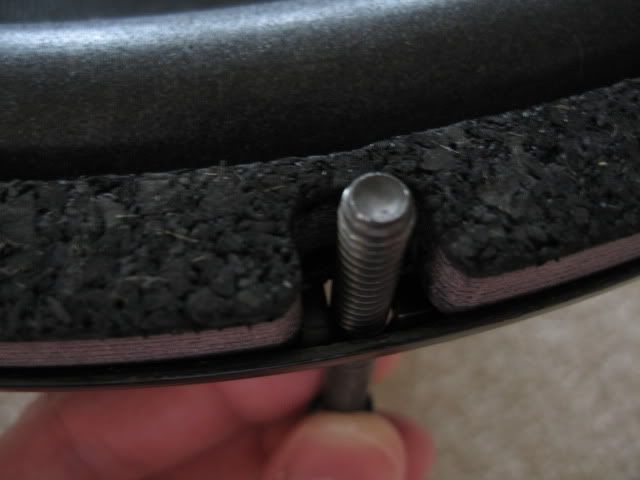
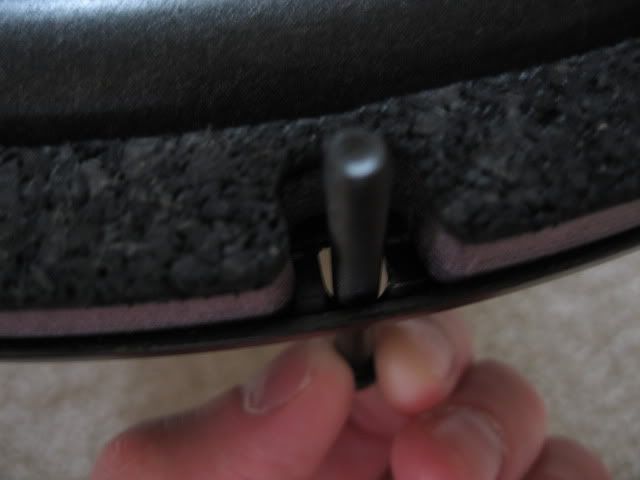
Also, incase anyone ever had doubts that this wasn't made in the same factory as the Adire Audio Tempest, Here is some pretty good proof: "Made In USA By Eminence" sticker on the backside of the frame:
Nice Gasket raised 3/4" from base of frame allowing XMAX and a nice seal rear mounted to speaker baffle:
Dayton DVC 15 Profile:
Here is a similar pic of my Mach5Audio IXL18 in my LLT (Unfortunately Bill doesn't allow images greater than 700px) so I can't inline "
Re: myn's Tuba HT Build Thread
Posted: Wed Jun 17, 2009 4:11 am
by chrapladm
well I just figured out what a LLT Anyway that 15 does look massive and it makes your LLT seem even larger than I originally thought.
I wish I could help you on your noise issues but there are others on here that are alot smarter than me so I am sure they will respond soon.
Re: myn's Tuba HT Build Thread
Posted: Wed Jun 17, 2009 6:24 am
by LelandCrooks
#10 washer, (technically a #10 rivet burr), #10 internal lockwasher and you'll be fine. The 1/4's will work fine also. The new gasket from Eminence does not compress fully, allowing some room for the excess nut. Your placement will have to be spot on so it does not hit the frame. That's why the 1/4's are only with the clamp mounts in my kits. Lessons learned the hard way.
Look for the leads to the coil slapping the cone. Try a slow sweep within the passband.
Re: myn's Tuba HT Build Thread
Posted: Wed Jun 17, 2009 9:29 am
by bgavin
A slightly smaller bolt diameter isn't a worry, because it allows for small errors in hole placement.
A 10-32 bolt will pull a pickup truck, so I doubt it will have problem holding down a 15" driver.
Re: myn's Tuba HT Build Thread
Posted: Wed Jun 17, 2009 10:14 am
by myn
LelandCrooks wrote:#10 washer, (technically a #10 rivet burr), #10 internal lockwasher and you'll be fine. The 1/4's will work fine also. The new gasket from Eminence does not compress fully, allowing some room for the excess nut. Your placement will have to be spot on so it does not hit the frame. That's why the 1/4's are only with the clamp mounts in my kits. Lessons learned the hard way.
Look for the leads to the coil slapping the cone. Try a slow sweep within the passband.
I checked for tinsel lead slap. I don't believe that's the issue in this case.
Regarding the usage of a #10 washer, as I understand it would be placed in between the bolt head and Subwoofer frame?
[== 6/17/2009 ==]
Parts Express rocks. They sent me a return shipping label today so I can return the driver without incuring shipping charges and sending me another one.
I did some measuring today..
The PE website recommends a cutout size of 13 7/8 which from my measurements appears to be spot on for a front mount. In my case I'm doing a rear mount. The plans call to make the cutout an 1/8" smaller. I'm tempted to go down 2/8" instead of 1/8 (13 5/8" cutout) just so I have ample spacing for the 10-32 hurricane nuts. My fear is the surround will be obstructed as the cutout may be a tad bit small.
I don't plan on doing a 45 degree angle cutout as I'm going to be using my router and a straight bit. I've seen some posts for other Tubas to measure from the middle of the surround which makes sense for accordion style surrounds with less than the XMAX of this DVC. Is my assumption correct?
If anyone has done a DVC 15" in a THT, what size cutout did you use?
The above drawing shows how you can make a smaller cutout and still be safe from damaging the surround.
Re: myn's Tuba HT Build Thread
Posted: Wed Jun 17, 2009 10:13 pm
by myn
Since it will be a few days before the new replacement driver from Parts Express arrives, I used the defective one and traced an outline and marked the location of the holes on the baffle panel.
Based on my measurements, it appears there shouldn't be any issue using the 10-32 hurricane nuts. I placed the 10-32 hurricane nuts directly ontop of the hole markings and measured the distance between them. It looks like I've got a clean 14". So the PE recommended 13 7/8" cutout would easily work.
Re: myn's Tuba HT Build Thread
Posted: Tue Jun 23, 2009 9:35 pm
by myn
[== 6/23/3009 ==]
So my exchanged 15" DVC came in today. Tried it out. No crackle/pop noises! Parts Express did a great job with the driver exchange.
Onwards to cutting out the driver cutout. I ran into some bad luck tonight. I took my Skill 1825 router out of storage which was working awsome last year for my LLT project and did a test run on some spare OSB I had hanging around to ensure I had a perfect 13 6/8 diameter (1/8th smaller than cutout) [6 7/8 radius]. That went very well and I proceeded to the real panel (3) that I had already trimmed. In any case, I was 2/3 done when the router quit .
I'm now left with 2/3 of a cutout. My next steps are:
a) Proceed finishing off the cutout with my jigsaw freehand which isn't going to be NEAR as accurate as the router
b) Wait for a replacement router as it's still under warranty and finish the hole which will delay the rest of the construction.
Testing driver cutout diameter is perfect on a piece of OSB:
2/3 done routing and the router quits:
Re: myn's Tuba HT Build Thread
Posted: Wed Jun 24, 2009 11:23 am
by maxmercy
I vote for waiting for the router, I do not like to use different tools for the same job...