Page 3 of 5
Re: New THT build in Wisconsin
Posted: Thu Aug 28, 2014 4:22 pm
by 67baja
Don't think that we aren't watching. I suspect most board members are watching but don't have anything new to add to the replies you have already received. I.e. looks good, great build, etc. It's fun for us to watch silently as a new sub is being born.
New THT build in Wisconsin
Posted: Thu Aug 28, 2014 8:53 pm
by howiez
^^Thanks, good to know then i'm not seriously screwing up!
HOLY smoke this thing is big Bill, there should be a disclaimer, LOL. I had no idea until I stood this baby up. Seriously, before I started I got out a ruler and thought long and hard, 36x36 isn't THAT big. And 24" wide will just tuck right in a corner right? I think I'm gonna have to really make a nice end table, the WAF is gonna be tough.
New THT build in Wisconsin
Posted: Thu Aug 28, 2014 9:05 pm
by howiez
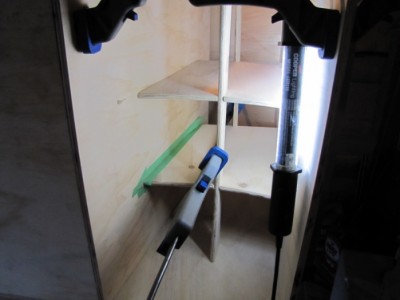
I started to glue the mouth ribs and brace in. I should have taken a picture or two sooner. I was wrestling with how to keep the PL at bay so I can stain this baby and make it look halfway decent. I marked lightly, then masked off around where it would glue. After the glue expanded a bit, I just peeled the tape out. It came surprisingly clear, other than one booger you can see where I smeared on the way in. Horizontal brace was pre-glued, I just have a clamp in to hold the jig / spacer on the back side until the PL cures.

A little closer in so you can see the bottom one left to peel. The top one came pretty clean. The trick seems to be to pull the tape on the face the glue touches first. Then the tape on the sides of each piece just keeps that off as you clear it. Then those around the ribs peel last with relative ease. I'm not happy with the rounded edges. I thought it would look nice, but there was no easy way to transition the ribs to the horizontal brace. I wanted to leave a square bit and hand sand, but I got carried away with my router. Maybe THT#2
Re: New THT build in Wisconsin
Posted: Thu Aug 28, 2014 11:28 pm
by caddylackn
Don't worry too much about the braces. I spent way too much time making mine pretty, but you will never see the finished braces when the speaker is placed in the room as the opening will either be facing a wall or a corner.
You should spend the extra time on finishing the opposite side and the top, as those are the sides that stand out and you will see in the room.
Re: New THT build in Wisconsin
Posted: Fri Aug 29, 2014 8:35 am
by whines
caddylackn wrote:Don't worry too much about the braces. I spent way too much time making mine pretty, but you will never see the finished braces when the speaker is placed in the room as the opening will either be facing a wall or a corner.
+1, I painted stuff on the front of my T39's that I only ever get to see when I move them.

Re: New THT build in Wisconsin
Posted: Fri Aug 29, 2014 2:30 pm
by tvan
>>
>> I'm not happy with the rounded edges. I thought it would look nice, but there was no easy way to transition the ribs to the horizontal brace. I wanted to leave a square bit and hand sand, but I got carried away with my router.
>>
Yes, no one will ever see it.......but you'll know it's there....
A couple of dabs of Bondo, shape with a square file, touch up with a sanding block/stick.....like it never happened.
Looks great. If this is your only "oops", then you are golden.
New THT build in Wisconsin
Posted: Sat Aug 30, 2014 10:28 am
by howiez
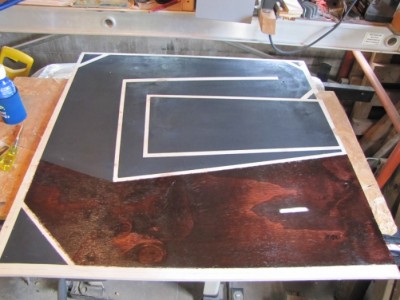
Down to the last panel. I temporarily clamped Side two on, carefully traced everything I could reach in the mouth and around the outside. Then I reached through the access panel and traced inside. So I was able to lay out every panel except 7, 8 and the corner braces (3/10/12) up top. I got a smidgen of 7, but could barely reach around the corner. I double checked it with a T-bevel and threw a straight edge on that to get direction, and transferred the length. Then I offset everything ~1/2" allowing for a little slop and transferred the angle from 7 to 8 with a t-bevel. Then we measured and transferred that angle from 7 to 8 and 8's length. That layout I made over 1/2" wide to account for error. The panels turned out pretty straight but I wanted enough bare wood for the PL. All the corner braces were just measured and transferred, being a little generous. Lastly we masked her off with 5/8" masking tape. I trimmed some where I knew I was very close to 15/32, others I left proud to give the PL some room. A little MinWax Bombay Red Mahogany #225 and 3 coats of water based MinWax poly lightly sanded. I didn't want to put too much time in as it sounds like we'll never see it! Anyway it was good practice to see how my red would come out.

New THT build in Wisconsin
Posted: Sat Aug 30, 2014 10:40 am
by howiez
I slapped some stain on the other half, in the mouth as well. What a messy job reaching around all that stuff, I'll have stained arms for weeks. It turned out really dark, I think we'll paint her all flat black next time! As I was laying out the lines for side 2 to mask and paint, I noticed a bit of warp in panel 9, the top. I don't remember it being there before, so I don't know if the humidity, and my clamping caved it in a bit. You can barely see in the top of the picture but I tried to repair the warp. I've wet it down a bit, and clamped a cedar 4x4 across it to pull it up a little. I put a block on each end and clamped as close to the ends as I could. Then I spaced a couple clamps in the middle and pulled it up a bit. I tried to force it a bit high, as I can clamp it back in at final glue, or it will relax anyway.
Re: New THT build in Wisconsin
Posted: Sat Aug 30, 2014 5:18 pm
by caddylackn
howiez wrote:I slapped some stain on the other half, in the mouth as well. What a messy job reaching around all that stuff, I'll have stained arms for weeks.
An old painters trick to get off oil based paint and oil based stains from your skin is to use vegetable oil first, lather up well, then liquid dish soap (with no water), lather up well again with the soap until the stain is lifted, then rinse in hot water. Don't add any water at all until the soap is well mixed in and you can see the stain is lifted off your skin. If it is not, use more vegetable oil. This also works great for greasy oily hands from working on a car. If you spend the time with the vegetable oil, you can even work out the stain from under your finger nails. This trick won't work at all if you get your hands wet with water first. Once you have already washed your hands with soap and water the vegetable oil trick no longer works.
The vegetable oil works, since it is a lot lighter oil it acts as a solvent and lifts the stain up out of the skin, then the liquid dish soap cuts it further and out of your skin and makes it so you can rinse it off. Best part when you are done, your hands are as smooth as a baby's bottom. This works much better than paint thinner with no fumes.
Re: New THT build in Wisconsin
Posted: Sat Aug 30, 2014 6:38 pm
by whines
Really pretty color! I think it will look more like furniture and less like theatrical equipment this way instead of flat black.
New THT build in Wisconsin
Posted: Mon Sep 01, 2014 7:59 pm
by howiez
This is what caddylackn alluded to, I think my side 1 has a little warp to it yet. All glued up though and it seems to look ok in real life
New THT build in Wisconsin
Posted: Wed Sep 03, 2014 6:55 pm
by howiez
A view into the mouth, very dark, shoulda gone black or used stain pre-treat for this soft pine.
I also need to use my flush cut bit on side 2, still have some overhang as you can see.
A view of my installed test driver
New THT build in Wisconsin
Posted: Wed Sep 03, 2014 7:18 pm
by howiez
Have my access cover stained and 3 coats of water based poly, it didn't turn out too bad. My refurb BASH300S has white latex caulk where some tool sealed it and got sloppy. I had to clean the factory gasket off, it was trashed. I poly'd the cover right away and sealed the amp with some black RTV, I don't plan on taking it out anytime soon. Going to test for leaks, listen a bit, then convince myself to take it back to the garage for stain. Then I can clean the rest of that white latex off the amp hopefully.
Cell takes awful pictures, I have to steal my wife's Canon again.
Re: New THT build in Wisconsin
Posted: Wed Sep 03, 2014 11:43 pm
by Radian
howiez wrote:Going to test for leaks, listen a bit, then convince myself to take it back to the garage for stain.
One could argue that's the hardest part.

Best regards on the finishing work. Fix'n to look as good as it'll sound!

Re: New THT build in Wisconsin
Posted: Sun Sep 07, 2014 2:38 am
by MissileCrisis
howiez wrote:Made a crude jig for my RotoZip since I can't seem to find one of those router hole cutting templates.

It works, not as clean / square as a router, but not bad, only 1/8" kerf if you can call it that.

I built my own router jig thingamabob. take a oval shaped piece with a circle end the size of the base of your router out of 1/4 or 1/8th solid wood, cut the other side down to a funnel like shape. drill Measure radius you want to cut + bit radius, drill a hole in said piece of wood that far from your cutter, test on scrap, rinse repeat until you have "the one" I've done this for all my circle cuts after I jig saw'ed the T39 circles, yes it worked but it was extremely stressful as it was my first ever woodworking project much less sub build. Key circle sizes I tend to use are 11 3/4 and 9 and something for 12 and 10 inch subs respectively.

