(My) First TRT
-
LelandCrooks

- Posts: 7242
- Joined: Thu May 04, 2006 9:36 am
- Location: Midwest/Kansas/Speaker Nirvana
- Contact:
Re: (My) First TRT
The dust collector. Genius. I am so stealing that.
If it's too loud, you're even older than me! Like me.
http://www.speakerhardware.com
http://www.speakerhardware.com

Re: (My) First TRT
Welcome. I guess your favorite laundry softener will do as good…LelandCrooks wrote:The dust collector. Genius. I am so stealing that.
So the TRT got carpeted today. Here are some pictures of the process:


Speakon jack installed:

The inside wire was supported so that it will not touch a panel and add a rattle:

Then the driver was fitted with the back seal, connected the wires and the driver was bolted on:

And the TRT was ready for some initial testing:

I played some tracks from CDs I had in my car and in spite the large space (compared to the intended small car cabin) it sounded really good.
I had a LPF set to around 70 – 80Hz and the low end was clear and defined. Donald Fagen's Morph the Cat actually made some loose things in the workshop rattle!...
Authorized Builder
- 6 DR290
- Omni10.5
- AT, TAT
- Tuba 48
- 2 WH10
- Truck Tuba
http://www.boniton.co.il
http://www.bt-12.com Balanced Tilting Sounds Better...
- 6 DR290
- Omni10.5
- AT, TAT
- Tuba 48
- 2 WH10
- Truck Tuba
http://www.boniton.co.il
http://www.bt-12.com Balanced Tilting Sounds Better...
-
Drey Chennells

- Posts: 1377
- Joined: Sun May 17, 2009 10:12 pm
- Location: Central FL ~Authorized Builder
- Contact:
Re: (My) First TRT
Beautiful work and build thread as usual Nimrod 
"Things happen, but music stays in your blood forever~." bf
InfraCoustik
Consulting/Design/Fabrication
Authorized BF Builder
http://www.infracoustik.com/
info@infracoustik.com
InfraCoustik
Consulting/Design/Fabrication
Authorized BF Builder
http://www.infracoustik.com/
info@infracoustik.com

Re: (My) First TRT
+1
Got any tips for forming the carpet over the rounded corners? It looks great!
Got any tips for forming the carpet over the rounded corners? It looks great!
Good food, good people, good times.
4 - AT
1 - TT
1 - THT Slim
2 - SLA Pro 4x6 Alphalite
1 - T18
4 - AT
1 - TT
1 - THT Slim
2 - SLA Pro 4x6 Alphalite
1 - T18
Re: (My) First TRT
Looks Good! Great techniques!
-
bassmonster
- Posts: 1384
- Joined: Wed Jul 13, 2011 9:23 am
Re: (My) First TRT
Looks great, can't wait to see it installed in the car. Precision work as usual. 

Re: (My) First TRT
That is some serious carpet work. The whole thing looks awesome!
================
Built:
1 - 16” TAT; 1 - 24” T24, BP-102
2 - DR200s, melded array
2 - 24" T45s, Lab12
2 - SLA Pros, 4/4
(My HT)
1-T18; 2-TLAH 9/12(standing); 1-Curved SLA 6/6; 2-SLA 4/0; 2–SLA 2/0;
For Work
1-T18; 2-SLA 4/6
Built:
1 - 16” TAT; 1 - 24” T24, BP-102
2 - DR200s, melded array
2 - 24" T45s, Lab12
2 - SLA Pros, 4/4
(My HT)
1-T18; 2-TLAH 9/12(standing); 1-Curved SLA 6/6; 2-SLA 4/0; 2–SLA 2/0;
For Work
1-T18; 2-SLA 4/6
Re: (My) First TRT
Thanks 
Today I finished the spacers and made a short 'road' test…
(The to-be owner of the TRT was present, so thank him for the step by step pictures)
Copied the spacer outline on to a piece of cardboard and also marked the placement of the Velcro pieces:

Cut out the Velcro areas and folded the edges to form a template for spraying the contact glue:

Template ready:

Sprayed the glue on one side of the spacers and one set of Velcro pieces:

Spacers and Velcro stripes curing:

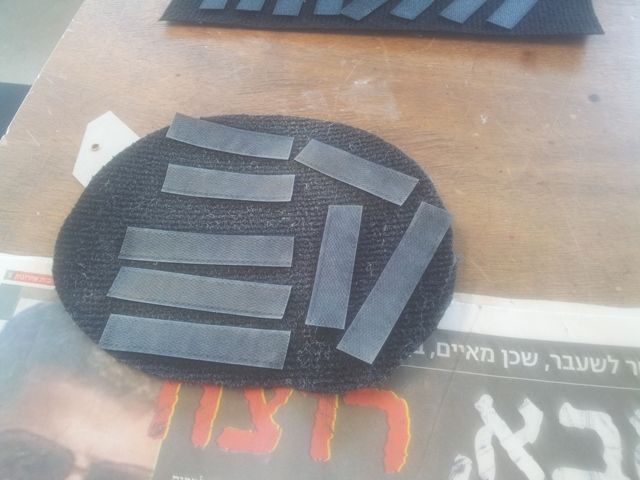
Attaching the Velcro stripes to the spacers:

Added a staple at the ends for safety:

Spacers ready (after above routine was applied also to the other side):

Then we did a first test of the TRT in the client's car.
The TRT is fitted with the spacers before laying down:

…and in its final position:

Note: the client was driving the last two weeks with an Auto Tuba in the car so that was our reference.
We first positioned the TRT with the spacers (driver facing down) and also tried it driver side up (straight on the floor)
We both agreed on the following observations:
First, in both positions the TRT sounded more tamed and defined than the AT!....
Second, the TRT sounded deeper, fuller (and nicer…) with the driver facing down. The difference was very obvious.
Hopefully this weekend we will complete the installation by adding a grill, tweeters to the system etc. and then properly calibrating the system.
A review will follow.

Today I finished the spacers and made a short 'road' test…
(The to-be owner of the TRT was present, so thank him for the step by step pictures)
Copied the spacer outline on to a piece of cardboard and also marked the placement of the Velcro pieces:
Cut out the Velcro areas and folded the edges to form a template for spraying the contact glue:
Template ready:
Sprayed the glue on one side of the spacers and one set of Velcro pieces:
Spacers and Velcro stripes curing:
Attaching the Velcro stripes to the spacers:
Added a staple at the ends for safety:
Spacers ready (after above routine was applied also to the other side):
Then we did a first test of the TRT in the client's car.
The TRT is fitted with the spacers before laying down:
…and in its final position:
Note: the client was driving the last two weeks with an Auto Tuba in the car so that was our reference.
We first positioned the TRT with the spacers (driver facing down) and also tried it driver side up (straight on the floor)
We both agreed on the following observations:
First, in both positions the TRT sounded more tamed and defined than the AT!....
Second, the TRT sounded deeper, fuller (and nicer…) with the driver facing down. The difference was very obvious.
Hopefully this weekend we will complete the installation by adding a grill, tweeters to the system etc. and then properly calibrating the system.
A review will follow.
Authorized Builder
- 6 DR290
- Omni10.5
- AT, TAT
- Tuba 48
- 2 WH10
- Truck Tuba
http://www.boniton.co.il
http://www.bt-12.com Balanced Tilting Sounds Better...
- 6 DR290
- Omni10.5
- AT, TAT
- Tuba 48
- 2 WH10
- Truck Tuba
http://www.boniton.co.il
http://www.bt-12.com Balanced Tilting Sounds Better...
Re: (My) First TRT
I'm a bit interested in hearing why he choose the TRT design over the AT in that space space. Seem to fit a AT very well and I think with the form factor the AT would be a winner there?
Re: (My) First TRT
The AT is 102 Liters, the TRT is 106 liters including the 50mm floor clearance (84 liters by itself) - both at minimum widths.osse wrote:I'm a bit interested in hearing why he choose the TRT design over the AT in that space space. Seem to fit a AT very well and I think with the form factor the AT would be a winner there?
So by simple comparison, the AT would indeed be the preferable choice over the in DDTRT (driver down TRT...)
But upon switching between both, it was very clear that the DDTRT, being shallow as it is, leaves much more practical space (especially on top of it) compared to the AT.
That was our initial intuition and it proved right.
Authorized Builder
- 6 DR290
- Omni10.5
- AT, TAT
- Tuba 48
- 2 WH10
- Truck Tuba
http://www.boniton.co.il
http://www.bt-12.com Balanced Tilting Sounds Better...
- 6 DR290
- Omni10.5
- AT, TAT
- Tuba 48
- 2 WH10
- Truck Tuba
http://www.boniton.co.il
http://www.bt-12.com Balanced Tilting Sounds Better...
Re: (My) First TRT
Well...I think I would skip braces if (when) I build one in the future. My braceless BB 12" is still going strong. with the narrower panels, no need for braces, no access panel, outward mounted driver and a thin profile as opposed to cubed (I'm looking at you 18" t18), I'm thinking this will definitely be my next cab.N.Webber wrote:Yes, definitely easy and straight forward with no braces and also no access panel...osse wrote:This build looks nice! Must be a relief to be able to skip bracing...
(The wider 10" version needs braces though)
Built:6 t39, t18, 4 Jack10, 2 autotuba, 2 SLA,2 wedge, 2 TT, 2 Tritrix, curved sla, 2 otop212, 2 SLA pros, Ported 8" sub, 2 ported 210, dual ported 8" sub