Jools4001 is in the UK, so I don't think they have a Lowes. Never the less, the idea is a good one.ncgrove wrote:Just go to Lowes or Home Depot and get a cheap plastic miter box/back saw combo. It has 90 degree and 45 degree guides, so you can cut the pizeo horns with no table saw.Jools4001 wrote: I'm also thinking ahead about how I'm going to manage a melded array using just a jigsaw
It's a bit of an arm workout, but you get to keep all of your fingers attached to your hands. I used a dremmel tool with a sanding drum bit to trim down the screws on the horn. If you alternate horn orientations, you might be able to skip that step.
Bottom line, don't sacrifice any fingers.
Second BFM Build: 2 x J12 Lites
Re: Second BFM Build: 2 x J12 Lites
TomS
Re: Second BFM Build: 2 x J12 Lites
Doh...there's another Homer moment right there!ncgrove wrote:Just go to Lowes or Home Depot and get a cheap plastic miter box/back saw combo. It has 90 degree and 45 degree guides, so you can cut the pizeo horns with no table saw.Jools4001 wrote: I'm also thinking ahead about how I'm going to manage a melded array using just a jigsaw
Why didn't I think of that before? I have the very tool sitting right at the back of my shed !!!! I bought it about 5 years ago and I had forgotten all about it...but I've just dug it out.
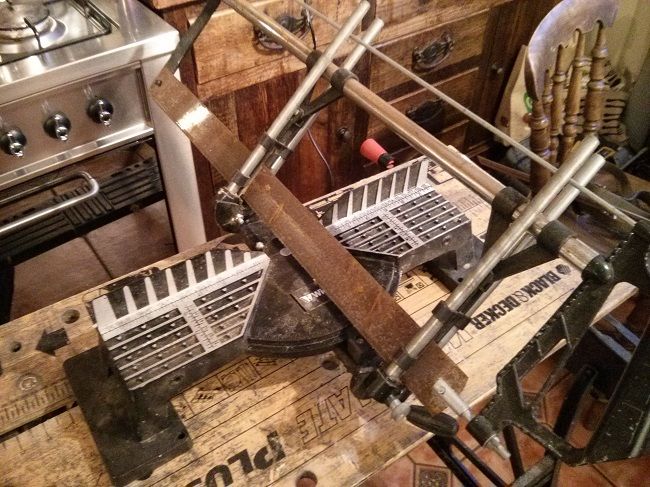
In actual fact it's more sophisticated than a simple mitre box, like a big hacksaw that runs in guides between the two upright posts. It cuts at up to 45 degrees in the orientation shown, which may be best with the piezo mouth downwards, or you can swing the blade to 45 degrees to the left or right and cut the piezo edgewise...and I'd imagine that it will easily cut the screw head as well. It hasn't seen any love in the last few years so it'll need a bit of lube and a clean, but I shouldn't imagine the piezos will care about a bit of rust on the blade.
Onwards and upwards, if I get a good week in next week I might even stand a chance of getting these done for next Saturday's gig...tonight's gig may be a bit ambitious
2 x 3012 HO Jack 12 Lites
2 x Delta Pro 8b Wedgehorn 8 Monitors
Subs? Big question mark!
2 x Delta Pro 8b Wedgehorn 8 Monitors
Subs? Big question mark!
Re: Second BFM Build: 2 x J12 Lites
The machine and blade should definitely be cleaned and lubed. Use steel wool on the blade to clean most of the oxidation off. If used uncleaned, expect a lot of binding and chipped out cuts. Cleaning and lubing shouldn't take more than 15 minutes or so. Well worth the time, IMHO.
I know money often seals the deal, but seriously, quality is an investment, not an expense... Grant Bunter
Accept the fact that airtight and well-braced are more important than pretty on the inside. Bill Fitzmaurice
Accept the fact that airtight and well-braced are more important than pretty on the inside. Bill Fitzmaurice
Re: Second BFM Build: 2 x J12 Lites
That saw looks like this model:
http://www.fleetfarm.com/detail/Empire- ... OgodiSwABw
Interesting tool, for thirty-five bucks.
http://www.fleetfarm.com/detail/Empire- ... OgodiSwABw
Interesting tool, for thirty-five bucks.
-
Grant Bunter
- Posts: 6912
- Joined: Mon Nov 28, 2011 11:12 am
- Location: Ilfracombe Queensland Australia
- Contact:
Re: Second BFM Build: 2 x J12 Lites
+1DJPhatman wrote:The machine and blade should definitely be cleaned and lubed. Use steel wool on the blade to clean most of the oxidation off. If used uncleaned, expect a lot of binding and chipped out cuts. Cleaning and lubing shouldn't take more than 15 minutes or so. Well worth the time, IMHO.
Looks like a very handy tool in the absence of a powered method of cutting the piezo's.
Save yourself some time and effort.
Put the blade in a container and cover with white vinegar for a few hours.
Rinse well with water then use the steel wool. You'll get a better cleanup
If you can find it, 0000 grade steel wool is best.
Then lightly oil...
Built:
DR 250: x 2 melded array, 2x CD horn, March 2012 plans.
T39's: 4 x 20" KL3010LF , 2 x 28" 3012LF.
WH8: x 6 with melded array wired series/parallel.
Bunter's Audio and Lighting "like"s would be most appreciated...
DR 250: x 2 melded array, 2x CD horn, March 2012 plans.
T39's: 4 x 20" KL3010LF , 2 x 28" 3012LF.
WH8: x 6 with melded array wired series/parallel.
Bunter's Audio and Lighting "like"s would be most appreciated...
Re: Second BFM Build: 2 x J12 Lites
Good tip Grant but, being notorious for taking the easy option, I have a couple of hours to kill in town tomorrow while my wife is in for a minor hospital appointment so I'll just nip into Wickes or B&Q (a couple of the UK's Lowes and Home Depot equivalents) and buy a new blade for the princely sum of £4.99. While I'm in there I'm going to have to keep a tight grip on my wallet in case I walk out with a table saw insteadGrant Bunter wrote: Save yourself some time and effort.
Put the blade in a container and cover with white vinegar for a few hours.
Rinse well with water then use the steel wool. You'll get a better cleanup
If you can find it, 0000 grade steel wool is best.
Then lightly oil...
Anyway, made some progress on the second cab today and it ended up leapfrogging the first.
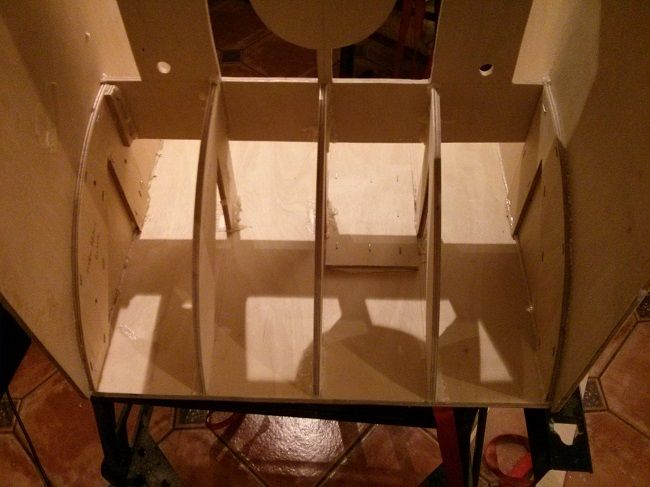
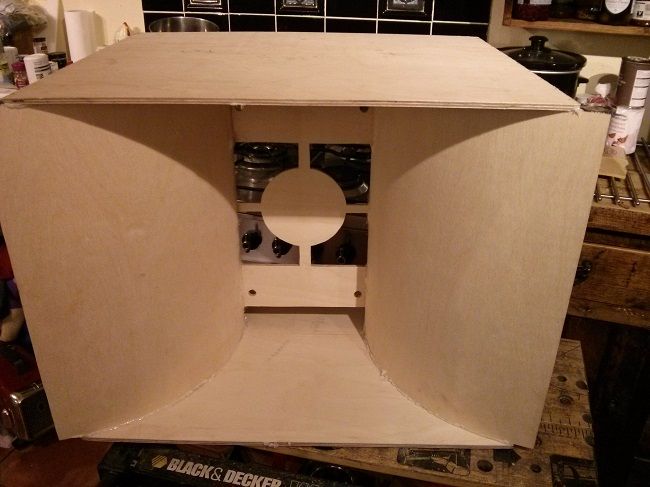
One of the things I was a bit peeved by, when I was scraping PL off the first cab, is that you're supposed to leave a 3mm gap between the horn braces and the side of the duct/baffle cut-out so that the 3mm horn sheath sits flush when you apply that. I squared the cabinet as detailed in the plans then fired brads through the top of the cab into the baffle (which already has PL applied), but at that stage you need 4 pairs of hands to hold the baffle snug, keep the cab square, hold the brad gun tight enough and get it aimed right...and the problem is that PL is slippery when wet...so it slipped by just over .5mm, so now I have about 3.6mm on one side and 2.4mm on the other. Not a huge problem to wrangle, and I will just do a bit of trimming and filling to fix it, but irritating nonetheless...especially when you've taken great care to cut the components accurately.
So I got to thinking that the PL slip sliding away was going to be a nightmare when installing the horn braces, because you have to keep the horn brace in position, in three dimensions, and keeping enough pressure on it with one hand while aiming the brad gun on the other side (brad guns are great, but you do need to make sure you keep a firm hand on them otherwise they recoil and don't drive the brad fully home). I suppose I could've made a horn brace holding jig but wanted a simple option....then I noticed there were a fair number of offcuts less than the size of a postage stamp lying in the pile of sweepings on the floor.
CLEATS!!! They're the answer...
So I simply stapled some cleats to one side of the lines I had already drawn out for the horn brace positions like so...
Then put the horn brace up against them, pressed another couple of cleats up snug on the other side and pulled the trigger.
So I'd now got a little housing joint either side of the horn brace to hold it in position..."Look mum...no hands"
There's no PL on the cleats since I simply planned to knock them away once they'd done their job...and they made installing the horn braces a piece of cake. As I installed each brace I simply ran a bead of PL along the front of the baffle plate in the appropriate position, then ran a bead of PL onto the bits of the horn brace that butt up to the side, slid the horn brace between the cleats and lined up the front of the brace with the angle on the front of the side panel, held the brace tight (no need to worry about positioning or slippage), lined the brad gun up with lines that I'd already made on the outside and pulled the trigger - finally, adjusted the horizontal and fired a couple of brads through from the rear of the baffle....done! Fitted all the horn braces, all nicely lined up, in about 15 minutes (once the prep had been done of course).
In the end, since the cleats naturally got PL squeeze out all over them I decided to leave them in there and just ran a bead of PL around the perimeter of each so that there's no chance of them coming loose and rattling in future...of course it will mean I'll have a pair of Jack 12 not-quite-as-Lite-as-they-could-have-beens, but the trade off in ease of construction was worth it..
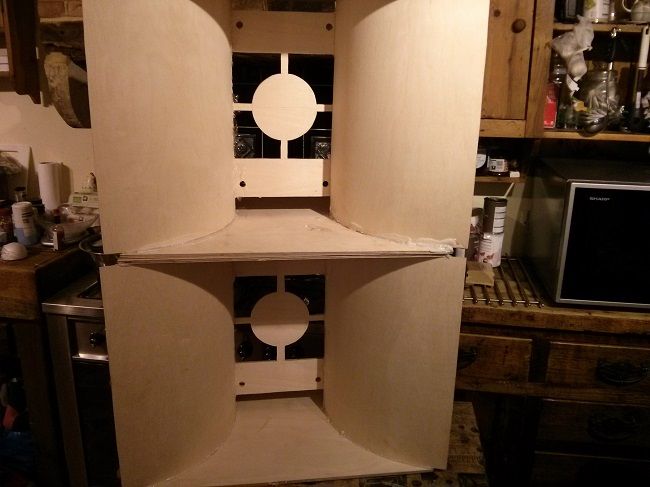
Next up is getting cab one to the same stage...won't be able to do anything on them then for a few days but at least that'll give all the PL time to cure properly before I have a go at bending the horn sheaths. I'm still wondering how I'm going to get my brad gun in tight enough to staple the sheaths to the top and bottom braces but I have a cunning plan involving some tie down straps, lots of polythene bags and a trained ferret...No, I made that last bit up...no animals were harmed in the making of these cabs, although I might have to go and chisel my Jack Russels off the PL on the kitchen floor.
Thinking onward, I have top hats but haven't committed to drilling holes for them yet because I can't think of a suitable way to back up the 1/4" ply to get a strong enough screw hold...Can't see it being possible to back up the ply internally because that would restrict the duct dimensions (which I'm sure are carefully worked out), and I really don't want to stick an ugly patch on the outside...mind you, haven't read that bit of the plans recently so I'd better check them again before I get an IITP!
2 x 3012 HO Jack 12 Lites
2 x Delta Pro 8b Wedgehorn 8 Monitors
Subs? Big question mark!
2 x Delta Pro 8b Wedgehorn 8 Monitors
Subs? Big question mark!
-
Charles Jenkinson

- Posts: 1127
- Joined: Sat Aug 06, 2011 3:25 pm
- Location: Manchester, UK
Re: Second BFM Build: 2 x J12 Lites
Good work Jools. 
I dont think the cross section area of the ducts is so sensitive, since putting a top hat in restricts them and that is permissible, in both top and bottom of cab, so another wee flange sized thickening piece is no bother. I put mine on the inside and constructed the ports and minor sheath support structur afterwards. The order of how things are done in rhat area i felt was important, so it goes together easier, and since there is a caveat for the top hat to be sealed in, effectively, at the important interface, the one with the bottom of the cab. I found it a bit of a head scratcher how to approach sealing of the top hat with the inner horizontal port shelf, especially when theres vent holes to the horn chambers, but, its probably not so critical there - it helps to install the top hat early on. Keep up the great work.
I dont think the cross section area of the ducts is so sensitive, since putting a top hat in restricts them and that is permissible, in both top and bottom of cab, so another wee flange sized thickening piece is no bother. I put mine on the inside and constructed the ports and minor sheath support structur afterwards. The order of how things are done in rhat area i felt was important, so it goes together easier, and since there is a caveat for the top hat to be sealed in, effectively, at the important interface, the one with the bottom of the cab. I found it a bit of a head scratcher how to approach sealing of the top hat with the inner horizontal port shelf, especially when theres vent holes to the horn chambers, but, its probably not so critical there - it helps to install the top hat early on. Keep up the great work.
2xJ12L (3012HO) switchable/melded
2xT30
Words&graphics - Audio&Acoustics - Hardware&DSP; 3 different paradigms.
2xT30
Words&graphics - Audio&Acoustics - Hardware&DSP; 3 different paradigms.
-
Chris_Allen

- Posts: 3358
- Joined: Wed Jul 11, 2007 2:43 pm
- Location: Huddersfield, UK
Re: Second BFM Build: 2 x J12 Lites
Jools, I have a spare couple of melded arrays I built for a Jack10 project that you can have for nothing, just PM your address. You could chop them up to make a bigger array, extend them or just look at them and through them away!
Built:
6xDR200, 2xT39, 2xT48, 2xJack110, 1xOmni10.5, 1xAutotuba, 1xT18, 1xSLA Pro, 1xW8, 1xW10
6xDR200, 2xT39, 2xT48, 2xJack110, 1xOmni10.5, 1xAutotuba, 1xT18, 1xSLA Pro, 1xW8, 1xW10
Re: Second BFM Build: 2 x J12 Lites
Charles: Thanks for that, the thought did occur to me that the duct area would have quite a bit of restriction if there were top hats in both ducts. On a reflex cab of course, the port size and tuning are critical, but I have no idea whether this carries over directly to horn loaded designs or even whether the duct is directly equivalent to a port....good job I didn't design them then 
I'll follow your lead on backing up the ply with a top hat sized patch...if I could get away with it I'd like to back up the thickness of the ply enough to allow me to route a disc on the outer surface and get the top hat mounted flush...but I won't push my luck.
Chris: What can I say, that's a very generous offer and typical of the sort of help, advice and support I've found on this forum. I'm probably not the most deserving recipient of your kindness, I already have a box of 50 Goldwood 1016 piezos that I ordered from Leland, and they're just waiting to get processed. I bought a new plastic/metal cutting blade for the mitre saw and tested it with a couple of 45 degree cuts on a pair of piezos, and it works just fine...except that the 'ruler' on the thing is only good for 90 degree cuts so placing the end of the piezo on the 3 3/8" mark resulted in cutting a 3 1/4" cut (so now I only have 48). I'll take you up on your offer, but I won't have them for nothing...name your charity and I'll donate £25 to it.
Incidentally, while we're giving stuff away, I ordered up an 8cm polystyrene ball for the phase plug from Amazon using 1-click. Slightly bigger than the 3" required but it can be cut down easily....got the confirmation email and realised I had ordered 25 of them I had thought of making another pair of Jacks for my bass, but at this rate I've got enough to make 50 cabs, so if anyone wants a load of balls they can rely on me!
I'll follow your lead on backing up the ply with a top hat sized patch...if I could get away with it I'd like to back up the thickness of the ply enough to allow me to route a disc on the outer surface and get the top hat mounted flush...but I won't push my luck.
Chris: What can I say, that's a very generous offer and typical of the sort of help, advice and support I've found on this forum. I'm probably not the most deserving recipient of your kindness, I already have a box of 50 Goldwood 1016 piezos that I ordered from Leland, and they're just waiting to get processed. I bought a new plastic/metal cutting blade for the mitre saw and tested it with a couple of 45 degree cuts on a pair of piezos, and it works just fine...except that the 'ruler' on the thing is only good for 90 degree cuts so placing the end of the piezo on the 3 3/8" mark resulted in cutting a 3 1/4" cut (so now I only have 48). I'll take you up on your offer, but I won't have them for nothing...name your charity and I'll donate £25 to it.
Incidentally, while we're giving stuff away, I ordered up an 8cm polystyrene ball for the phase plug from Amazon using 1-click. Slightly bigger than the 3" required but it can be cut down easily....got the confirmation email and realised I had ordered 25 of them
2 x 3012 HO Jack 12 Lites
2 x Delta Pro 8b Wedgehorn 8 Monitors
Subs? Big question mark!
2 x Delta Pro 8b Wedgehorn 8 Monitors
Subs? Big question mark!

Re: Second BFM Build: 2 x J12 Lites
Hi Jools,
I've been enjoying your build thread and you've had some good ideas to ease the build. I'm considering some Jack 10 lites myself and was planning to buy a box of 50 piezos from Leland, perhaps building some WH6s to make use of the rest. Do you mind me asking how much you ended up paying for them with VAT, duties, shipping all totalled up? I reckoned it was going to cost over £120 even for a box of unmatched ones, which made the ASD1001 compression drivers (which are available in the UK) much more economical.
Cheers,
John
Built: XF210
Building: None
Considering: Jack 10 Lites and Wedgehorn 6s
Building: None
Considering: Jack 10 Lites and Wedgehorn 6s
Re: Second BFM Build: 2 x J12 Lites
Thanks for the comments John...
To be honest, I can't remember how much the actual cost of 50 piezos from Leland was. I know they were $2 each but I can't recall how much shipping was (although it was quite pricey), or what the exchange rate was at the time. I also ordered all the crossover components at the same time and can't remember how much these contributed to the final bill. I also know that Her Majesty's Revenue and Customs fleeced me of another £30 before the package was released.
Having said that, when I built my W8 monitors I sourced all the components from UK suppliers. The piezos were a stupid price so you don't need too many of them before the price break. I also spent ages checking through web sites making sure that the crossover components were the right spec, the right values, the right tolerances etc...if I factored in my time it was getting silly. Far easier to put in an order with someone who's done all that for you.
2 x 3012 HO Jack 12 Lites
2 x Delta Pro 8b Wedgehorn 8 Monitors
Subs? Big question mark!
2 x Delta Pro 8b Wedgehorn 8 Monitors
Subs? Big question mark!
Re: Second BFM Build: 2 x J12 Lites
"How smug am I feeling today?"
"We don't know Jools, how smug are you feeling today?"
"As smug as an extra smug thing with extra smug sauce on the side, that's how smug"...this is why.
I had wondered how to get my staple gun in close enough to the top and bottom horn braces so that I could bend and fix the horn sheaths. I quickly concluded that I couldn't, so I would have to staple the sheath to the middle three braces and find another way of holding the edges down. I've used tie down straps for ages, mostly to hold my Ducati on it's trailer on the way to track days, but I've also used them for clamps when working on my bike, so I thought these would do the trick...and since I also have all of the BFM plans I'd seen them put to use on the DR200 etc..
So I was simply going to use the straps on the edges and staple the middle, but I did a dry run where just using the straps was so successful that I thought I would just go for it..as follows.
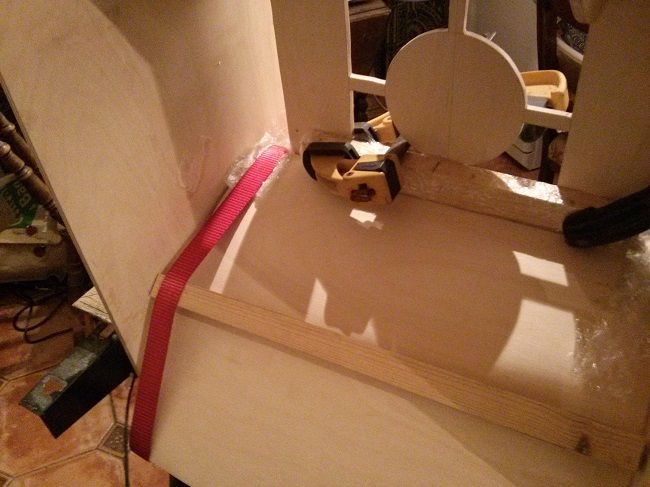
You take a horn sheath made from 1/8th inch ply, appropriately cut to size and with the bending axis properly oriented as per the plans.
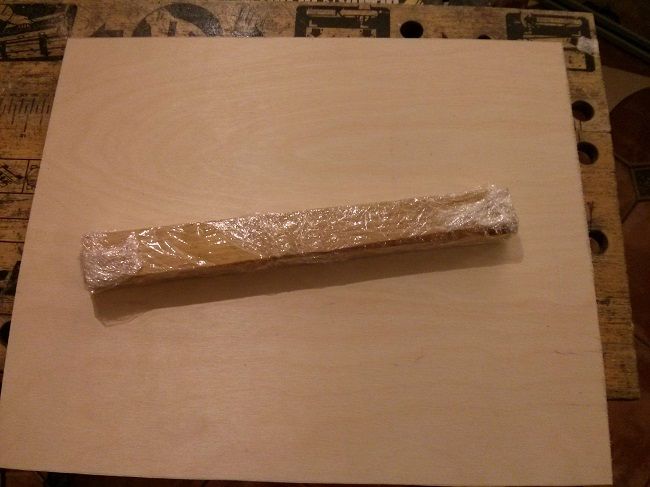
Then you add a jig. A jig is quite a grandiose term because it's nothing more than a short length of 1 1/2" x 1" stick wrapped in clingfilm.
Then you take a cab that you've prepared earlier and stick it on it's side on your workmate.
And slather the gluing surfaces with lots of PL
Then butt the horn sheath up to the baffle and clamp your fancy stick on top.
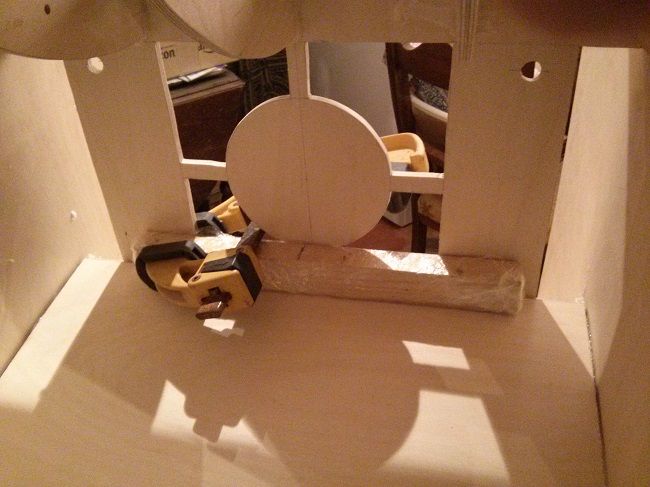
...and then clamp the other side (unless you're really retentive you don't need matching clamps )
So far, so good, and pretty much as per the plans...total time so far, about 5 minutes
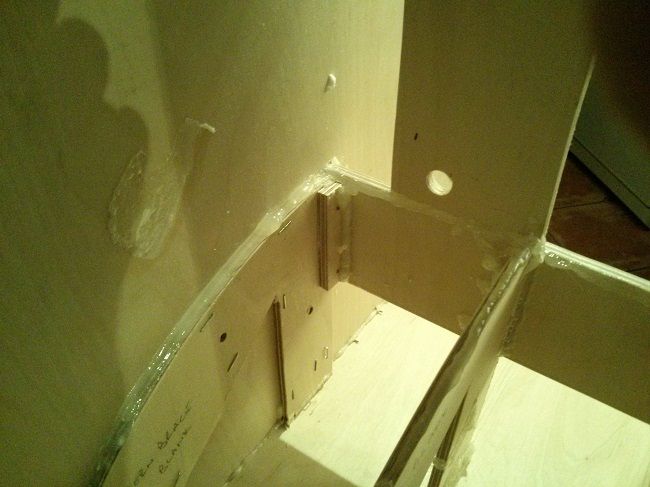
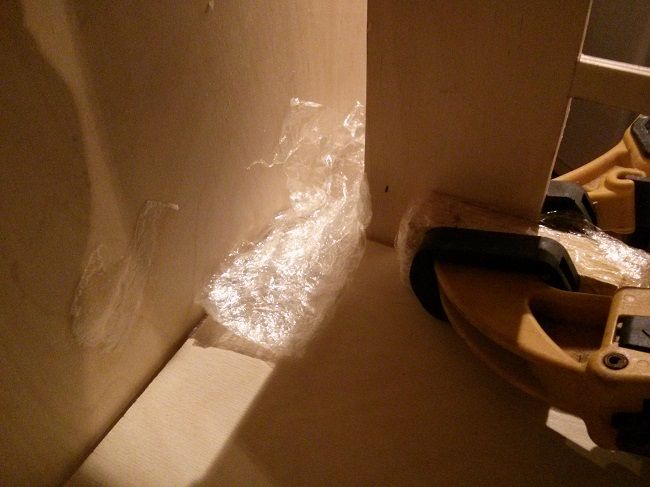
Then, fold over a bit of clingfilm so you have quite a few thicknesses, and lay it into the duct opening to stop PL getting all over your webbing straps
Then take another stick and lay it onto the horn sheath...this stick doesn't even need the sophistication of a clingfilm wrap, it's just a stick.
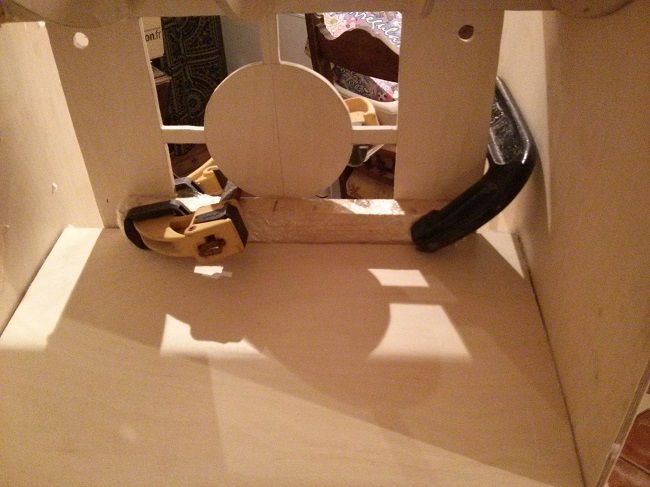
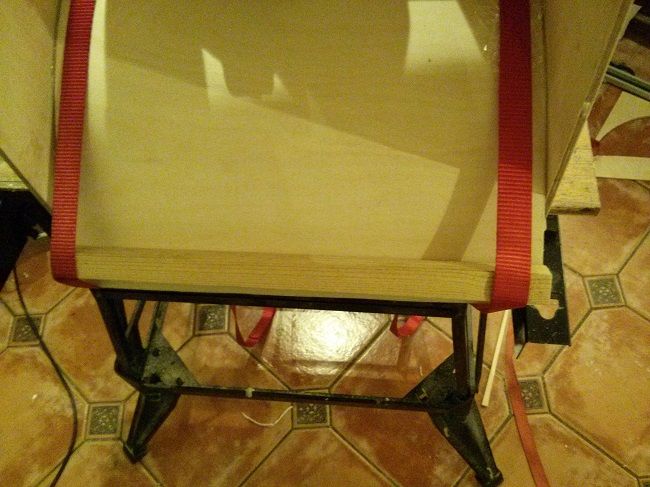
Now take a webbing strap, hook one end to the back of your workmate and then thread the other end through the duct, over the stick and hook that underneath your workmate.
You can see that even with the small amount of tension applied simply hooking the strap into place the horn sheath already seems to have realised it's destiny and bends quite easily with minimal pressure...repeat with a strap on the right hand side.
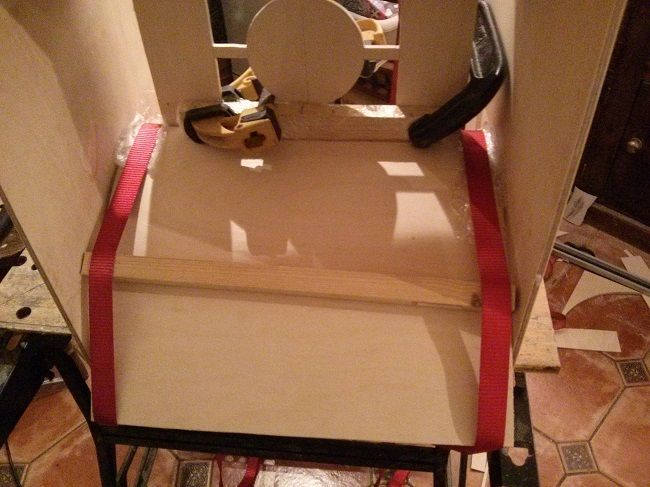
Once you have a bit of tension holding the stick down, you can pull it down to the edge of the sheath...then, just press the middle of the stick and take up the tension on the tie down straps....these aren't even ratchet straps, just ones with a buckle arrangement...
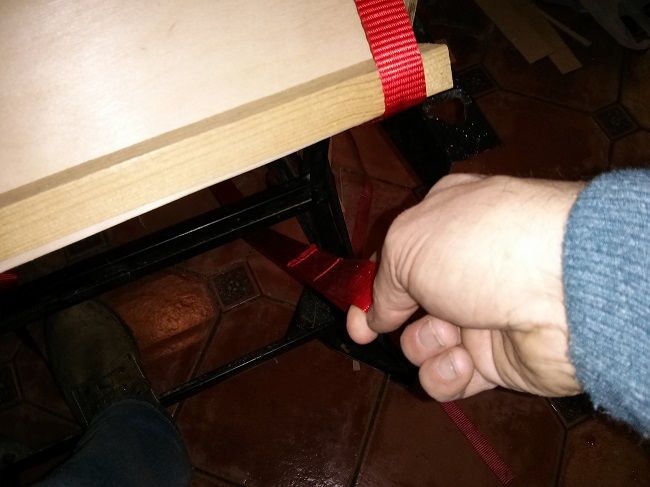
Then just give the straps a final tug until everything is pulled nice and tight, dive underneath to check that you've closed the gap between the cab side and the sheath nice and evenly, with a good bit of squeeze out, and check inside to see that the horn braces have all got a nice bit of squeeze out going on...at this stage the horn sheath will sound like a drum if you ping it.
Then make yourself a coffee and go and read through your T39 plans (yes, I swore that the J12's would be it, but, you know...) while the PL does it's thang...total time so far, about 10 minutes.
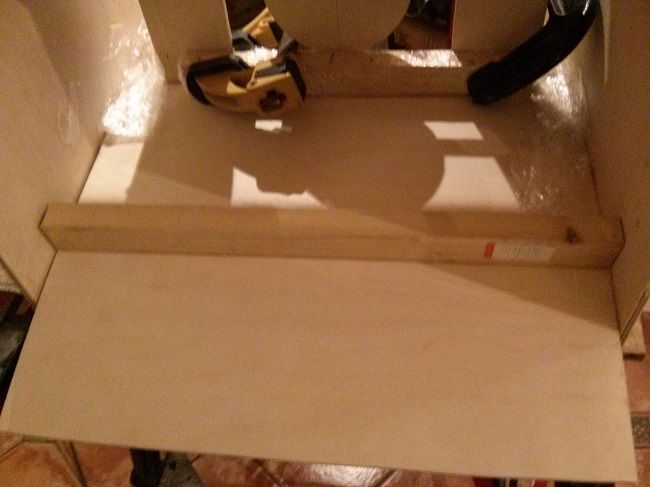
When the PL has had time to set up, just release the straps and voila...horn sheaths all glued up with not a staple or brad in sight
and by the miracle of time-lapse photography...then there were two...
So, a really productive day, especially because when I read through the plans, bending the horn sheaths looked like a bit of a tricksy operation. In the event my actual time was no more than an hour, waiting for the PL to cure sufficiently was the main time factor, but this really was so simple that it gave me a childish delight in how straightforward it was.
Credit really goes to Bill for an incredible design...it's amazing...oh, and PL never fails to amaze me either.
Jools
"We don't know Jools, how smug are you feeling today?"
"As smug as an extra smug thing with extra smug sauce on the side, that's how smug"...this is why.
I had wondered how to get my staple gun in close enough to the top and bottom horn braces so that I could bend and fix the horn sheaths. I quickly concluded that I couldn't, so I would have to staple the sheath to the middle three braces and find another way of holding the edges down. I've used tie down straps for ages, mostly to hold my Ducati on it's trailer on the way to track days, but I've also used them for clamps when working on my bike, so I thought these would do the trick...and since I also have all of the BFM plans I'd seen them put to use on the DR200 etc..
So I was simply going to use the straps on the edges and staple the middle, but I did a dry run where just using the straps was so successful that I thought I would just go for it..as follows.
You take a horn sheath made from 1/8th inch ply, appropriately cut to size and with the bending axis properly oriented as per the plans.
Then you add a jig. A jig is quite a grandiose term because it's nothing more than a short length of 1 1/2" x 1" stick wrapped in clingfilm.
Then you take a cab that you've prepared earlier and stick it on it's side on your workmate.
And slather the gluing surfaces with lots of PL
Then butt the horn sheath up to the baffle and clamp your fancy stick on top.
...and then clamp the other side (unless you're really retentive you don't need matching clamps
So far, so good, and pretty much as per the plans...total time so far, about 5 minutes
Then, fold over a bit of clingfilm so you have quite a few thicknesses, and lay it into the duct opening to stop PL getting all over your webbing straps
Then take another stick and lay it onto the horn sheath...this stick doesn't even need the sophistication of a clingfilm wrap, it's just a stick.
Now take a webbing strap, hook one end to the back of your workmate and then thread the other end through the duct, over the stick and hook that underneath your workmate.
You can see that even with the small amount of tension applied simply hooking the strap into place the horn sheath already seems to have realised it's destiny and bends quite easily with minimal pressure...repeat with a strap on the right hand side.
Once you have a bit of tension holding the stick down, you can pull it down to the edge of the sheath...then, just press the middle of the stick and take up the tension on the tie down straps....these aren't even ratchet straps, just ones with a buckle arrangement...
Then just give the straps a final tug until everything is pulled nice and tight, dive underneath to check that you've closed the gap between the cab side and the sheath nice and evenly, with a good bit of squeeze out, and check inside to see that the horn braces have all got a nice bit of squeeze out going on...at this stage the horn sheath will sound like a drum if you ping it.
Then make yourself a coffee and go and read through your T39 plans (yes, I swore that the J12's would be it, but, you know...) while the PL does it's thang...total time so far, about 10 minutes.
When the PL has had time to set up, just release the straps and voila...horn sheaths all glued up with not a staple or brad in sight
and by the miracle of time-lapse photography...then there were two...
So, a really productive day, especially because when I read through the plans, bending the horn sheaths looked like a bit of a tricksy operation. In the event my actual time was no more than an hour, waiting for the PL to cure sufficiently was the main time factor, but this really was so simple that it gave me a childish delight in how straightforward it was.
Credit really goes to Bill for an incredible design...it's amazing...oh, and PL never fails to amaze me either.
Jools
2 x 3012 HO Jack 12 Lites
2 x Delta Pro 8b Wedgehorn 8 Monitors
Subs? Big question mark!
2 x Delta Pro 8b Wedgehorn 8 Monitors
Subs? Big question mark!
Re: Second BFM Build: 2 x J12 Lites
Great work Jools. You've earned your smugness! Those staple free sheaths look great. I'll definitely be referring back to this thread if I ever get round to building my Jacks.
There doesn't seem to be any way of getting piezos here at a reasonable price but it'll probably be worth getting a box of 50 from Leland in the long run. Hadn't thought that the crossover components would be difficult to source but I guess I will take heed of your experience and order them all together. Out of interest, did you get your PL from Leland as well or use the Lumberjack stuff we can get here? If you've used both, have you noticed much difference?
John
Built: XF210
Building: None
Considering: Jack 10 Lites and Wedgehorn 6s
Building: None
Considering: Jack 10 Lites and Wedgehorn 6s

Re: Second BFM Build: 2 x J12 Lites
Have you tried sending a PM to forum member Sabbelbacke ? It has been quite a while since I have been in touch with him, but he used to get me good quality Monacor pizzers for decent money. Not as cheap as the US, but it was OK. He is in Germany, shipping to the UK is not prohibitively expensive and you wouldn't need to sponsor your immortal royal highness and her offspring on that shipment. On the other hand, Leland is a great guy to deal with and has many useful things in stock. If you order pizzers from him, I recommend you also have a look at the other sections on his website. Like smaller plastic corners of good quality, 1/2" black screws for mounting them, small black metal corners, tools, crossovers and crossover components, router bits. I'm still glad I ordered some extra from him a few years ago, haven't run out of my small stock of corners and screws just yet.
-
LelandCrooks

- Posts: 7242
- Joined: Thu May 04, 2006 9:36 am
- Location: Midwest/Kansas/Speaker Nirvana
- Contact:
Re: Second BFM Build: 2 x J12 Lites
Nice. Well done and thought out.
If it's too loud, you're even older than me! Like me.
http://www.speakerhardware.com
http://www.speakerhardware.com