T48 Build Thread
Re: T48 Build Thread
miked, what is the date on your plans? that seems to be the older style baffe.
Built:
2x Tuba 30s delta12lf loaded (gone)
4x Otop12 d2512 loaded
8x t48s (18, 18, 24, 24, 30, 30) 3015lf loaded
2x AT (1 mcm, 1 gto 804)
2x SLA Pro (dayton pa6, 6 goldwood piezo loaded)
1x bastard XF208
2x OT212 (delta pro 450a loaded, eminence psd)
2x Tuba 30s delta12lf loaded (gone)
4x Otop12 d2512 loaded
8x t48s (18, 18, 24, 24, 30, 30) 3015lf loaded
2x AT (1 mcm, 1 gto 804)
2x SLA Pro (dayton pa6, 6 goldwood piezo loaded)
1x bastard XF208
2x OT212 (delta pro 450a loaded, eminence psd)
Re: T48 Build Thread
An astute observation, my friend.sine143 wrote:miked, what is the date on your plans? that seems to be the older style baffe.
Bill has said there is no performance difference b/t the old and new T39/T48 plans. Just that in the new plans, the driver is a whole lot easier to mount. I decided that the tradeoff b/t easier build and more difficult driver mounting was worth it for me. If I was using the new plans, I could (and would) use Recex screws/washers to mount the driver. It would save me the agony of installing and using t-nuts, like I'll have to do now. I am happy so far with my decision.
Last edited by miked on Sat Aug 10, 2013 11:29 pm, edited 4 times in total.
T48 build thread: http://billfitzmaurice.info/forum/viewt ... 30&t=20315
OTop12 build thread: http://billfitzmaurice.info/forum/viewt ... 30&t=19214
OTop12 build thread: http://billfitzmaurice.info/forum/viewt ... 30&t=19214
Re: T48 Build Thread
I'd use tnuts on the access panel as well honestly. I have 3 old style, 3 new style and after a couple opens, its PRETTY hard to get a tight seal on the acess panel in the old style.
Built:
2x Tuba 30s delta12lf loaded (gone)
4x Otop12 d2512 loaded
8x t48s (18, 18, 24, 24, 30, 30) 3015lf loaded
2x AT (1 mcm, 1 gto 804)
2x SLA Pro (dayton pa6, 6 goldwood piezo loaded)
1x bastard XF208
2x OT212 (delta pro 450a loaded, eminence psd)
2x Tuba 30s delta12lf loaded (gone)
4x Otop12 d2512 loaded
8x t48s (18, 18, 24, 24, 30, 30) 3015lf loaded
2x AT (1 mcm, 1 gto 804)
2x SLA Pro (dayton pa6, 6 goldwood piezo loaded)
1x bastard XF208
2x OT212 (delta pro 450a loaded, eminence psd)
Re: T48 Build Thread
Thanks for the tip. Curious: Why did you open them in the first place? I will properly limit mine from the get-go. Aside from an unusual driver failure i will never open mine.sine143 wrote:I'd use tnuts on the access panel as well honestly. I have 3 old style, 3 new style and after a couple opens, its PRETTY hard to get a tight seal on the acess panel in the old style.
T48 build thread: http://billfitzmaurice.info/forum/viewt ... 30&t=20315
OTop12 build thread: http://billfitzmaurice.info/forum/viewt ... 30&t=19214
OTop12 build thread: http://billfitzmaurice.info/forum/viewt ... 30&t=19214
Re: T48 Build Thread
first time fix a rattle. second time to replace a blown up 3015lf, (crown xti 2k, neg 3 limiter is untrustworty). 2nd time, same deal, 3rd time, same deal. 4th time same deal on an xti 4k limited to 50 volts (eminence told me this one was a manufacturer defect though). all of these were the old style (granted I've had them longer, and the drivers have been in use longer)
Built:
2x Tuba 30s delta12lf loaded (gone)
4x Otop12 d2512 loaded
8x t48s (18, 18, 24, 24, 30, 30) 3015lf loaded
2x AT (1 mcm, 1 gto 804)
2x SLA Pro (dayton pa6, 6 goldwood piezo loaded)
1x bastard XF208
2x OT212 (delta pro 450a loaded, eminence psd)
2x Tuba 30s delta12lf loaded (gone)
4x Otop12 d2512 loaded
8x t48s (18, 18, 24, 24, 30, 30) 3015lf loaded
2x AT (1 mcm, 1 gto 804)
2x SLA Pro (dayton pa6, 6 goldwood piezo loaded)
1x bastard XF208
2x OT212 (delta pro 450a loaded, eminence psd)
Re: T48 Build Thread
You certainly play them loud, that's for sure! I'm going to stick with screws for the access panel though.
I've got the angles on the baffles cut; that took awhile to figure out. I wanted one side of the baffles in particular facing the driver, the smooth side, not the side with all the "x's" cut in the corners from the rising cut on the TS. So it took ahwhile to figure which side to have facing down on the TS when cutting the angles. It's done.
Now I'm trying to lay out where to put the 2/5 braces to ensure they don't hit the mounting screws for the driver.
T48 build thread: http://billfitzmaurice.info/forum/viewt ... 30&t=20315
OTop12 build thread: http://billfitzmaurice.info/forum/viewt ... 30&t=19214
OTop12 build thread: http://billfitzmaurice.info/forum/viewt ... 30&t=19214

Re: T48 Build Thread
Hi Mikesine143 wrote:I'd use tnuts on the access panel as well honestly. I have 3 old style, 3 new style and after a couple opens, its PRETTY hard to get a tight seal on the acess panel in the old style
+1 with sine143 regarding tnuts.
I've also opened mine a few times to re-tighten the drivers and no issues with leaks etc. thus far.
PulseMan
BUILT
6 OT12's DELTA PRO 12A STRAIGHT ARRAY
2 OT12's DELTA PRO 12A MELDED ARRAY
8 T48's 24" 3015LF LOADED
2 WEDGEHORN 10 MKIV's
1 SLA PRO FOR CENTRE FILL
Like us on facebook
https://www.facebook.com/Pulse.Entertainment.SA
6 OT12's DELTA PRO 12A STRAIGHT ARRAY
2 OT12's DELTA PRO 12A MELDED ARRAY
8 T48's 24" 3015LF LOADED
2 WEDGEHORN 10 MKIV's
1 SLA PRO FOR CENTRE FILL
Like us on facebook
https://www.facebook.com/Pulse.Entertainment.SA
Re: T48 Build Thread
you can definitly use screws, just be wary.
Built:
2x Tuba 30s delta12lf loaded (gone)
4x Otop12 d2512 loaded
8x t48s (18, 18, 24, 24, 30, 30) 3015lf loaded
2x AT (1 mcm, 1 gto 804)
2x SLA Pro (dayton pa6, 6 goldwood piezo loaded)
1x bastard XF208
2x OT212 (delta pro 450a loaded, eminence psd)
2x Tuba 30s delta12lf loaded (gone)
4x Otop12 d2512 loaded
8x t48s (18, 18, 24, 24, 30, 30) 3015lf loaded
2x AT (1 mcm, 1 gto 804)
2x SLA Pro (dayton pa6, 6 goldwood piezo loaded)
1x bastard XF208
2x OT212 (delta pro 450a loaded, eminence psd)
Re: T48 Build Thread
OK, I'll bite. What size/dimension t-nuts did you use for the access panels? I've got some t-nuts coming in the mail, but only enough to mount the drivers. The BigBox stores never have stock on 10-32 t-nuts; typically they have some 10-24 and tons of 1/4" t-nuts. They certainly don't have any black bolts, though on the old style cabs with the access panel on top, nobody would see the silver bolt heads anyway. Thoughts?
It's my understanding that a finer thread (10-32 vs. 10-24) allows for stronger clamping power due to more threads per inch. Maybe I'm wrong on that?
It's my understanding that a finer thread (10-32 vs. 10-24) allows for stronger clamping power due to more threads per inch. Maybe I'm wrong on that?
T48 build thread: http://billfitzmaurice.info/forum/viewt ... 30&t=20315
OTop12 build thread: http://billfitzmaurice.info/forum/viewt ... 30&t=19214
OTop12 build thread: http://billfitzmaurice.info/forum/viewt ... 30&t=19214
Re: T48 Build Thread
Today's mediocre update:
Angles on baffles cut
Spacer rings mounted to baffles
17-degree cut at bottom of baffles. (I also got the 3-degree cut on the other side done, but it's not worth showing)

Layout of how driver will mount on baffle....sorta. Speaker will be rotated so that terminals are closer to access panel. That would be at the top of cab, at the top of the photo, for reference.

Marking mounting hole locations on spacer ring, so that I can know where to shoot (and not shoot) brads when PLing/nailing the spacer ring to the baffle. For those that might not know; you have to secure the spacer ring to the baffle panel. PL is the best way to do that, but you need fastners too, to hold the ring in place while the PL cures. You don't want to drive nails or screws where they might be in the way of the mounting bolts/screws you will later use to bolt the driver into the cab. You must plan all this out in advance. And THIS is why it costs good money to have someone build cabs for you, One1Sony or whatever your screen name is. Anyway.
I used a large nail setter to mark the holes. The increasing diameter of the point fits very well inside the mounting hole in the frame of the driver. There is not much side-to-side play at all, so the nail set is almost perfectly-centered in the hole. I've used pens, pencil, markers, etc in the past. This is way easier and more accurate. A logical question is "What's the difference b/t this and just using a regular nail?" Good question. I used to use a nail. But a nail is very small in diameter and difficult to accurately center in the hole. Using a nail setter, that when inserted in the mounting hole, does not have a lot of "wiggle room", increases your "centering accuracy" by a whole lot. We all know how finicky t-nuts are! The more on-center you get that t-nut seated, the less problems you will have when "payday" comes and you're finally bolting down that driver.

Easy to see where to drill for t-nuts.

Not the best shot of the nail setter, but you get the idea of what it looks like.

Spacer ring PL'd and nailed to the baffle. I think I've finally gotten the hang of using PL. Though I wore disposable rubber gloves, I got not a spec of it on me. It helps that for once, I cut the nozzle off the PL as tiny as I could get away with. Much easier to thread a large screw in there to stop the oozing. Note the brads are driven in between every two t-nut hole markings. Also note the small piece of BB scrap I used as a reference spacer at the top of the baffle. You must have at least 1/2" of space on top of the spacer ring b/c that is where the access panel flanges sit.

Hope to make some good progress during the week. Slow and steady wins the race, right?
Angles on baffles cut
Spacer rings mounted to baffles
17-degree cut at bottom of baffles. (I also got the 3-degree cut on the other side done, but it's not worth showing)
Layout of how driver will mount on baffle....sorta. Speaker will be rotated so that terminals are closer to access panel. That would be at the top of cab, at the top of the photo, for reference.
Marking mounting hole locations on spacer ring, so that I can know where to shoot (and not shoot) brads when PLing/nailing the spacer ring to the baffle. For those that might not know; you have to secure the spacer ring to the baffle panel. PL is the best way to do that, but you need fastners too, to hold the ring in place while the PL cures. You don't want to drive nails or screws where they might be in the way of the mounting bolts/screws you will later use to bolt the driver into the cab. You must plan all this out in advance. And THIS is why it costs good money to have someone build cabs for you, One1Sony or whatever your screen name is. Anyway.
I used a large nail setter to mark the holes. The increasing diameter of the point fits very well inside the mounting hole in the frame of the driver. There is not much side-to-side play at all, so the nail set is almost perfectly-centered in the hole. I've used pens, pencil, markers, etc in the past. This is way easier and more accurate. A logical question is "What's the difference b/t this and just using a regular nail?" Good question. I used to use a nail. But a nail is very small in diameter and difficult to accurately center in the hole. Using a nail setter, that when inserted in the mounting hole, does not have a lot of "wiggle room", increases your "centering accuracy" by a whole lot. We all know how finicky t-nuts are! The more on-center you get that t-nut seated, the less problems you will have when "payday" comes and you're finally bolting down that driver.
Easy to see where to drill for t-nuts.
Not the best shot of the nail setter, but you get the idea of what it looks like.
Spacer ring PL'd and nailed to the baffle. I think I've finally gotten the hang of using PL. Though I wore disposable rubber gloves, I got not a spec of it on me. It helps that for once, I cut the nozzle off the PL as tiny as I could get away with. Much easier to thread a large screw in there to stop the oozing. Note the brads are driven in between every two t-nut hole markings. Also note the small piece of BB scrap I used as a reference spacer at the top of the baffle. You must have at least 1/2" of space on top of the spacer ring b/c that is where the access panel flanges sit.
Hope to make some good progress during the week. Slow and steady wins the race, right?
T48 build thread: http://billfitzmaurice.info/forum/viewt ... 30&t=20315
OTop12 build thread: http://billfitzmaurice.info/forum/viewt ... 30&t=19214
OTop12 build thread: http://billfitzmaurice.info/forum/viewt ... 30&t=19214
PL QUESTION
I've noticed many folks mist the joining surfaces with water before PLing them together. Is there a temperature/humidity range that when reached, you need to mist?
In my garage it varies from 90F and 33% humidity, to 105F and 20% humidity. Is this a range where I should be misting before assembly? For reference, when I built my OTops I got a lot of PL cracking. I did not mist b/c I didn't know about misting. I simply PL'ed over the cracks, smooshed it in with my finger and all was well. Don't want to deal with that with my T48s. Thanks.
In my garage it varies from 90F and 33% humidity, to 105F and 20% humidity. Is this a range where I should be misting before assembly? For reference, when I built my OTops I got a lot of PL cracking. I did not mist b/c I didn't know about misting. I simply PL'ed over the cracks, smooshed it in with my finger and all was well. Don't want to deal with that with my T48s. Thanks.
T48 build thread: http://billfitzmaurice.info/forum/viewt ... 30&t=20315
OTop12 build thread: http://billfitzmaurice.info/forum/viewt ... 30&t=19214
OTop12 build thread: http://billfitzmaurice.info/forum/viewt ... 30&t=19214
-
Bill Fitzmaurice

- Site Admin
- Posts: 29119
- Joined: Tue May 02, 2006 5:59 pm
Re: T48 Build Thread
70-80 degrees and 50-60% humidity is perfect. Otherwise, mist.
Re: T48 Build Thread
Thank you, Bill. I'm obviously way outside the optimal parameters. Will do, and thanks for the incredibly efficient designs.
T48 build thread: http://billfitzmaurice.info/forum/viewt ... 30&t=20315
OTop12 build thread: http://billfitzmaurice.info/forum/viewt ... 30&t=19214
OTop12 build thread: http://billfitzmaurice.info/forum/viewt ... 30&t=19214
15 August Update
The "Prep Work" always takes longest. Cutting the panels, making the complete baffle, cutting out handholds, jack plate openings, etc. Once all the little stuff is done, the big parts can start getting assembled! Got a good amount done today:
Baffles are complete (hurricane nuts mounted, "Harley Tricked" in place).
Handholds done on backs/tops and on the 6/10 horizontal brace ala "Bruce Style"
It might not seem like a lot for about 8 hours work, but those of you that have truly installed t-nuts "the right way" know it takes forever. Without a doubt, the baffles are the most time-consuming part of the build. I ran the bolt completely through each t-nut (hurricane, but t--nut is easier to type), making sure the threads were good. I threw away 6 t-nuts. Not taking any chances. I also drilled the driver side of the t-nut hole a bit larger than the hole for the t-nut itself to give me some wiggle room when bolting the driver down. My drill press is a tiny POS and it's throat isn't deep enough to drill all the driver mounting holes on a baffle of this size, so I had to do 4 on each baffle by hand. Trying to hold a drill perfectly vertical is not easy when you're really trying hard to do it.
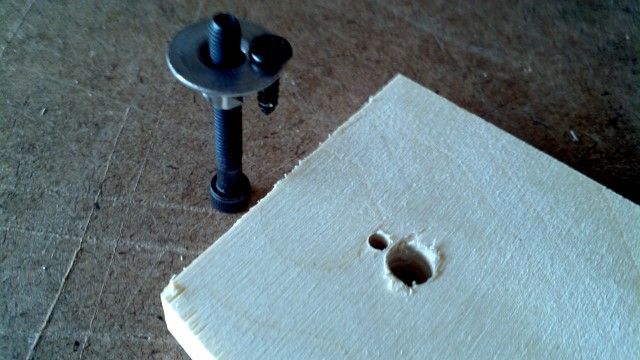
Here's the setup I used for drilling the hole for the hold-down screw. The Harley Trick is much easier with t-nuts vs. hurricane nuts; you simply wedge a screw b/t the spokes vs. drilling a hole. But then again, w/t-nuts, you have to deal with the prongs sticking out into the driver cutout. Can't win, I guess. Anyway, piece of scrap with a 5/16" hole for the hurricane nut to sit in.

The setup on the drill press. Note the small spring clamp I used to hold the nut down while drilling. I originally was using my fingers, but metal gets hot when you drill it. Duh.

The screw is a #6 x 5/8", panhead (flat underside) screw. The hole I drilled in the t-nut is a 17/64. It was the next size up from 1/8" in the drill bit set I have and was the right size for this screw. YMMV.
One t-nut installed

8 T-nuts and screws installed in baffle. Keep in mind this is one baffle; all four are done.

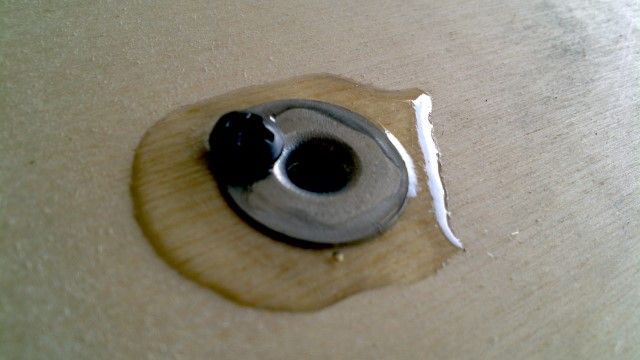
One t-nut epoxied over. BTW, I bought the standard 2-part, instant mix, "5-minute" epoxy. Five minutes my ass! After 6+ hours, it's still tacky. Maybe b/c my garage is 100F? I hope it's dry by morning. I intentionally did not glop the epoxy all over the screw b/c I didn't want any getting into the threads. The screw is installed tightly, and the epoxy is almost 360-degrees around the edge of each screw.
One complete baffle.

Next up were the upper handle holes in the top and back. I did the top first (no pics) and then the back. If you own a router, you need to make a template. "No, I can do it by hand." WHY would you spend an entire day just cutting handholds when a template lets you cut out two handle holes in about 3-4 minutes? I am soooo glad I made a template!!!
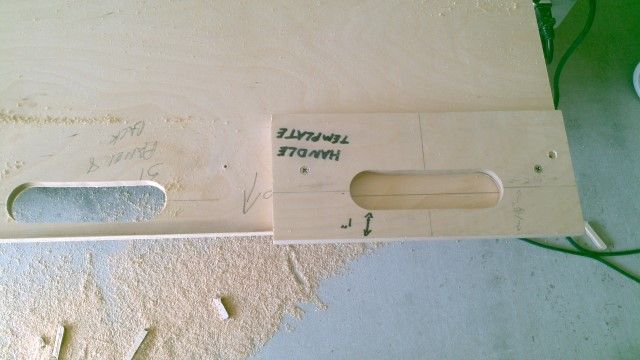
Both upper handholds on the back cut out. They have not been rounded-over yet, but doing all the handholds will take me 30 minutes, maybe.

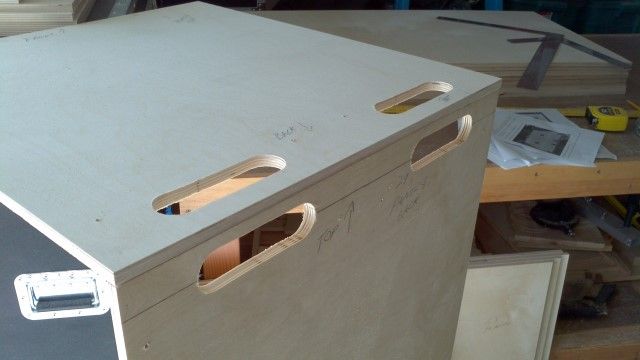
Back and Top mocked up so I could see if I got it right.
I was so happy that I got right, that I snapped a shot of me holding the quarter-round in place. Now here's something you don't see very day.

Last but not least, the handhold in the middle of the 6/10 horizontal brace. Bruce did this on his T39s and it's quite sturdy. Even if I never use it, my cab is about an ounce lighter than w/o it! Putting the roundover on the edges will be a pain (I don't own a router table), but I want it there. BTW, how do you guys cut the groove in the 6/10 braces that this thing sits in? I can think of a few diff ways to do it, but want to know how YOU do it.

I wanted to get the terminal plate holes done today, but I ran out of steam. That'll be first-thing tomorrow. Once all this "prep work" is done, assembly will be quick. And then the tedium of finishing can begin.
A QUESTION FOR THE FORUM:
I also want to put hand holds on the front of the bottom panel, as shown in the plans/Sketchup (Oct11 Plans). If you look at the Sketchup, the top edge of the handhold butts right up against the front edge of the 6/10 brace. I am worried that due to variances in cut accuracy, build technique, etc, that my 6/10 braces will wind up overlapping the handholds and it'll look like crap. What would be safe measurements to place the holes? I.E. Bottom of the hole (nearest the edge) xxx inches from the edge, and hole centered xxx inches from the other edge. Thanks for any clarity you can lend on this. I would like the holes, but if I can't get a guarantee that they won't interfere w/the 6/10 braces, I'm leaving them out.
Thanks for looking. More over the next 3 days; I've cleared my calendar to do nothing but build.
Baffles are complete (hurricane nuts mounted, "Harley Tricked" in place).
Handholds done on backs/tops and on the 6/10 horizontal brace ala "Bruce Style"
It might not seem like a lot for about 8 hours work, but those of you that have truly installed t-nuts "the right way" know it takes forever. Without a doubt, the baffles are the most time-consuming part of the build. I ran the bolt completely through each t-nut (hurricane, but t--nut is easier to type), making sure the threads were good. I threw away 6 t-nuts. Not taking any chances. I also drilled the driver side of the t-nut hole a bit larger than the hole for the t-nut itself to give me some wiggle room when bolting the driver down. My drill press is a tiny POS and it's throat isn't deep enough to drill all the driver mounting holes on a baffle of this size, so I had to do 4 on each baffle by hand. Trying to hold a drill perfectly vertical is not easy when you're really trying hard to do it.
Here's the setup I used for drilling the hole for the hold-down screw. The Harley Trick is much easier with t-nuts vs. hurricane nuts; you simply wedge a screw b/t the spokes vs. drilling a hole. But then again, w/t-nuts, you have to deal with the prongs sticking out into the driver cutout. Can't win, I guess. Anyway, piece of scrap with a 5/16" hole for the hurricane nut to sit in.
The setup on the drill press. Note the small spring clamp I used to hold the nut down while drilling. I originally was using my fingers, but metal gets hot when you drill it. Duh.
The screw is a #6 x 5/8", panhead (flat underside) screw. The hole I drilled in the t-nut is a 17/64. It was the next size up from 1/8" in the drill bit set I have and was the right size for this screw. YMMV.
One t-nut installed
8 T-nuts and screws installed in baffle. Keep in mind this is one baffle; all four are done.
One t-nut epoxied over. BTW, I bought the standard 2-part, instant mix, "5-minute" epoxy. Five minutes my ass! After 6+ hours, it's still tacky. Maybe b/c my garage is 100F? I hope it's dry by morning. I intentionally did not glop the epoxy all over the screw b/c I didn't want any getting into the threads. The screw is installed tightly, and the epoxy is almost 360-degrees around the edge of each screw.
One complete baffle.
Next up were the upper handle holes in the top and back. I did the top first (no pics) and then the back. If you own a router, you need to make a template. "No, I can do it by hand."
Both upper handholds on the back cut out. They have not been rounded-over yet, but doing all the handholds will take me 30 minutes, maybe.
Back and Top mocked up so I could see if I got it right.
I was so happy that I got right, that I snapped a shot of me holding the quarter-round in place. Now here's something you don't see very day.
Last but not least, the handhold in the middle of the 6/10 horizontal brace. Bruce did this on his T39s and it's quite sturdy. Even if I never use it, my cab is about an ounce lighter than w/o it!
I wanted to get the terminal plate holes done today, but I ran out of steam. That'll be first-thing tomorrow. Once all this "prep work" is done, assembly will be quick. And then the tedium of finishing can begin.
A QUESTION FOR THE FORUM:
I also want to put hand holds on the front of the bottom panel, as shown in the plans/Sketchup (Oct11 Plans). If you look at the Sketchup, the top edge of the handhold butts right up against the front edge of the 6/10 brace. I am worried that due to variances in cut accuracy, build technique, etc, that my 6/10 braces will wind up overlapping the handholds and it'll look like crap. What would be safe measurements to place the holes? I.E. Bottom of the hole (nearest the edge) xxx inches from the edge, and hole centered xxx inches from the other edge. Thanks for any clarity you can lend on this. I would like the holes, but if I can't get a guarantee that they won't interfere w/the 6/10 braces, I'm leaving them out.
Thanks for looking. More over the next 3 days; I've cleared my calendar to do nothing but build.
T48 build thread: http://billfitzmaurice.info/forum/viewt ... 30&t=20315
OTop12 build thread: http://billfitzmaurice.info/forum/viewt ... 30&t=19214
OTop12 build thread: http://billfitzmaurice.info/forum/viewt ... 30&t=19214
Re: T48 Build Thread
Mike, I just looked at my Nov, 2011 plans in Sketchup and found that there is a 2" gap between the handhold and the brace. If the brace is to far forward, trim the bottom a touch. That will allow the brace to move farther into the mouth. Also, the handhold is 1/2" in from the front edge.
TomS