Page 3 of 5
Re: Jack 110 build from a first-timer
Posted: Wed Mar 09, 2011 4:28 am
by Harley
AntonZ wrote:
I stand corrected.
Many clamps is good, more clamps is more better.
Well...seeing we're on a roll here, at this place we say "The more clamps, the better"
Re: Jack 110 build from a first-timer
Posted: Wed Mar 09, 2011 10:31 am
by ian
moar clampz, we haz them.


Construction time is actually bound by the number of clamps and guideboards I have. I think this is a good thing... if I only do one or two steps per night, I don't rush.
Top attached, and driver mounting ring as well. It's worth restating that I bought the baffle and the mounting ring from Leland, since the cost was less than the tools I would have needed to buy just for those pieces. If you're getting a driver kit from Leland, and don't want to spring for the full flatpack, get some of the individual cut pieces that he sells.
Gluing the top was tricky because I wanted to minimize error that was likely both in the level in the horizontal plane and in the eventual joints to the side and back panels. So I places the top on top, aligned it to the joint lines, then placed a level on top to determine where to clamp and where to fill gaps. Checked angles with a square and straightedge as best I could. Next time I build one, I'm going to cut all pieces in tandem so as to match edge lengths (i.e., measure with the cut piece, not with a ruler), then I should only have to correct for warping.
Re: Jack 110 build from a first-timer
Posted: Thu Mar 10, 2011 12:16 pm
by ian

Mouth trimmed and sides attached. With yet more clamps! I picked up some 24" bar clamps from HF last night. These clamps are stupendous value, $5-7 for a very nice and versatile clamp. I have four 18" and three 24" ones (hence the use of the clamp-and-cut in this image).
Re: Jack 110 build from a first-timer
Posted: Thu Mar 10, 2011 4:44 pm
by Philip Kelley
I just read through this thread; good work! It looks like when your all done you'll have not only a fine speaker cab, but a whole new set of skills and a much bigger tool collection than you started with. Be careful or you'll get hooked.
Re: Jack 110 build from a first-timer
Posted: Thu Mar 17, 2011 8:42 pm
by ian
Today I framed up the back of the cab. Unfortunately my side panels are not exactly matched so I'll have to attack it with the sander before rounding the corners and finishing.
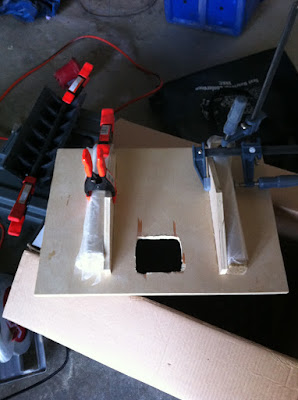
I also did the melded array:

Took them apart first, since the idea of cutting piezos on the miter saw with the screws in felt like a disaster in the making. In the picture above they're dry-fit on the jig. The painters tape is to shim up the piezos a bit since the jig was built a little generously. I did a first pass with the glue... tomorrow I'll go over it again to fill in any gaps.
Re: Jack 110 build from a first-timer
Posted: Fri Mar 18, 2011 5:14 pm
by ian
No pics yet, but good progress all the same. The melded array is glued. I built the crossover. Then I went to work on the back... the panel is cut but needs trimming to fit and also the bracing. Sunday's a holiday (Purim) so not much will be happening, hopefully next weekend I can sand, trim, and paint.
Re: Jack 110 build from a first-timer
Posted: Sun Mar 20, 2011 5:15 pm
by ian
Ok, more pictures and more work done. The aforementioned crossover:

The melded array and diffuser, glued and clamped, and the back panel, trimmed, jack plate cutout, and braces glued and clamped:
And lastly, a half-inch square frame for a petscreen grille:

The front inside of the cab has also been primed. Then I realized I still needed to round corners and so left that off for now.
After the diffuser is firmly attached, the array can be painted, and then i can wire up the piezos. The end is in sight.
Re: Jack 110 build from a first-timer
Posted: Tue Mar 22, 2011 8:37 am
by ian
Painted the melded array last night, and learned that no matter how small, you should always read online reviews before any purchase. Lowes' Valspar plastic paint is complete garbage... poor coverage and drips everywhere. I'm going to have to scrub it down and redo it with a better paint.
I am headed back to Lowes, however, for a larger piece of PetScreen. And HF for a brad nailer/stapler.
Re: Jack 110 build from a first-timer
Posted: Wed Mar 23, 2011 9:11 pm
by ian
Confirmed: Krylon Fusion is the cats pajamas. Took a little hunting but found it at Kmart. My grille frame didn't survive the praise of my 6-year old, so I picked up a length of half-round for a second try.
Re: Jack 110 build from a first-timer
Posted: Sun Mar 27, 2011 12:19 pm
by ian
Holy smokes, it works.

Melded array and woofer hooked up to the crossover, and the crossover jack leads connect to a mono 1/8" cable, connected to the Mac which is playing music from iTunes. Radio Shack sells a spiffy 1/8" mono to dual blades which is nice for testing.
The tweeters are a bit scratchy, so I have to keep the volume a below halfway. How do I debug scratchy tweets? Or is it just because I'm putting music out the computer's headphone line?
Re: Jack 110 build from a first-timer
Posted: Sun Mar 27, 2011 10:22 pm
by Tom Smit
Scratchy tweets could be a faulty connection anywhere from the source, to the array.
Re: Jack 110 build from a first-timer
Posted: Mon Mar 28, 2011 7:33 am
by ian
They're ok as long as the volume doesn't go too high. At any rate, I tested the array without the crossover circuit, and listened closely when there was scratchiness. I can't track it down to a single element, so the next step is to desolder one element at a time and test each one. Whee.
I primed the box and the rear panel, and mounted the array brackets. My technique for the latter was, to tape the array to the two brackets, lie the cab face up, and then position the array with the brackets at the right point. Then I clamped guides under the brackets to bring the array forward of the throat ducts, and applied PL between the brackets and the cabinet top/bottom. This is a good place to cut the brackets a bit shallow, because with careful use of the PL tube, I was able to squirt the PL right in between the bracket end and the cab, and then smooth out the joint with my finger. I know a picture would really help here, but I didn't have one

Re: Jack 110 build from a first-timer
Posted: Mon Mar 28, 2011 9:23 am
by Frankie G
Not sure if it helps but when I wanted to listen to each tweet in the arrays I used a tip I read on here somewhere. That was to use a paper towel tube and with the array making sound, hold it up against each one with your ear on the other end. Obviously you don't want to get too loud here! It does a pretty good job of isolating each one.
Re: Jack 110 build from a first-timer
Posted: Mon Mar 28, 2011 8:36 pm
by ian
Removed the melded array, wired things back up on the bench for testing. I can't get scratchiness from my iPhone player, but off the main computer with the volume maxxed it scratches. I ended up taking the leads from the computer and touching them to each piezo's contacts. Now, this is a bit silly since the piezos are wired up in a circuit. However, I noticed that when the leads were on the piezos along one side, I had scratchy sound when touching each element. On the other side, no scratchiness.
Since each side is wired in parallel, when I connect to a single element on one side, I set up a small short circuit among elements on that side of the array. So now my hunch is that the side I hear scratchiness on is the side which needs rewiring.
I also need to point out a fatal flaw in my clever bracket mounting scheme mentioned above. When I went to remove the array, I found that the brackets were placed close enough together that the array was trapped. I had to saw off a bracket to get the array out. Argh. I think I'll rout the inside of the brackets a bit to make removing/inserting the array possible.

Re: Jack 110 build from a first-timer
Posted: Mon Mar 28, 2011 10:12 pm
by Tom Smit
Ah frustrating, isn't it. But, once the cab is making music, looking and sounding beautiful, will come great satisfaction.
BTW, I like the look of the tweets...very brave.
