All those screws = all that Bondo...
myn's Tuba HT Build Thread
-
bgavin
- Posts: 5738
- Joined: Thu May 04, 2006 10:58 am
- Location: Sacramento, Moderator/Licensed BF Builder
- Contact:
Re: myn's Tuba HT Build Thread
It's un-American to have a garage that clean... 
All those screws = all that Bondo...
All those screws = all that Bondo...
My biggest worry is that when I'm dead and gone, my wife will sell my toys for what I said I paid for them.
Re: myn's Tuba HT Build Thread
[== 8/18/2009 ==]
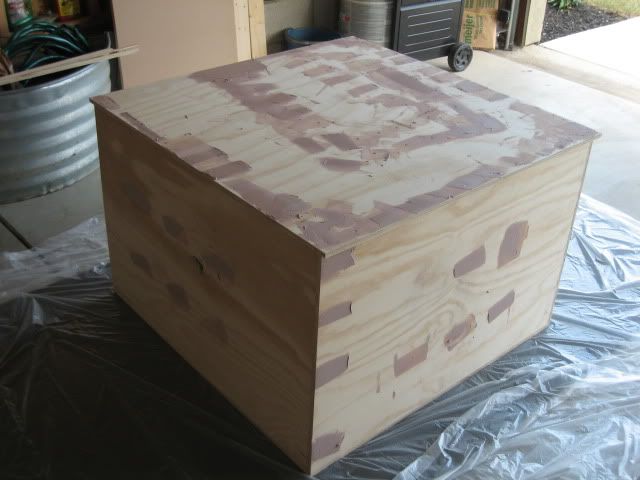
Speaking of Bondo...
I tried out my cheap random orbital sander from Harbor Freight on some of the Bondo I applied the other day. Using 60 grit it easily cleaned up the excess Bondo in a matter of mins. In contrast my traditional plain orbital would have taken at least 30 mins.
Today I applied the Bondo to 5 of the sides. It doesn't appear to be going on flush like the wood filler did. So I suspect I am going to need to sand and refill where appropriate again tomorrow. I did find it was a little tacky to the touch, even after waiting 2 hours. I remember last year it felt the same way when I was doing the EBS/LLT. Maybe the humidity outside?
I may be one of the few people that actually enjoys applying and sanding down Bondo. Not sure why, I find it fun.
-
Scott Brochu

- Posts: 2473
- Joined: Sat Mar 10, 2007 11:53 pm
- Location: Maine
- Contact:
Re: myn's Tuba HT Build Thread
I got 4 wedges with a S**T load of bondo waiting for you up here in Maine with your name all over them.myn wrote:[== 8/18/2009 ==]
Speaking of Bondo...
I may be one of the few people that actually enjoys applying and sanding down Bondo. Not sure why, I find it fun.
Drumming is a way of life.
ME LIKE TO HIT THINGS!
http://billfitzmaurice.info/forum/viewt ... 26&t=11232
ME LIKE TO HIT THINGS!
http://billfitzmaurice.info/forum/viewt ... 26&t=11232
Re: myn's Tuba HT Build Thread
Send me the ticket, and I'm all over it!Scott Brochu wrote:I got 4 wedges with a S**T load of bondo waiting for you up here in Maine with your name all over them.
I know money often seals the deal, but seriously, quality is an investment, not an expense... Grant Bunter
Accept the fact that airtight and well-braced are more important than pretty on the inside. Bill Fitzmaurice
Accept the fact that airtight and well-braced are more important than pretty on the inside. Bill Fitzmaurice
Re: myn's Tuba HT Build Thread
[== 8/20/2009 ==]
Just a quick update. The bondo filling and sanding is going well. I've spent the last couple of days fill all of the screw holes. I can't believe how much better a random orbital works in contrast to a regular orbital. Looks like I'll have all of the holes patched up ready for flush trim routing and a roundover this weekend.
Just a quick update. The bondo filling and sanding is going well. I've spent the last couple of days fill all of the screw holes. I can't believe how much better a random orbital works in contrast to a regular orbital. Looks like I'll have all of the holes patched up ready for flush trim routing and a roundover this weekend.
-
Bill Fitzmaurice

- Site Admin
- Posts: 29153
- Joined: Tue May 02, 2006 5:59 pm
Re: myn's Tuba HT Build Thread
Not enough catalyst.myn wrote: I did find it was a little tacky to the touch, even after waiting 2 hours. I remember last year it felt the same way when I was doing the EBS/LLT. Maybe the humidity outside?
Re: myn's Tuba HT Build Thread
[== 8/21/2009 ==]
I sanded more today with all of the screw holes now filled and sanded. There are still a few places that need some touch ups. I am wondering how flawless the box needs to be since a coat of flat black latex and than Duratex will be applied?
Tomorrow the router comes back out to do the flush trim and a 3/8 roundover.
Regarding the 3/8 roundover. In the case where the mouth of the horn is the bearing on the 3/8 roundover will probably be sitting lower than the edge of the 1/2" ply. I've seen on other posts people recommending a straight edge, using it as a guide for the router:
Like this:
http://web.me.com/wb12/iWeb/WB%20/OT12% ... G_0521.jpg
http://web.me.com/wb12/iWeb/WB%20/OT12% ... G_0522.jpg
Is this the best and only way?
I was contemplating doing a 1/4" so I wouldn't have the hastle but love the look of a more aggressive roundover.
Last edited by myn on Sat Aug 22, 2009 6:06 pm, edited 1 time in total.
-
David Carter

- Posts: 1850
- Joined: Mon Jan 01, 2007 7:20 am
- Location: (East) Tennessee, USA
Re: myn's Tuba HT Build Thread
I went all the way around the mouth of my T39's with a 3/8" roundover bit, and I didn't need any straightedges or guides. The bearing rode very low on the edge of the 1/2" ply, but it worked. I just made sure that I was simply guiding the router along the edge and holding it steady, but not pushing it into the ply.myn wrote:Regarding the 3/8 roundover. In the case where the mouth of the horn is the bearing on the 3/8 roundover will probably be sitting lower than the edge of the 1/2" ply.
Dave
Built:
- Omni 10 (S2010 + piezo array)
- 2 x DR250 (DL II 2510 + melded array)
- 2 x Titan 39 (BP102 - 14"W)
- 2 x Titan 39 (3012LF - 20"W)
- 4 x DR200 (Delta Pro 8B + melded array)
Built:
- Omni 10 (S2010 + piezo array)
- 2 x DR250 (DL II 2510 + melded array)
- 2 x Titan 39 (BP102 - 14"W)
- 2 x Titan 39 (3012LF - 20"W)
- 4 x DR200 (Delta Pro 8B + melded array)
Re: myn's Tuba HT Build Thread
I did that because I was using a 3/4" roundover on a 3/4" thick surface. In your case, like David said, you'll be fine without a guide.myn wrote:
Regarding the 3/8 roundover. In the case where the mouth of the horn is the bearing on the 3/8 roundover will probably be sitting lower than the edge of the 1/2" ply. I've seen on other posts people recommending a straight edge, using it as a guide for the router:
Like this:
http://web.me.com/wb12/iWeb/WB%20/OT12% ... G_0521.jpg
http://web.me.com/wb12/iWeb/WB%20/OT12% ... G_0522.jpg
Is this the best and only way?.
Tomorrow I'm going to stop procrastinating - WB
Re: myn's Tuba HT Build Thread
[== 8/22/2009 ==]
Thanks for the tip about not needing a guide to apply a 3/8" roundover. It worked out quite well. I used a 1/2" flush trim bit first to remove that large overhang around the one side. Then went around all edges except for the internal horn mouth and used a 3/8" roundover.
I'm pretty pleased with the results.
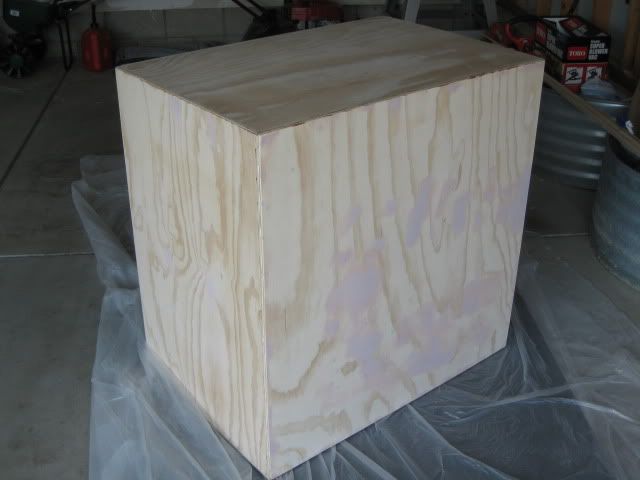
I scanned back over the surface of the enclosure looking for last little imperfections be it small cracks or little dings and filled them with Bondo. How perfect does the surface need to be before I can apply the latex paint and Duratex?
Tomorrow I hope to be able to get the access panel flange started. Any tips on this?
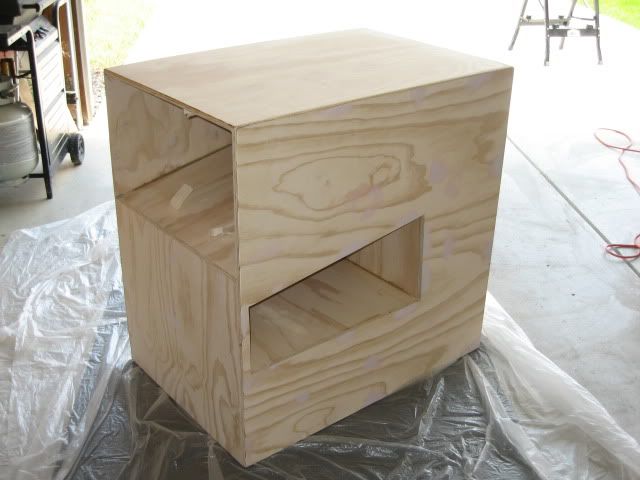
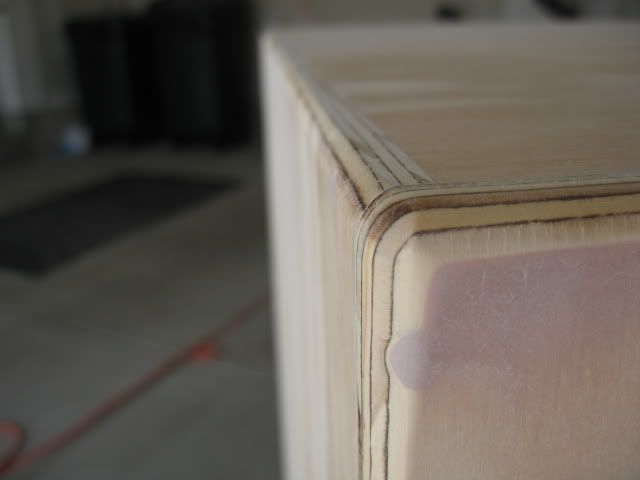
Thanks for the tip about not needing a guide to apply a 3/8" roundover. It worked out quite well. I used a 1/2" flush trim bit first to remove that large overhang around the one side. Then went around all edges except for the internal horn mouth and used a 3/8" roundover.
I'm pretty pleased with the results.
I scanned back over the surface of the enclosure looking for last little imperfections be it small cracks or little dings and filled them with Bondo. How perfect does the surface need to be before I can apply the latex paint and Duratex?
Tomorrow I hope to be able to get the access panel flange started. Any tips on this?
Re: myn's Tuba HT Build Thread
Very nice! The surface pefection depends on how much texture you are applying to the duratex. If you are going to use a texturing roller, the answer is not very perfect. If you are going to thin the duratex and apply a satin-type finish, it needs to be sanded to around 220, no gaps or pits. You'll see when you apply the latex paint. If a defect is bad enough to bother you, sand down the paint and refill with bondo.
To be safe, just sand to 150 or 220, start with 60, go to 100, 150, and if needed, 220. Then paint. Get those roundovers nice and smooth.
JSS
To be safe, just sand to 150 or 220, start with 60, go to 100, 150, and if needed, 220. Then paint. Get those roundovers nice and smooth.
JSS
Re: myn's Tuba HT Build Thread
Use an oil based primer over the Bondo. I just finished scraping and repainting my boxes where the Duratex did NOT stick to the Bondo.
-
bgavin
- Posts: 5738
- Joined: Thu May 04, 2006 10:58 am
- Location: Sacramento, Moderator/Licensed BF Builder
- Contact:
Re: myn's Tuba HT Build Thread
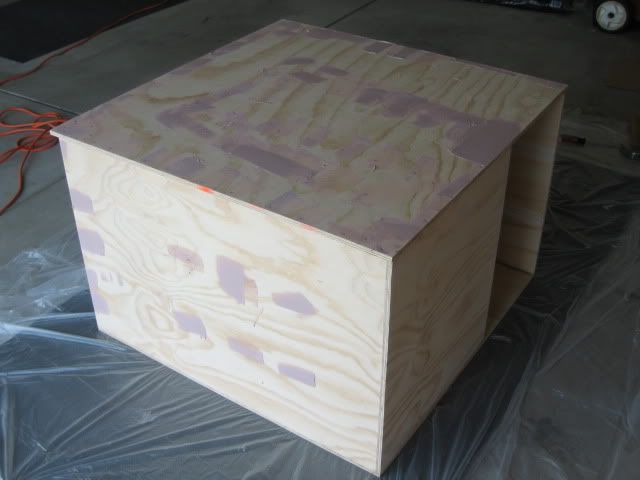
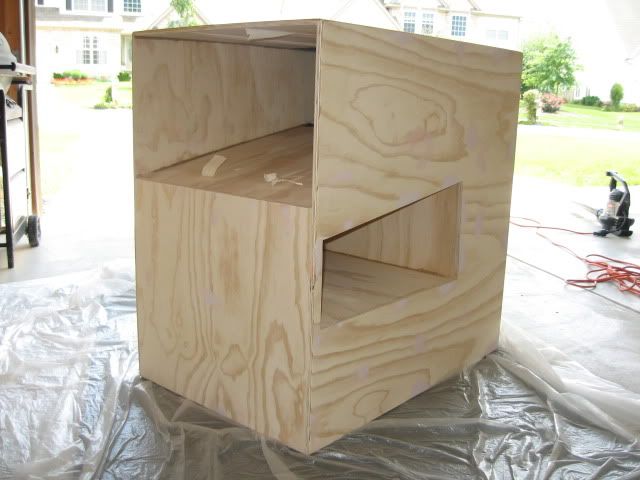
In the last photo I do not see a brace in the mouth.
You are leaving a very large panel without bracing, and makes it subject to buzzing.
This is an easy fix right now.
Cut the right angle, slide in until snug. Drill pilot holes. Fit and glue.
You are leaving a very large panel without bracing, and makes it subject to buzzing.
This is an easy fix right now.
Cut the right angle, slide in until snug. Drill pilot holes. Fit and glue.
My biggest worry is that when I'm dead and gone, my wife will sell my toys for what I said I paid for them.
Re: myn's Tuba HT Build Thread
bgavin wrote:In the last photo I do not see a brace in the mouth.
You are leaving a very large panel without bracing, and makes it subject to buzzing.
This is an easy fix right now.
Cut the right angle, slide in until snug. Drill pilot holes. Fit and glue.
Nice catch
As I wanted todo all of the Bondo/Sanding outside I left the mouth braces off intentionally so the sander could get into the mouth easier.
Regarding the Oil primer over Bondo. I'm going to be applying a flat black latex (water based) prior to the Duratex. I suspect this will work okay allowing the Duratex to bond well to the Bondo'd areas?pgolde wrote:Use an oil based primer over the Bondo. I just finished scraping and repainting my boxes where the Duratex did NOT stick to the Bondo.
Re: myn's Tuba HT Build Thread
[== 8 /24/2009 ==]
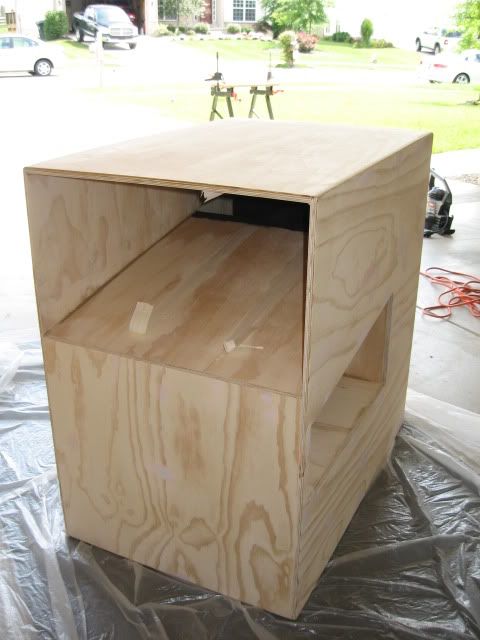
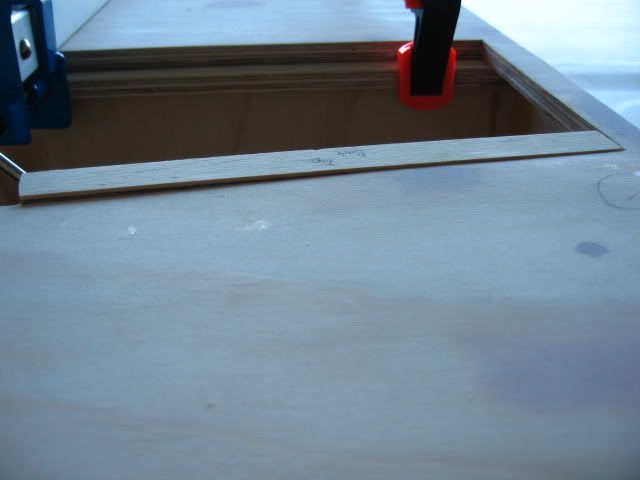
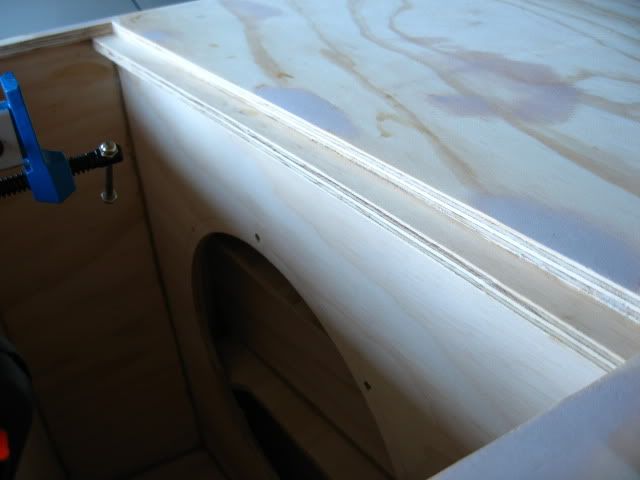
Yesterday I cut out the access panel flanges. That took alot longer than I thought. Getting them to fit perfectly was a good challenge. I'm PL/clamping one flange at a time. Unfortunately I believe I made a major boo-boo, not screwing these into place first and instead freehanding the clamping of these to the side of the panels.
After the first access flange was glued in, I scraped all of the PL off with a chisel and placed the access panel ontop of the one flange. I noticed that the middle portion of the flange was bowed up causing the access panel to not be flush with the rest of the side panel. The ends of the flange are okay, just the middle is bowed.
I'm a little pissed to say the least. The only time I don't pre-screw and align everything perfect and it bites me, at the very end of the build none the less. Do you think some sanding of the access flange plus some sanding of the access panel can solve this flush issue?
How major of a factor is the bowing of the access panel flange? Will it cause leakage?
I'm so pissed I've even thought about using a straight flush trim bit and carving it out but I think that will make it into an even worst situation.
Thoughts?
See pics below: