OTop12 Build Thread

Post your build odyssey here.
Message
Author
miked
Posts: 1209
Joined: Fri Oct 23, 2009 4:18 am
Location: San Antonio, TX

Re: OTop12 Build Thread

#211 Post by miked »

Yep, I've used those terminal strips many times...when there was room. There just wasnt' room on the boards for them this time around. But then again, maybe there is. I'll think it over today...it would just be one more thing (four more, actually) to buy and wire up...not to mention one more posssible point of failure (8 little screws to worry about coming loose) Though it WOULD come in handy if I ever needed to open the cab up. I am inclined to just direct-solder the wires for the drivers and jacks, leaving a little slack in the wires (neatly zip-tied) in case I ever need to cut things loose to repair stuff. I'll think on it.

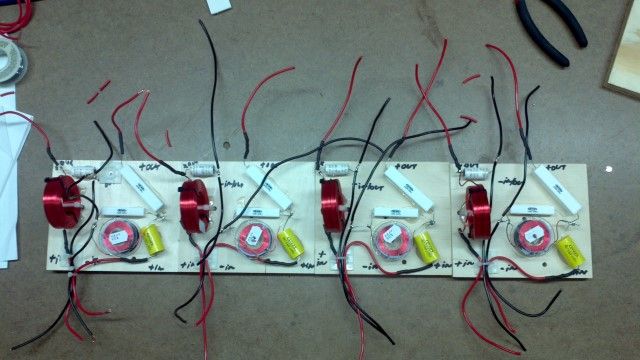
I many be wrong, but I think my inductors are OK (not optimal, obviously) the way they are. They are oriented in different directions and don't "aim at each other." Besides, if you look at the pre-built crossovers that many of us buy, the inductors are even closer together than mine, though the LP coil is turned slightly more the the left. See?

Image

Tonight, I'll clear off the mess on my bench, set up my "testing rig" and run all the crossovers through the paces with both a woof and a tweet. Then it's time to start buttoning up cabs.

Grant Bunter
Posts: 6912
Joined: Mon Nov 28, 2011 11:12 am
Location: Ilfracombe Queensland Australia
Contact:

Re: OTop12 Build Thread

#212 Post by Grant Bunter »

You may well be right mike, regarding alignment of inductors.

This is worth a read:
http://stereointegrity.com/Files/Crosstalk.pdf

And not long after I got here, someone had pics and charts of how much it mattered, but for the life of me I can't remember who...
Built:
DR 250: x 2 melded array, 2x CD horn, March 2012 plans.
T39's: 4 x 20" KL3010LF , 2 x 28" 3012LF.
WH8: x 6 with melded array wired series/parallel.
Bunter's Audio and Lighting "like"s would be most appreciated...

miked
Posts: 1209
Joined: Fri Oct 23, 2009 4:18 am
Location: San Antonio, TX

Re: OTop12 Build Thread

#213 Post by miked »

Thanks, Grant. I appreciate the concern. I"ve seen the chart to which you're referring; and I know it does matter, but I feel the layout I have is OK based on what I've seen other Otop xovers look like. If I hear problems, I'll change it. For now, it's staying as is.

*edit* Found it. Bottom of page. Crap. I may have to have another look at it. :chainsaw:

http://www.troelsgravesen.dk/coils.htm
Last edited by miked on Tue Apr 09, 2013 5:49 pm, edited 1 time in total.

Grant Bunter
Posts: 6912
Joined: Mon Nov 28, 2011 11:12 am
Location: Ilfracombe Queensland Australia
Contact:

Re: OTop12 Build Thread

#214 Post by Grant Bunter »

^ no probs
Built:
DR 250: x 2 melded array, 2x CD horn, March 2012 plans.
T39's: 4 x 20" KL3010LF , 2 x 28" 3012LF.
WH8: x 6 with melded array wired series/parallel.
Bunter's Audio and Lighting "like"s would be most appreciated...

miked
Posts: 1209
Joined: Fri Oct 23, 2009 4:18 am
Location: San Antonio, TX

Re: OTop12 Build Thread

#215 Post by miked »

Now I'm not so sure. All 4 of my xovers aren't exactly identical, but more or less, the coils are in teh same place. Look at this pic.

Image

While they are rotated in relation to each other, "badly", they aren't in-line with each other. The HP coil sits lower on the board than the LP coil. Wonder what Bill would say?

User avatar
Bill Fitzmaurice
Site Admin
Posts: 28955
Joined: Tue May 02, 2006 5:59 pm

Re: OTop12 Build Thread

#216 Post by Bill Fitzmaurice »

miked wrote: The HP coil sits lower on the board than the LP coil. Wonder what Bill would say?
Close enough.

miked
Posts: 1209
Joined: Fri Oct 23, 2009 4:18 am
Location: San Antonio, TX

Re: OTop12 Build Thread

#217 Post by miked »

Bill Fitzmaurice wrote:
miked wrote: The HP coil sits lower on the board than the LP coil. Wonder what Bill would say?
Close enough.

*whew* REALLY didn't feel like "un-hot-gluing" that big coil. Thanks, Bill! :hyper:

miked
Posts: 1209
Joined: Fri Oct 23, 2009 4:18 am
Location: San Antonio, TX

Re: Terminal strips

#218 Post by miked »

I caved. :clap:

All four cabs look like this now.
Image

Crossover outputs go to the terminal strip, terminal strip goes to drivers. The connection from the back panel to the crossover will be made with quick-disconnect terminals. I crimp down on the female terminal, so the male side is difficult to push in. Once joined they aren't coming apart unless you really pull on them. More tomorrow.

88h88
Posts: 1606
Joined: Mon Jul 04, 2011 10:20 am
Location: Coventry, UK

Re: OTop12 Build Thread

#219 Post by 88h88 »

That's really nice and neat. My crossovers look awesome but they're not mounted as nicely as those will be. In future though...
4xOT12s, 2xT39s@22", TTLS@18", 2xT60@18"

miked
Posts: 1209
Joined: Fri Oct 23, 2009 4:18 am
Location: San Antonio, TX

Re: OTop12 Build Thread

#220 Post by miked »

Thanks. The zip-tie bases really help keep things tidy...it's a habit I picked up way back in my car audio days. You can't see it in the pics, but those bases have a screw hole in the middle in addition to the peel-and-stick back.

My crossovers did not turn out neat at all, but they are physically and electrically sound and that's what matters. Doing them myself I saved a lot of cash vs. buying the prebuilt ones, which was my preferred way to go. Of course, the "saved money" went towards wire, screws, corners, paint and the other 33 things that fall under "incidentals" when building cabs.

I should've left the connecting wires MUCH longer than I did, but I was in a hurry to get them done and wasn't thinking "down the line". I'll have to solder/heat shrink the wires from the jacks to the LP/HP inputs. Again, not pretty, but it'll work. That's tonight! I'll get at least one of the OTops buttoned up tonight...can't wait!

I have a Driverack PA+ in my amp rack, but that equipment is BURIED behind my workbench and 44 other boxes ATM. I have my Crown XLS1500 that I've been using for driver break-in and testing; it has a 24db/oct variable xover built in. I'll probably set it highpassed at slightly above 100Hz just to see what the cab sounds like. Running the tweets through the xover yesterday, I could immediately tell there will be quite a bit of EQing involved. That's OK; that's what I bought the Driverack for. I've also got a Behringer dual-mono 31-band EQ that I can use in addition, so I'll be just fine.

miked
Posts: 1209
Joined: Fri Oct 23, 2009 4:18 am
Location: San Antonio, TX

Ran out of heatshrink

#221 Post by miked »

:cussing: Why am I not done? Because I ran out of heat shrink tubing. To be more specific, ran out of the size that fits over 14-16 gauge crimp-on terminals. It acts as a strain relief; been doing it that way for years and at the last minute, I'm not cutting any corners. Got the crossovers wired up and mounted, got the woofs mounted (I love Recex/Kreg screws!) and ran them all with the backs off. Good Lord, these things are LOUD. :shock: And all I had was my laptop feeding directly into the power amp; no proper input level to get a proper signal in/out of the amp. My ears were ringing and I could feel the snap of the snare in my chest...and the cooling fan of the amp wasn't even running. :owned: I took a look at the woofer cones and there was barely any movement. I'm gonna love these things! Had the crossover on the amp set at a 105Hz/24db highpass, btw.

Anyway, pics!

What is badass? THIS, is badass. 8)
Image
Image
Image
Image

Closeup of crossover and terminal block. The +/- for the tweets are reversed at the terminal block. Look at the two wires on right-hand side of the terminal block; black to red and red to black.
Image

Note the ziptie on the bottom of the cab. You can just see it poking through the foam. There's a ziptie base under there. Wires coming off the Speakon are ziptied to the back panel, then ziptied again in front of the crossover. Almost impossible to accidentally pull wires loose that way. More techniques from my car audio days.
Image

No pic, but I did silicone around the Speakons where they come through the back panel. It should take me all of two hours tomorrow night to wire the Speakons, put the gasket tape around the back and screw down the back covers. Grills will be ordered next week. I hope to start on my custom speaker stand mounting plates this weekend. OH, along those lines, I'm very glad I did not go with my original plan of trying to mount the tophat up into the rear of the cab. Though the rear panel is not mounted yet, the center of gravity is right behind the baffle, in the speaker compartment...almost even with the rear of the handle hole/port. NO way the tophat would've fit there. Word to the wise.

STAY TUNED!

Bruce Weldy
Posts: 8566
Joined: Fri Nov 27, 2009 11:37 am
Location: New Braunfels, TX

Re: Ran out of heatshrink

#222 Post by Bruce Weldy »

miked wrote::cussing: Why am I not done? Because I ran out of heat shrink tubing.

We really need an OCD smilie...... :mrgreen:

Not thinking you need a lot of strain relief when there is no strain. It's sealed inside the speaker.

I think we're at the point where Dr. Freud (you know, the guy that makes saw blades and router bits) would say that you are not wanting to finish because either:

A. You are afraid it won't work

B. You won't know what to do with your time since this has become a way of life for the last few weeks.

Mike, it's ok......put on the back. Plug in the Speakon....let it rip. C'mon - you can do it!
5cp-logo.png
5cp-logo.png (19.09 KiB) Viewed 1493 times

6 - T39 3012LF
4 - OT12 2512
1 - T24
1 - SLA Pro
2 - XF210


"A system with a few knobs set up by someone who knows what they are doing is always better than one with a lot of knobs set up by someone who doesn't."

miked
Posts: 1209
Joined: Fri Oct 23, 2009 4:18 am
Location: San Antonio, TX

Re: OTop12 Build Thread

#223 Post by miked »

LOL! Nice. Hey, I never said I wasn't OCD. :fruit: This is just the final piece of the puzzle...just trying to do everything as well as it's possible to do. But you hit the nail on the head with the "Become a way of life" comment. These cabs have occupied almost every minute of my considerably sparse free time. When you can only work on them 2-3 hours a night, it takes ahwile to get from one major step to another. There are so many little nitnoid details in tops...building/wiring/installing the crossovers took almost as much time as building the cab itself, for example. I'm looking forward to the Titans. Nice, straightforward wood construction, no electronic piece to worry about.

The cabs work; I had all four running last night and I wasn't kind with the volume either. :shock: Pretty amazing how the tweeter array smooths out once it's running with woofer. I'm very curious to see what they sound like after a good run through the RTA/auto EQ on the Driverack. The REAL test comes after they are buttoned up. That'll be tonight.

miked
Posts: 1209
Joined: Fri Oct 23, 2009 4:18 am
Location: San Antonio, TX

99% done!

#224 Post by miked »

Well, they're "done" but not "finished." Grills will be purchased early next week. :broke: I listened to them in the garage, with just the laptop plugged straight into a Crown XLS1500, highpass at 98Hz. I'm amazed at how clear and defined they are...and there's not a hint of EQ on them yet. They most definitely need EQing...mostly in the midrange area and I think I hear a bit of "boxiness" around 250Hz-ish. We'll see what the RTA says when I get them out in the backyard this weekend. That said, it's pretty impressive how well the woof and tweets and crossover all work together; it's obvious a whole lot of time, trial and error went into component validation/selection. :clap:

So the rest of the build...

Proper pigtails (with OCD-approved heatshrink) Larger 12-gauge female disconnects on the right were used to be able to fit both pieces of 14ga wire in there.
Image

Connection to Speakons
Image
Image

Dual rows of 3/8" wide gasket tape, one on either side of the screw holes. BTW, one roll of the stuff is enough for 4 cabs, dual rows of gasket tape. I bought 2 rolls, but wound up with about 3 feet of the first roll left over. It's sufficient to buy one roll.
Image
Image

Front shot of the two pairs
Image
Image

And for the grand finale, the backs. 8)
Image
Image

The back panels are held on with 30, 1.5" #8 screws with finish washers on them. These are the washers, sitting on the back panel as I was screwing them in. How powerful is the magnet on a Delta Pro? THIS powerful:
Image
Image

So far I'm very impressed with how they sound...just effortless volume...my neighbors are going to love me this weekend.

With blacked-out grills and corners on there I'll be totally happy with their appearance. Can't wait to get them EQ'd and playing with subs! These mothers are very heavy; didn't get a chance to get them on a scale yet, but I'm guessing 50 pounds each and the grill will add at least another pound or two.

I'll snap some pics this weekend when I've got them in the backyard. Stands will not be done though...hmm...I'll have to figure out what I'm going to put 100 pounds of speaker per side on. Maybe I'll just setup sawhorses with 3/4" ply across them and call it good. My backyard is roughly 20'x50', much better listening environment than my overstuffed 2-car garage. Thanks for reading my thread and for all the advice you've given me; I've learned a whole lot by building these....could build a nicer pair in half the time now, but isn't that the way it always works? Live and learn, right? :)

ps
An important footnote on speaker gasket compression. Last night when I installed the woofers, I tightened the Kreg screws (Recex...same thing) in a star pattern snug, waited about 15 minutes, then tightened them again. I let them sit overnight. Tonight, before buttoning up the back cover I went back and tightened them AGAIN. Most screws turned about another 3/4s of a turn. Check your woofer mounting screws/bolts before buttoning up the cab!

Grant Bunter
Posts: 6912
Joined: Mon Nov 28, 2011 11:12 am
Location: Ilfracombe Queensland Australia
Contact:

Re: OTop12 Build Thread

#225 Post by Grant Bunter »

Hooray! :clap: :clap: :clap:

Epic build thread, warts and all, loved it!
Plenty of help for people who read it too.

Now when you crank these babies over the weekend, I know you're going to have a rather wide smile :)
Built:
DR 250: x 2 melded array, 2x CD horn, March 2012 plans.
T39's: 4 x 20" KL3010LF , 2 x 28" 3012LF.
WH8: x 6 with melded array wired series/parallel.
Bunter's Audio and Lighting "like"s would be most appreciated...

Post Reply