OTop12 Build Thread

Post your build odyssey here.
Message
Author
Bruce Weldy
Posts: 8538
Joined: Fri Nov 27, 2009 11:37 am
Location: New Braunfels, TX

Re: OTop12 Build Thread

#196 Post by Bruce Weldy »

bmf wrote:When you get done with your painting put a piece of plastic wrap on the surface of the paint before sealing the can. It will keep it from skimming the top which is a pain to get out of the can.

While that's not a bad idea, I've had Duratex sit for a year then open it up. Just like the day I got it. Pretty amazing stuff.

6 - T39 3012LF
4 - OT12 2512
1 - T24
1 - SLA Pro
2 - XF210


"A system with a few knobs set up by someone who knows what they are doing is always better than one with a lot of knobs set up by someone who doesn't."

miked
Posts: 1209
Joined: Fri Oct 23, 2009 4:18 am
Location: San Antonio, TX

Re: OTop12 Build Thread

#197 Post by miked »

I spent the entire day in the garage with just breaks for food and a quick trip to Lowes (you always run out of something...today it was glue sticks). I wound up taking off about 3/4s of the piezo elements, grinding down the offending mounting ears and reinstalling before wiring. I did make wiring a lot easier, so I highly recommend getting the elements aligned correctly from the get-go as opposed to doing it my way and wasting 3 hours. There are just THREE things left to do; build and install the crossovers, install the woofers, wire it up to the rear jacks. I'm shot, so I'll let the pics do the talking.

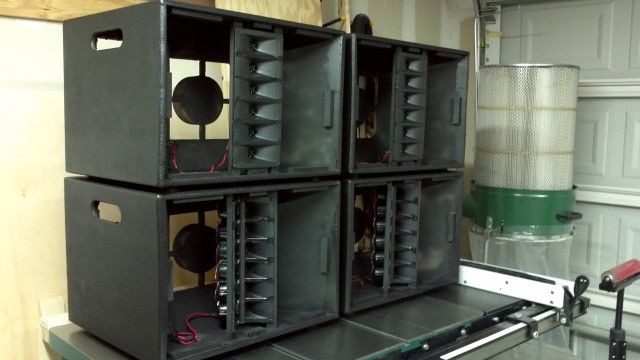
Diffusers installed.
Image
Image

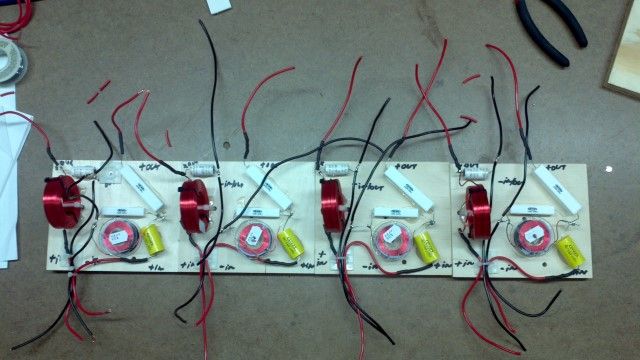
Melded arrays wired. What a PITA this was. I sure hope the payback on the melded vs. straight arrays is worth the hours I spent. BTW: ALL arrays were tested prior to installation. As far as I can tell, all elements are working.
Image
Image

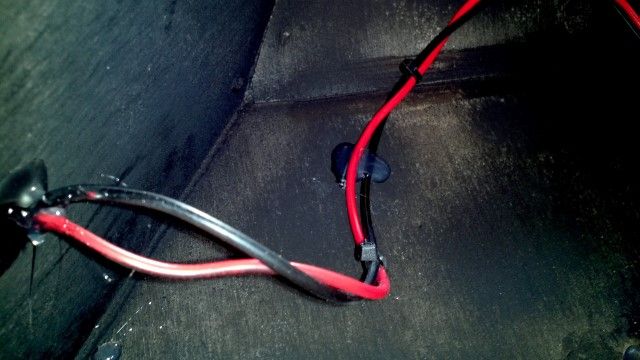
All arrays were installed with quick disconnects, which were properly crimped and then heat-shrinked. I did this w/serviceability in mind. Soldering would be better, but if I ever need to remove the array, this will help greatly. The wires feeding the array were also hot-glued in place; there will be no wires flopping around in the breeze, so the disconnects wont' be moving. They aren't going anywhere.
Image
Image
Image
Image

Something you don't see everyday; the rear of a melded array through the baffle. 8)
Image

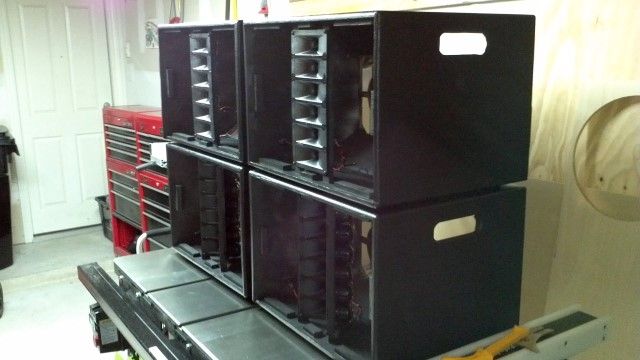
And....done. Of course, they'll look much better with grills and corners. Coming soon.
Image
Image
Image
Image
Image
Image

Lonely back panels, waiting to be called to active duty.
Image

Trying to fit the crossovers (both) on a 5x6 board is not turning out to be easy. I keep toying w/the idea of separating them into two boards, but I really want them both on one board. Less wiring mess that way. I'm done for the night. Thanks for looking!

88h88
Posts: 1603
Joined: Mon Jul 04, 2011 10:20 am
Location: Coventry, UK

Re: OTop12 Build Thread

#198 Post by 88h88 »

miked wrote:I sure hope the payback on the melded vs. straight arrays is worth the hours I spent.
Totally worth it. You've done a really nice job on this build buuuuuddy.
4xOT12s, 2xT39s@22", TTLS@18", 2xT60@18"

miked
Posts: 1209
Joined: Fri Oct 23, 2009 4:18 am
Location: San Antonio, TX

Re: OTop12 Build Thread

#199 Post by miked »

Thanks, 88h88. I think I've done OK, but the proof will be in the pudding when I fire them up this week. Got family obligations to take care of today, so I'll be lucky to get the crossovers laid out, boards drilled and at least the components hot glued/zip tied down. Probably won't get that far though. Needless to say, I am really looking forward to getting them done and HEARING THEM. I may not have any Titans to go with them (yet) but at least I have some subs to use. Not BFM, but they get the job done.

In other news, last night I came up with a brilliant (in my small brain, anyway) idea for stands. I've been tossing ideas around for almost as long as I've wanted to build OTops. I really wanted to get some metal stands fabbed up, ala PulseMan's awesome stands, but that is just not financially possible at this time. :broke:

My idea is relatively cheap, will look good and will be VERY, VERY sturdy (2 "very's" for emphasis); that is very important to me. How sturdy? "Sturdy" as in "Nothing short of a 60mph wind or 180-pound drunk dude crashing into them is going to knock them over."

Additionally, I already have much of the materials needed and the total cash outlay will be less than $150. There'll be a separate complete build thread (vs. an "in-progress" thread) in this forum when they are done, which should be by next weekend. No more hints as I'm not giving the idea away...you'll have to wait and see the final product. :mrgreen: Nothing groundbreaking; i.e. it's been done before, but not quite like this.

Grant Bunter
Posts: 6912
Joined: Mon Nov 28, 2011 11:12 am
Location: Ilfracombe Queensland Australia
Contact:

Re: OTop12 Build Thread

#200 Post by Grant Bunter »

Pulseman's idea is awesome.

You can also achieve a slightly less industrial option with 2 regular stands side by side (ie for two sides you need 4 stands) and a platform with 2 regular tophats on it to attach it to the stands. Then strap your cabs to the platform.

I think Donny (Doncolla) does it this way and has pics somewhere.

It's worth a thought, and one day it will be how I do it too...
Built:
DR 250: x 2 melded array, 2x CD horn, March 2012 plans.
T39's: 4 x 20" KL3010LF , 2 x 28" 3012LF.
WH8: x 6 with melded array wired series/parallel.
Bunter's Audio and Lighting "like"s would be most appreciated...

miked
Posts: 1209
Joined: Fri Oct 23, 2009 4:18 am
Location: San Antonio, TX

Re: OTop12 Build Thread

#201 Post by miked »

Grant Bunter wrote:Pulseman's idea is awesome.

You can also achieve a slightly less industrial option with 2 regular stands side by side (ie for two sides you need 4 stands) and a platform with 2 regular tophats on it to attach it to the stands. Then strap your cabs to the platform.

I think Donny (Doncolla) does it this way and has pics somewhere.

It's worth a thought, and one day it will be how I do it too...
Well, there goes my big secret, down to the last detail. Thanks a lot, Grant. LOL! That's exactly what I'm doing. The majority of the expense is from the additional two stands I had to buy. A single tophat barely cuts it for one of these cabs (IMO), let alone 2. Whereas your average commercial top is tall and narrow, these are short and squat and have much more side-to-side "rocking weight" if you will. Platform mounting is definitely the way to go. Getting two stands ala PulseMan done up would cost almost as much as the four OTops...I just can't swing it. Plus, the setup/teardown has opportunities for things to go wrong. I.E. You'd always have to carry additional nuts/bolts/washers...just more stuff to lose. Not only is a platform supported by two stands very stable, it makes a nifty place to hang lights from, too. :mrgreen:

More to follow. Still trying to get the crossovers laid out. I think I've got it, but am double checking things.

User avatar
DJPhatman
Posts: 5411
Joined: Mon Aug 14, 2006 5:08 am
Location: Warren, MI
Contact:

Re: OTop12 Build Thread

#202 Post by DJPhatman »

miked wrote: Still trying to get the crossovers laid out. I think I've got it, but am double checking things.
Post a picture of your lay-out. A picture is worth a thousand words! :mrgreen: :ugeek:
I know money often seals the deal, but seriously, quality is an investment, not an expense... Grant Bunter
Accept the fact that airtight and well-braced are more important than pretty on the inside. Bill Fitzmaurice

Grant Bunter
Posts: 6912
Joined: Mon Nov 28, 2011 11:12 am
Location: Ilfracombe Queensland Australia
Contact:

Re: OTop12 Build Thread

#203 Post by Grant Bunter »

miked wrote: Well, there goes my big secret, down to the last detail. Thanks a lot, Grant. LOL!
:oops:
miked wrote:Not only is a platform supported by two stands very stable, it makes a nifty place to hang lights from, too. :mrgreen:
Now there's an idea I did not think of, good one!
Built:
DR 250: x 2 melded array, 2x CD horn, March 2012 plans.
T39's: 4 x 20" KL3010LF , 2 x 28" 3012LF.
WH8: x 6 with melded array wired series/parallel.
Bunter's Audio and Lighting "like"s would be most appreciated...

User avatar
Bas Gooiker
Posts: 752
Joined: Fri Jul 06, 2012 5:05 pm

Re: OTop12 Build Thread

#204 Post by Bas Gooiker »

Can't you just make some support for your platform out of pieces of trussing? Very sturdy and easy to setup.
Life is just a game, don't take it to seriously!

miked
Posts: 1209
Joined: Fri Oct 23, 2009 4:18 am
Location: San Antonio, TX

Re: OTop12 Build Thread

#205 Post by miked »

I guess I could, but; I don't own any trussing, I can't weld (and don't own any welding equipment) and anything that has to be bolted together...has to be bolted together. Anything I tried to make out of metal would look "cobbled together" and probably wouldn't be safe.

Don't get me wrong; in my perfect world I'd have Pulseman's stands. But being that I don't do the DJ/live sound thing for a living, I can't see spending that kind of coin to have metal stands fabbed up, when I have an equivalent solution "at hand."

For me, it was quicker, easier and cheaper to just buy two more stands and two, 2'x4', 3/4" oak plywood to make the platforms from. I already had the tophats as I'd originally planned on installing them in the OTops proper. The build will require more wood than just those two sheets of ply, but I have plenty of scraps in the shop to use.

The stands I'm using (On Stage Stands SS7725B) are rated at 120 lbs capacity each. I take that with a grain of salt; figure 100 lbs each. Two stands give a capacity of 200 lbs. Two OTops (Delta Pro loaded) will be roughly 50 pounds each. Plus another 20 for the platform. That's 120 lbs, leaving me at least 80 pounds of wiggle room...figure a scanner-type light hanging under each platform...another 20 pounds. Still got 60 to play with. Sure; two stands per side takes up more room and leaves another 3 legs to trip over, but the stands' legs will be "interwoven" if you will...the additional footprint isn't all that much larger and the advantages in safety and stability will be well worth it.

I ran out of time last night; I wanted to take a pic of my proposed xover layout...I am 99% sure I got it right. It looks ugly, but it should work. The PITA detail is on the positive side of the high pass circuit. The capacitor, coil, 30 and 4 ohm resistors all have to be soldered together, basically. Not sure what the best way to do that is. I have a high-temp soldering iron, but am worried about damaging components with all that heat applied for a long time. Hope that makes sense. I may clip an alligator clip in there to use as a heatsink. Any tips would be appreciated.

I would really like to get the crossovers at least laid-out (mounting boards drilled, etc) tonight.

User avatar
Tom Smit
Posts: 7566
Joined: Sat Jan 05, 2008 1:24 pm
Location: Sarnia, Ont. Canada

Re: OTop12 Build Thread

#206 Post by Tom Smit »

miked wrote: Not sure what the best way to do that is. I have a high-temp soldering iron, but am worried about damaging components with all that heat applied for a long time. Hope that makes sense. I may clip an alligator clip in there to use as a heatsink. Any tips would be appreciated.
Start by having the components wired together. Then, with the soldering iron turned on and the tip in mid-air, occasionally touch the solder to the tip. When the solder melts on the tip (may take a few moments), then bring the tip against the connection and dab the solder wire onto the tip causing the solder to run down onto the connection. This part should take a max of three seconds. :)
TomS

miked
Posts: 1209
Joined: Fri Oct 23, 2009 4:18 am
Location: San Antonio, TX

Re: OTop12 Build Thread

#207 Post by miked »

Ah, similar to what I did when wiring the arrays. Thanks, Tom. Sooo close at this point...can't wait to fire'em up!

miked
Posts: 1209
Joined: Fri Oct 23, 2009 4:18 am
Location: San Antonio, TX

Crossovers done

#208 Post by miked »

Well, four hours and one burnt finger later, the crossovers are done. They won't win any beauty contests, but they're solid. I tested the first one I did with (all) four tweet arrays and it was good to go. No time to test the other three and right now I don't remember which one was the first one finished...so I've got to test them all tomorrow with at least one tweet array and a woofer (woofs not mounted yet). Got to test them before mounting them. I've never done crossovers without a PCB before...and probably won't again. LOL! I opted to have in/out pigtails to make wiring into the cab easier. Still undecided if I'll use quick disconnects (crimp on) or just solder to the wires in the cab. Feel free to voice your opinion on that, please. Pics and I'm done.

I have separate hot and ground wires for the lowpass/highpass filters, though they will share a common feed on the input side.

Image
Image
Image
Image

Reverse angle to see the connections.
Image

RE: Wiring the tweets. The tweets have to be wired out of phase, correct? I should just connect the + from the tweets to the - output of the xover and - from the tweets to the + of xover, correct?

gdougherty
Posts: 2623
Joined: Sun Jan 28, 2007 11:13 am
Location: Denver, CO
Contact:

Re: OTop12 Build Thread

#209 Post by gdougherty »

Don't have pictures, but I found 6 position screw down terminal strips at Home Depot that made wiring of the crossover components much easier. There's an input pair, LF pair and HF pair with an input and output side to each. I did all the filter cabling on one side and the jack and driver cabling on the other. It's a very simple matter to unscrew anything I need in order to pull it. On the few occasions I've opened up the cab during repaints or upgrades it was most handy to pull the leads to the back panel.


Edit: Something like this: http://www.allelectronics.com/make-a-st ... AMP/1.html

Grant Bunter
Posts: 6912
Joined: Mon Nov 28, 2011 11:12 am
Location: Ilfracombe Queensland Australia
Contact:

Re: OTop12 Build Thread

#210 Post by Grant Bunter »

If you can, rotate the larger inductor about 20 degrees clockwise, so that it ends up perpendicular to the smaller inductor.
It wouldn't be an issue if the 2 inductors were more than 6 inches apart, but since that's not the case, best to do it now. It stops some sort of interference...
Built:
DR 250: x 2 melded array, 2x CD horn, March 2012 plans.
T39's: 4 x 20" KL3010LF , 2 x 28" 3012LF.
WH8: x 6 with melded array wired series/parallel.
Bunter's Audio and Lighting "like"s would be most appreciated...

Post Reply