OTop12 Build Thread
Re: OTop12 Build Thread
Mike, Duratex will dry to the touch in a very short time. It takes about 7 days to fully cure and harden. If your space heater can get the garage very warm safely, use it. You should not have to wait very long between coats, maybe an hour or so if it's cool. The warmer and dryer it is, the faster the time you can recoat. Don't worry about sanding the exterior smooth, as Duratex will hide most small imperfections. Leave the surface a bit "rough" after 60 grit sanding to give a better "bite" to the surface. There is no need or want to sand smoother than 60 grit.
I know money often seals the deal, but seriously, quality is an investment, not an expense... Grant Bunter
Accept the fact that airtight and well-braced are more important than pretty on the inside. Bill Fitzmaurice
Accept the fact that airtight and well-braced are more important than pretty on the inside. Bill Fitzmaurice
Re: OTop12 Build Thread
Thanks, DJPhatman. It would be nice to get the cabs DONE, both coats in a day. I've only used Duratex once before and did not rough up the surface at all. I wound up with a sandpaper finish, which while tough as nails, is not what I wanted. Right now my cabs are smooth, having just had all the spackle sanded smooth with 120-grit paper. Will roughing them up a bit help with a more "Duratex-like finish" (vs. a sandpaper-like finish)?
T48 build thread: http://billfitzmaurice.info/forum/viewt ... 30&t=20315
OTop12 build thread: http://billfitzmaurice.info/forum/viewt ... 30&t=19214
OTop12 build thread: http://billfitzmaurice.info/forum/viewt ... 30&t=19214
-
Bruce Weldy
- Posts: 8719
- Joined: Fri Nov 27, 2009 11:37 am
- Location: New Braunfels, TX
Re: OTop12 Build Thread
+1 to all of that.....except it will be in the 70s today...won't need the heater.DJPhatman wrote:Mike, Duratex will dry to the touch in a very short time. It takes about 7 days to fully cure and harden. If your space heater can get the garage very warm safely, use it. You should not have to wait very long between coats, maybe an hour or so if it's cool. The warmer and dryer it is, the faster the time you can recoat. Don't worry about sanding the exterior smooth, as Duratex will hide most small imperfections. Leave the surface a bit "rough" after 60 grit sanding to give a better "bite" to the surface. There is no need or want to sand smoother than 60 grit.
Often I can paint all the surfaces that I can get to on all the cabs - and by the time I'm through, I can start over again on the second coat. It really does dry pretty fast. Then put some plastic wrap on the roller, go have lunch, then you can turn 'em over and get a couple of coats on the bottom. Screw on the feet, then you can turn 'em back up and hit the top with another coat.
Another hint....don't even bother with pouring the duratex into a pan. Just dip the roller in the bucket. It won't even drip and there's no cleanup afterward....just throw away the roller and close the bucket.
6 - T39 3012LF
4 - OT12 2512
1 - T24
1 - SLA Pro
2 - XF210
"A system with a few knobs set up by someone who knows what they are doing is always better than one with a lot of knobs set up by someone who doesn't."
-
Bruce Weldy
- Posts: 8719
- Joined: Fri Nov 27, 2009 11:37 am
- Location: New Braunfels, TX
Re: OTop12 Build Thread
The finish is determined by the nap on the roller. Try to find the blue ones like Leland sells.miked wrote: Will roughing them up a bit help with a more "Duratex-like finish" (vs. a sandpaper-like finish)?
6 - T39 3012LF
4 - OT12 2512
1 - T24
1 - SLA Pro
2 - XF210
"A system with a few knobs set up by someone who knows what they are doing is always better than one with a lot of knobs set up by someone who doesn't."
Re: OTop12 Build Thread
Got it, Bruce. Thanks much!
Bruce Weldy wrote:+1 to all of that.....except it will be in the 70s today...won't need the heater.DJPhatman wrote:Mike, Duratex will dry to the touch in a very short time. It takes about 7 days to fully cure and harden. If your space heater can get the garage very warm safely, use it. You should not have to wait very long between coats, maybe an hour or so if it's cool. The warmer and dryer it is, the faster the time you can recoat. Don't worry about sanding the exterior smooth, as Duratex will hide most small imperfections. Leave the surface a bit "rough" after 60 grit sanding to give a better "bite" to the surface. There is no need or want to sand smoother than 60 grit.
Often I can paint all the surfaces that I can get to on all the cabs - and by the time I'm through, I can start over again on the second coat. It really does dry pretty fast. Then put some plastic wrap on the roller, go have lunch, then you can turn 'em over and get a couple of coats on the bottom. Screw on the feet, then you can turn 'em back up and hit the top with another coat.
Another hint....don't even bother with pouring the duratex into a pan. Just dip the roller in the bucket. It won't even drip and there's no cleanup afterward....just throw away the roller and close the bucket.
T48 build thread: http://billfitzmaurice.info/forum/viewt ... 30&t=20315
OTop12 build thread: http://billfitzmaurice.info/forum/viewt ... 30&t=19214
OTop12 build thread: http://billfitzmaurice.info/forum/viewt ... 30&t=19214
Re: OTop12 Build Thread
You can paint the entire box. Use a 5 gallon bucket on a stand and place the mouth of the box over the bucket (cut to fit). This will allow you to paint all surfaces at one time and not worry about setting it on soft material. If you can get them in the sun after painting do it. If you do want to Duratex inside the mouth you can still do it later but with grills installed, flat black works fine.
On another note. You can use automotive fabric dye to paint the foam a solid black (where needed) without damaging it. It is reasonably cheap and available in spray cans. very potent stuff. don't get it on anything you don't want to be that color for a couple hundred years.
This is a great thread. One of the best discussed and documented for an otop i have seen. Although I haven't been here that long myself. Great Job!!

Re: OTop12 Build Thread
For a moment I thought you were going to suggest dipping the cab in the 5 gallon bucketbmf wrote:You can paint the entire box. Use a 5 gallon bucket on a stand and place the mouth of the box over the bucket
+1 to that.This is a great thread. One of the best discussed and documented for an otop i have seen.
Re: OTop12 Build Thread
Thanks for the kind words, all. I can't tell you how many tens of build threads, review threads and other assorted pics I have checked out on this website, planning my build. The build threads I read were incredibly helpful to me, so paying it forward is good karma. Even after buying the plans, I was a little lost as I've never built "complicated" cabs before, and kept referring back to those build threads and of course, my 100 different questions that you all answered in detail. It's funny now that I have built some OTops, I could build better ones in half the time. Ah, the irony.  These are turning out OK though.
Some teaser pics for now. Last night was interesting. I got one light/medium coat on all cab surfaces (back panels too) and by the time I finished the last one, the first three were almost dry. So I kept going. After a few painting/drying cycles, what I wound up with was:
Back panels are done (1 light coat, then 1 heavy coat, then 1 "skim coat")
Bottoms are done. (1 light coat, 1 really heavy coat)
One side is done. (1 light coat, 1 heavy coat, 1 skim coat)
Pics or no cabs!
Bottom

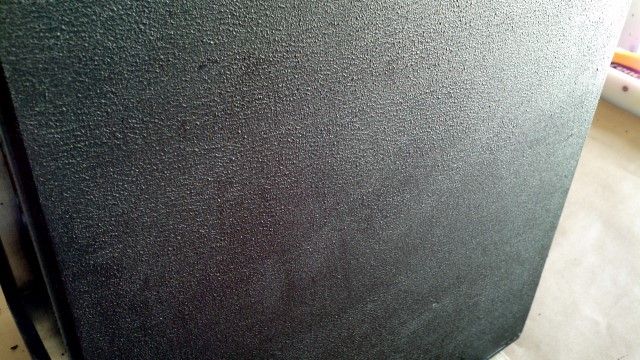
Side (very happy with this texture)


This is what the top of a cab looked like after what I thought was a medium-ish coat. It turned out more like a skim coat, but that's OK. Just for your reference (and mine!) BTW: the recessed holes are where the feet from the stacking cab will rest. Those holes were sprayed flat black...3 or 4 coats.

Backs

I'm using this 4-inch roller handle and rollers. I found that applying pressure gets you a smooth, flat texture and using a heavy-ish amount of Duratex and very light "skimming the surface" pressure gets you a nice, bumpy finish.

This size roller is PERFECT for dipping directly into the bucket. Thanks for that tip, Bruce. I have used about 1.5 inches out of the gallon of DTex so far. I will easily have 2/3rds of the bucket left after I'm done. Perfect for the two T48s that are next. More later. Cabs will be done this weekend, hopefully. I still have to:
Wire the arrays...not looking forward to that.
Build the crossovers.
Install crossovers, arrays, woofs.
Grills will be ordered from Reliable next week, after payday.
Some teaser pics for now. Last night was interesting. I got one light/medium coat on all cab surfaces (back panels too) and by the time I finished the last one, the first three were almost dry. So I kept going. After a few painting/drying cycles, what I wound up with was:
Back panels are done (1 light coat, then 1 heavy coat, then 1 "skim coat")
Bottoms are done. (1 light coat, 1 really heavy coat)
One side is done. (1 light coat, 1 heavy coat, 1 skim coat)
Pics or no cabs!
Bottom
Side (very happy with this texture)
This is what the top of a cab looked like after what I thought was a medium-ish coat. It turned out more like a skim coat, but that's OK. Just for your reference (and mine!) BTW: the recessed holes are where the feet from the stacking cab will rest. Those holes were sprayed flat black...3 or 4 coats.
Backs
I'm using this 4-inch roller handle and rollers. I found that applying pressure gets you a smooth, flat texture and using a heavy-ish amount of Duratex and very light "skimming the surface" pressure gets you a nice, bumpy finish.
This size roller is PERFECT for dipping directly into the bucket. Thanks for that tip, Bruce. I have used about 1.5 inches out of the gallon of DTex so far. I will easily have 2/3rds of the bucket left after I'm done. Perfect for the two T48s that are next. More later. Cabs will be done this weekend, hopefully. I still have to:
Wire the arrays...not looking forward to that.
Build the crossovers.
Install crossovers, arrays, woofs.
Grills will be ordered from Reliable next week, after payday.
T48 build thread: http://billfitzmaurice.info/forum/viewt ... 30&t=20315
OTop12 build thread: http://billfitzmaurice.info/forum/viewt ... 30&t=19214
OTop12 build thread: http://billfitzmaurice.info/forum/viewt ... 30&t=19214
-
Grant Bunter
- Posts: 6912
- Joined: Mon Nov 28, 2011 11:12 am
- Location: Ilfracombe Queensland Australia
- Contact:
Re: OTop12 Build Thread
Hey mike,
As far as wiring the arrays, it can be done quite quickly if you have a ratchet type wire stripper.
Cut an overly long (compared to the length of one side of the array) piece of lighter guage speaker wire, peel off one of the pair. Use the other piece for the -'s (or +'s if you do the -'s first).
Start in the middle, hit the wire with the ratchet stripper about three times in rapid succession and you end up with a gap of about 10mm/ 3/8". Fold the exposed wire over the (pre tinned) lug, hit it with your solder iron and a dab of solder, done. Move on to the next lug. Work out each way from the middle, cutting your leftover off at each end. Do the one side to other side as shorter single pieces of wire.
The wire sheath tends to shrink back if you just sit there doing not much. You don't have to rush, but you can't dawdle either!
I did both my DR250 arrays this way in about 30 minutes all up.
It's certainly heaps quicker than cutting "hundreds" of small pieces.
Hope this helps...
Built:
DR 250: x 2 melded array, 2x CD horn, March 2012 plans.
T39's: 4 x 20" KL3010LF , 2 x 28" 3012LF.
WH8: x 6 with melded array wired series/parallel.
Bunter's Audio and Lighting "like"s would be most appreciated...
DR 250: x 2 melded array, 2x CD horn, March 2012 plans.
T39's: 4 x 20" KL3010LF , 2 x 28" 3012LF.
WH8: x 6 with melded array wired series/parallel.
Bunter's Audio and Lighting "like"s would be most appreciated...
Cabs are done
Or more accurately; "The finish is finished." LOL! Duratex is just the greatest stuff ever...so easy to work with and dries fast. Love the stuff. I wound up putting another heavy coat on all sides. So the final count is:
Rear panels: 1 light coat, 2 heavy coats
Bottoms: 1 light coat, 2 heavy coats
Sides & Top: 2 light coats, 3 heavy coats
I think they turned out pretty good. I also got the Speakons mounted, though I still need to seal them with silicone from the back which I'll do when I'm wiring.
Rear panels


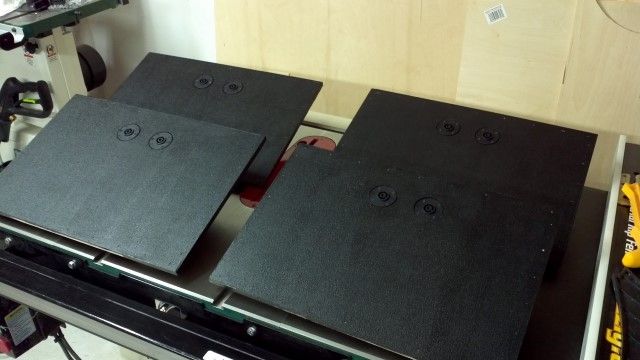
Duratexed cab goodness!


Got the feet on too. The ubiquitous PennElcom 1686 rubber foot and a 1-inch coarse thread panhead screw.

Hey, it's starting to look like something!

I really wanted to put the corners on, but they'd have to come off when it's time to put the backs and grills on...so I'm resisting temptation. For now, anyway. Thanks for looking!
Rear panels: 1 light coat, 2 heavy coats
Bottoms: 1 light coat, 2 heavy coats
Sides & Top: 2 light coats, 3 heavy coats
I think they turned out pretty good. I also got the Speakons mounted, though I still need to seal them with silicone from the back which I'll do when I'm wiring.
Rear panels
Duratexed cab goodness!
Got the feet on too. The ubiquitous PennElcom 1686 rubber foot and a 1-inch coarse thread panhead screw.
Hey, it's starting to look like something!
I really wanted to put the corners on, but they'd have to come off when it's time to put the backs and grills on...so I'm resisting temptation. For now, anyway. Thanks for looking!
T48 build thread: http://billfitzmaurice.info/forum/viewt ... 30&t=20315
OTop12 build thread: http://billfitzmaurice.info/forum/viewt ... 30&t=19214
OTop12 build thread: http://billfitzmaurice.info/forum/viewt ... 30&t=19214
-
Bruce Weldy
- Posts: 8719
- Joined: Fri Nov 27, 2009 11:37 am
- Location: New Braunfels, TX
Re: OTop12 Build Thread
Mike, those look great!
So, when are you gonna' start those T39s? (subliminal hint..)
So, when are you gonna' start those T39s? (subliminal hint..)
6 - T39 3012LF
4 - OT12 2512
1 - T24
1 - SLA Pro
2 - XF210
"A system with a few knobs set up by someone who knows what they are doing is always better than one with a lot of knobs set up by someone who doesn't."
Re: OTop12 Build Thread
Your still progressing!! Lookin' good.
Did you notice how little sanding you needed to do?
Did you notice how little sanding you needed to do?
TomS
Re: OTop12 Build Thread
Thanks guys! I'm pretty psyched tonigh!  It's a great feeling to finally have the "cabs" DONE. Once you start bolting on hardware, it starts to feel like you're coming to the finish line. It was also nice to clean up the shop and roll up all that brown paper that was coated with DTex, spray paint overspray and assorted gunk. I really want to install the drivers, but the crossovers have to go in first. I mean...I could shoehorn the xovers in there after the driver is in...if I had to. But it will be so much easier installing/wiring the xovers w/o the woofer in the way.
I just discovered that I did not cut the entire screw barrel off at least half the piezos when cutting the piezos to size. It didn't interfere when gluing them up, but now that I'm trying to rotate the elements to make wiring easier, the barrels are hitting each other. The only thing that concerns me is though Dremeling the barrels down is easy, the piezo "cone" will be exposed. I'll have to be very careful. If rotating the elements would only make the wiring easier, I wouldn't bother. But if you remember a few pages back, I noted that the melded arrays do not fit through the array braces if ANY of the tweet terminals are sticking out. You have to force it though and bend the terminals in order to get the array in there. Can't do that once it's all wired up. So tonight I'm unscrewing all the elements, putting the screws in a glass and then tomorrow it's plastic-bits-flying-everywhere time. This is one time I wish I owned a bench grinder....though my spindle/belt sander would work too. I'm a genius!
  Ah, I have my moments anyway.
I caught your subliminal hint, Bruce. Subtle...like a lunch tray to the face. LOL!!! I've got my heart set on T48s; though you are right. We'd have a helluva herd if I went w/T39s. I gotta go with T48s...been drooling over them for years now.
I just discovered that I did not cut the entire screw barrel off at least half the piezos when cutting the piezos to size. It didn't interfere when gluing them up, but now that I'm trying to rotate the elements to make wiring easier, the barrels are hitting each other.
I caught your subliminal hint, Bruce. Subtle...like a lunch tray to the face. LOL!!! I've got my heart set on T48s; though you are right. We'd have a helluva herd if I went w/T39s. I gotta go with T48s...been drooling over them for years now.
T48 build thread: http://billfitzmaurice.info/forum/viewt ... 30&t=20315
OTop12 build thread: http://billfitzmaurice.info/forum/viewt ... 30&t=19214
OTop12 build thread: http://billfitzmaurice.info/forum/viewt ... 30&t=19214
Re: OTop12 Build Thread
When you get done with your painting put a piece of plastic wrap on the surface of the paint before sealing the can. It will keep it from skimming the top which is a pain to get out of the can.
Re: OTop12 Build Thread
Thanks for the tip; will do!bmf wrote:When you get done with your painting put a piece of plastic wrap on the surface of the paint before sealing the can. It will keep it from skimming the top which is a pain to get out of the can.
T48 build thread: http://billfitzmaurice.info/forum/viewt ... 30&t=20315
OTop12 build thread: http://billfitzmaurice.info/forum/viewt ... 30&t=19214
OTop12 build thread: http://billfitzmaurice.info/forum/viewt ... 30&t=19214