Page 2 of 4
Re: SLA pro
Posted: Sat Dec 28, 2013 7:57 pm
by AntonZ
So every now and then I have added a drop of glue, a clamp, a day goes by, repeat and we end up here with the first cab.
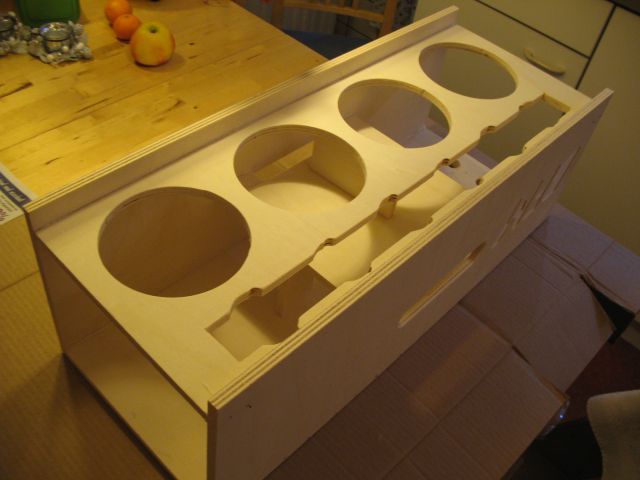
Sorry for not taking pics along the way for a while. Progress was really really slow. Still have to start glueing the 2nd cab together, so I may take some more shots on that one.
Anyway, most of the openings will be closed, eventually. Drivers, arrays, connectors, top and bottom panels. But the port openings on the sides remain open. They are both handles and ports. This poplar wood is rather white. I'd rather not have the insides show through. So I had this jar of black paint. Turns out it was all dried up. I only had time to go to local shops, none had any black paint. So while I walked home from the shops, I had this brain wave. We have young children. They like to tinker with things, paper, cardboard, scissors, glue. And paint. I know we have blue, yellow, red, white. Do we have any black? I asked my daughter when I got home and sure we do. Can I use some? Sure you can Daddy. I love my daughter.

It is not pitch black, it is dark enough for me.
Re: SLA pro
Posted: Sat Dec 28, 2013 10:32 pm
by miked
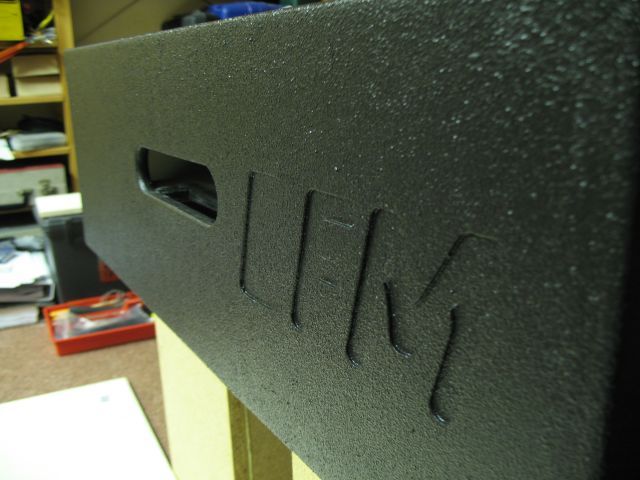
The logo looks great! Nice work with the template and router. Will you paint the logo a contrasting color? Just curious. I don't have a preference either way and even if I did, they are your cabs. LOL!
It was so nice of your daughter to share her paint with you. I've let my son help me in the recent past with putting the primer on cabs (my T48s) but he's only 4 years old. No matter how much instruction I give him, he winds up painting "X" patterns with the brush...with the bristles all crushed flat against the cab...hey, I tried at least.
Great idea to paint the insides of the cabs black, so as to minimize "seeing ugly" through the ports. Do SLA's require damping material? If so, you'll need to paint that too after it's installed.
The cabs look great! Keep going and post lots of pics!
Re: SLA pro
Posted: Sun Dec 29, 2013 2:51 pm
by AntonZ
Thanks Mike. I will not do contrasting colors in the logo. Too much trouble to keep that neat. As for damping: there is a DIY store in the area that has egg crate foam in a dark grey. I have used it before on other cabs, I will use it again on the SLA's.
Tonight I did the bottom panel. No such thing as having enough clamps in the workshop.

I don't have clamps long enough for the entire length of the cab, so I used the driver and socket holes instead.
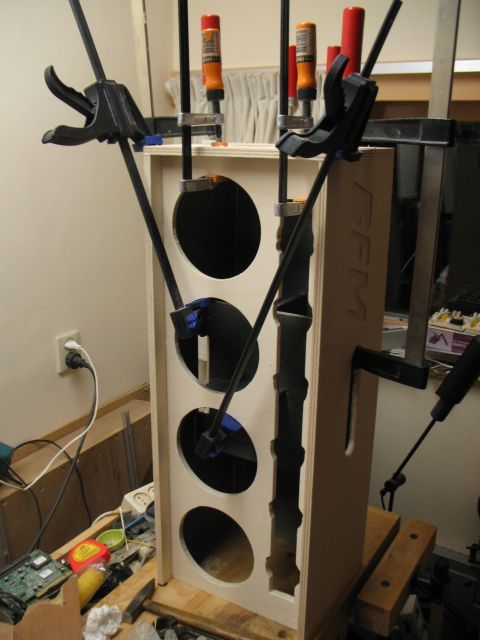
Only the top panel left to go (cab is upside down in these pics), then it is on to the finishing stage. No illusions about the speed at which that will happen.
Re: SLA pro
Posted: Mon Dec 30, 2013 4:00 am
by AntonZ
Just installed the last panel on cab no. 1, the top panel.

Re: SLA pro
Posted: Tue Dec 31, 2013 8:56 am
by miked
Looking good. Your clamping scheme is the same one I've used on more than half my wood projects. Ideally, you would have 24 of every clamp length, so you would "never run out of what you need" but this being the real world, we make do. Besides, the wood doesn't know if it's being clamped by two 36" clamps or six 12" clamps chained together.

Slow and steady wins the race. Keep going!
Re: SLA pro
Posted: Fri Jan 03, 2014 2:57 pm
by AntonZ
Construction on cab nr 2 has started. The W jigs are great, and so is the brad nailer. That is no excuse not to keep making excessive use of clamps though.


Re: SLA pro
Posted: Sun Jan 05, 2014 1:15 pm
by Magic Mike
Anton.
I've seen this cabinet built a couple of times. I've always wondered why the builder didn't put a single speakon jack on the bottom of the box, next to the pole cup. Since the speakon is a locking connector, there's no reason I can think of, that your setup wouldn't look neater with the speaker cable running straight into the bottom of the box, instead of looping around & into the back.
Don't know if it's too late, but you might want to think about it.
Cheers
Mike
Re: SLA pro
Posted: Sun Jan 05, 2014 2:50 pm
by Bruce Weldy
Magic Mike wrote:Anton.
I've seen this cabinet built a couple of times. I've always wondered why the builder didn't put a single speakon jack on the bottom of the box, next to the pole cup. Since the speakon is a locking connector, there's no reason I can think of, that your setup wouldn't look neater with the speaker cable running straight into the bottom of the box, instead of looping around & into the back.
Don't know if it's too late, but you might want to think about it.
Cheers
Mike
Be kinda' hard to stack 'em if you build more.....
Re: SLA pro
Posted: Sun Jan 05, 2014 4:53 pm
by AntonZ
A very valid point you make there Mike, I run tops on poles 95% of the time, and it never ceases to amaze me what length of speaker cable gets eaten up just to go up the speaker stand and up to the connector. It saves about 1 or 2 feet to plug into the bottom of the cab instead of the back.
A recessed mount is an absolute necessity. Even then there remains an increased risk of dirt/debris getting inside the connector when the cab is placed on the floor.
And Bruce makes a valid point as well. Been thinking about this a bit more. Since I am never going to stack more than 2 of these, one speakon into the bottom panel and one on the back panel would be enough for my needs. Bottom cab gets plugged in from below. Then a short lead from the back panel to the back panel on the upper cab, job done. In my situation I have already prepared holes for dual speakons on the back so they will both be wired. I will think about adding a recessed third speakon in the bottom panels. It is a bit late, although not yet too late. I have just glued the bottom panel onto the nr 2 cab today. Holidays are over after today, so it is not until next week or the week after before I can continu on this build. Gives me time to think it over.
I find it is details like this that separate a nice cab from a great cab. It is why I like to see the work from guys like Nimrod, Harley, Leland, Tim Ard, Jim van Straeder and many others. Taking in ideas, trying to make my own work just a bit more than just a DIY cab. I have two WH8's, virtually identical. One has a speakon on either side, so it can easily daisy chain on stage. They look and sound exactly the same. Yet the one that daisy chains is by far my favorite from the pair. One day I will open up the other one and add the other speakon so either one will daisy chain in the same manner and I don't have to think which cab I place left side or right side on stage because of where the power amp is located. Thanks for bringing this up, much appreciated.
Re: SLA pro
Posted: Sun Jan 05, 2014 9:54 pm
by Magic Mike
If you were thinking about stacking one cabinet on top of another, you might consider a second pole cup on the top of the bottom box. You could cut a short 'nipple' pipe long enough to hold the two boxes together. That would prevent them from sliding apart. If you added some sort of indexing pieces (recessed holes in the top plate of the bottom box, combined with low profile rubber feet on the bottom plate of the top box) you could stack securely & the boxes wouldn't shift or twist.
With rubber feet on the bottom plate of the box, that could ease your concern about getting any debris in that bottom speakon jack. The feet might also help prevent the boxes from travelling around when they're on a stage.
To extend the idea further, if you added the indexing holes to your bass bins, you could throw up a stack of bass, then set the top cabinets directly on top of the bass boxes (those nipple pipes again) then extend the height of your top array to your desired height.
Thought I'd brainstorm a little, sorry if I'm swerving your thread.
Cheers
M
Re: SLA pro
Posted: Thu Jan 09, 2014 6:33 pm
by AntonZ
Quick question on the filters: do current plans only have a piezo high-pass or is there also a low-pass for the Alpha 6 drivers these days?
Re: SLA pro
Posted: Thu Jan 09, 2014 10:25 pm
by Tom Smit
Nothing for the woofers.
Re: SLA pro
Posted: Fri Jan 10, 2014 6:35 pm
by AntonZ
Thanks Tom. Coils, caps and resistors have been ordered today.
In the meantime the last panel went on cab nr 2 today. Twin cabs rough wood work now done. On to the finishing stage. Almost halfway there.

Re: SLA pro
Posted: Sun Jan 19, 2014 6:04 pm
by AntonZ
OK, fasten your seat belts, ready for some fast-forward? Not all the way to the end mind you, since I'm not done yet. But we are going to skim over some boring bits. Sharp chisel has taken away the excess glue. The hand held router with top bearing bit for those few mm overhang here and there. After that the cabs went over the router table with the round over bit. Then came that dreadful phase of sanding, filling, sanding, filling. Most of the time is spent manual sanding, but the best bit still is the random orbit sander with a fresh 80 grit disc. At least you feel like making decent progress there. Got to be a bit careful or there is no cab left at all, just dust in the wind

Anyway, all that dull work does not yield pretty pics so I will spare you those details. This weekend I did some paint work. First I went over the recessed bits with the paint brush. You don't get there all the way with the roller.

Then comes the most gratifying bit of work: textured paint and the coarse roller.
Ugly raw wood turns into a near finished cab in a matter of minutes.
Re: SLA pro
Posted: Sun Jan 19, 2014 8:18 pm
by Tom Smit
Sweet!