Titan 39 Build
Re: Titan 39 Build
Yeah, from the pics I've seen I definitely prefer the look of the sprayed cabinets. Unless I just haven't seen any really great pictures of rolled cabs, they all just look like really thick latex paint to me, whereas the sprayed ones look a little more uniform and have a nicer looking texture. The mess isn't really an issue for me - I'll make a quick plastic spray booth in the garage. With 4 cabs to do, spraying them all at once will make up for the setup time.
-
Bruce Weldy
- Posts: 8719
- Joined: Fri Nov 27, 2009 11:37 am
- Location: New Braunfels, TX
Re: Titan 39 Build
Just giving you my two cents.....I have a compressor, but after rolling all of mine, I wouldn't ever buy a hopper gun and go through the mess of spraying them.
Leland lives in another world, where painting cabinets is happening on a very regular basis - I would probably be spraying too if the volume was as large as his.
But, certainly if it's what you want to do, then have at it. I just don't want everyone to think that it's the only way to get a good finish.
Here's a set of T39s
You do not have the required permissions to view the files attached to this post.
6 - T39 3012LF
4 - OT12 2512
1 - T24
1 - SLA Pro
2 - XF210
"A system with a few knobs set up by someone who knows what they are doing is always better than one with a lot of knobs set up by someone who doesn't."
Re: Titan 39 Build
And another two cents for a total of $.04:
I used "the wrong roller" on my OTops; a smooth, foam roller. At first I was a bit nervous about how it would turn out, but my fears were unfounded. I used this roller from Lowes:

I wound up with this texture (this is after 3 coats):


It really comes down to approximately what finish you WANT will determine what roller you use. Also, your rolling technique factors heavily into what results you'll get. You'll figure this all out within the first 5 minutes of using Duratex. There are many different versions of "a nice Duratex finish" you can get. There isn't just "one good finish" and the rest are unacceptable. Very happy with how mine turned out.
I have a large compressor and invested in the $15 Harbor Freight hopper gun but never used it. Why not? Two reasons:
1. I was halfway talked out of it by many on this forum.
2. I talked myself the rest of the way out of it when I realized I'd have to setup a "spray booth" in my garage. I'd have to hang plastic sheeting, which meant moving a lot of crap around and now what about overspray and what if there's stuff left in the gun and now I've gotta clean it out b/t coats, blahblahblah. You see where I went w/that.
If I had the space, no doubt I'd have tried my hand at spraying. Yes; the roller is quick, but nothing is as quick as a spray gun...for the APPLICATION part. For the CLEAN UP part, the roller is about 1000000x quicker than the spray gun and far less messy (for a spray gun noobie like me, anyway).
Hope this helps.
I used "the wrong roller" on my OTops; a smooth, foam roller. At first I was a bit nervous about how it would turn out, but my fears were unfounded. I used this roller from Lowes:
I wound up with this texture (this is after 3 coats):
It really comes down to approximately what finish you WANT will determine what roller you use. Also, your rolling technique factors heavily into what results you'll get. You'll figure this all out within the first 5 minutes of using Duratex. There are many different versions of "a nice Duratex finish" you can get. There isn't just "one good finish" and the rest are unacceptable. Very happy with how mine turned out.
I have a large compressor and invested in the $15 Harbor Freight hopper gun but never used it. Why not? Two reasons:
1. I was halfway talked out of it by many on this forum.
2. I talked myself the rest of the way out of it when I realized I'd have to setup a "spray booth" in my garage. I'd have to hang plastic sheeting, which meant moving a lot of crap around and now what about overspray and what if there's stuff left in the gun and now I've gotta clean it out b/t coats, blahblahblah. You see where I went w/that.
If I had the space, no doubt I'd have tried my hand at spraying. Yes; the roller is quick, but nothing is as quick as a spray gun...for the APPLICATION part. For the CLEAN UP part, the roller is about 1000000x quicker than the spray gun and far less messy (for a spray gun noobie like me, anyway).
Hope this helps.
T48 build thread: http://billfitzmaurice.info/forum/viewt ... 30&t=20315
OTop12 build thread: http://billfitzmaurice.info/forum/viewt ... 30&t=19214
OTop12 build thread: http://billfitzmaurice.info/forum/viewt ... 30&t=19214
-
Bill Fitzmaurice

- Site Admin
- Posts: 29152
- Joined: Tue May 02, 2006 5:59 pm
Re: Titan 39 Build
I hang my cabs from a backyard tree limb to spray them. Using a garden hose it takes at the most five minutes to clean my Harbor Freight hopper gun. The only major issue is whether or not you have a compressor. If you do spraying is a snap.miked wrote: I talked myself the rest of the way out of it when I realized I'd have to setup a "spray booth" in my garage. I'd have to hang plastic sheeting, which meant moving a lot of crap around...For the CLEAN UP part, the roller is about 1000000x quicker than the spray gun and far less messy (for a spray gun noobie like me, anyway).
Re: Titan 39 Build
I wish I had trees in my yard.  That sounds much easier than setting up a spray booth in the garage. Even if I did have a tree though, with my luck the wind would blow every single time I pulled the trigger and I'd have a bare cab and a Duratexed Face. Might be an improvement, actually.
T48 build thread: http://billfitzmaurice.info/forum/viewt ... 30&t=20315
OTop12 build thread: http://billfitzmaurice.info/forum/viewt ... 30&t=19214
OTop12 build thread: http://billfitzmaurice.info/forum/viewt ... 30&t=19214
-
Jon Barnhardt

- Posts: 718
- Joined: Wed Jun 08, 2011 1:20 pm
- Location: Bismarck, ND - Licensed builder
- Contact:
Re: Titan 39 Build
+1Bruce Weldy wrote: I just don't want everyone to think that it's the only way to get a good finish.
Re: Titan 39 Build
miked wrote:I wish I had trees in my yard.
TomS

Re: Titan 39 Build
Hilariousmiked wrote:I wish I had trees in my yard.
On a more serious note, I will see if I can take a better detail pic of the rolled finish on my wedgehorns.
-
jswingchun

- Posts: 1073
- Joined: Fri Dec 01, 2006 9:43 am
- Location: Cedar Rapids, Iowa
- Contact:
Re: Titan 39 Build
The overspray using duratex is minimal. I used to set up a huge spray booth when I first started but I don't anymore. I cover the floor with newspaper and put the cars in the driveway and spray in the garage. The stuff is heavy, the texture gun doesn't exactly atomize it. It doesn't fly that far. And I'm with Bill on the cleanup. A couple of minutes with the garden hose. Easy stuff. I have sprayed all of my cabs.
Omni 10
Omni 10.5
OmniTop 12 x 4
Wedgehorn 8 x 3
XF212
T39 @ 18" x 2
T39 @ 20" x 2
T39 @ 28" x 2
Jack 110 x 5
Jack Lite 12
XF210
XF210 (Slant only, no crossfire)
Omni 10.5
OmniTop 12 x 4
Wedgehorn 8 x 3
XF212
T39 @ 18" x 2
T39 @ 20" x 2
T39 @ 28" x 2
Jack 110 x 5
Jack Lite 12
XF210
XF210 (Slant only, no crossfire)
Re: Titan 39 Build
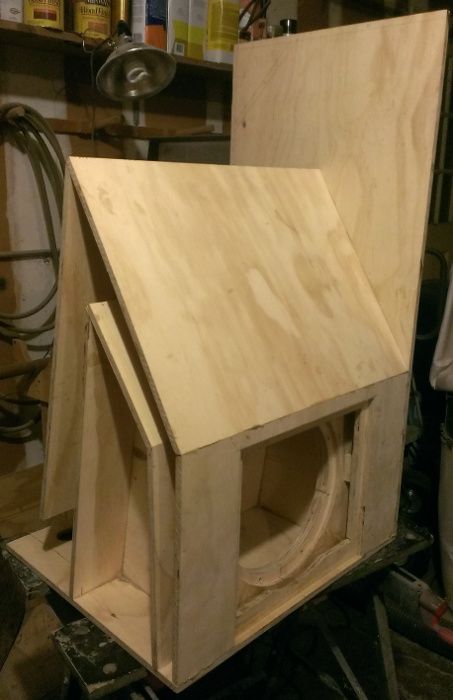
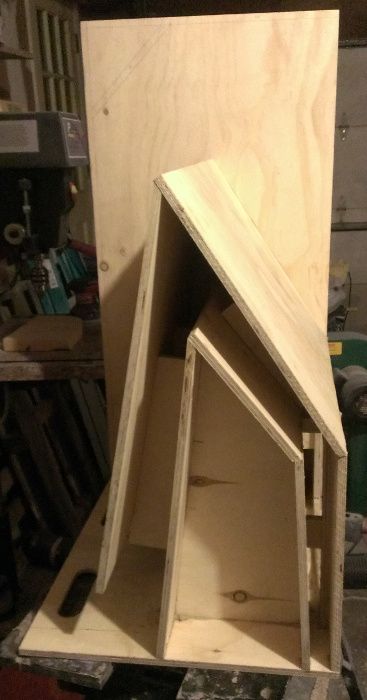
Made a little more progress last night - I think I'm finally seeing the light at the end of the tunnel for the first sub. Hopefully the second will go a little quicker. It better - I need to have these done by the end of the week so I can spray them and get them assembled for their first gig in less than 2 weeks.
I decided I'd spray them. I got a gallon of the spray Duratex and the hopper gun from HF. My garage is already a huge mess, so this can only add to the ambience. I'll put some plastic on the floor and cover the tools - hopefully a full booth won't be necessary (which wouldn't be a big deal, either).
Last night I got the front installed and braced. I don't remember who posted it before, but I did the front and the flange from single pieces of plywood, rather than the smaller strips. Probably not as efficient a use of the wood, but I figured less opportunities for leaks, and maybe a little less sanding/filling later. Turned out well. I'm hoping by the end of the night tonight that I'll have a completely assembled cabinet.
For the record, I still don't like PL


Re: Titan 39 Build
Wow, a longer Panel#6? That's interesting...and makes sense. Does making that panel longer change the horn path any? That Panel 6 Extension is one of the possible "problem spots" that I identified when reviewing the plans. This begs the question: Why is it designed the way it is, with a short extension piece vs. just a longer Panel 6?
T48 build thread: http://billfitzmaurice.info/forum/viewt ... 30&t=20315
OTop12 build thread: http://billfitzmaurice.info/forum/viewt ... 30&t=19214
OTop12 build thread: http://billfitzmaurice.info/forum/viewt ... 30&t=19214
Re: Titan 39 Build
Panel 6 doesn't change... the "extension" is just part of the front panel (so "panel 7" really is just a single panel now, instead of several different pieces.) Overall nothing about the configuration/horn path has changed, just a slightly different way to assemble the same panel.
Re: Titan 39 Build
Thanks for explaining that, Jason. I just got the "new" T48 plans a couple of days ago and haven't gotten very familiar with it yet. I really like your idea! When I saw that little panel extension, the first thing I thought was "that's pretty fiddly." The second thing was "you're gonna see that line through the Duratex." If it turns out that way, so be it. But I most probably will try it your way.
I may also try to build the access cover flange as one piece, ala the "one piece flange trick" for the "old style" T39/T48s.
I may also try to build the access cover flange as one piece, ala the "one piece flange trick" for the "old style" T39/T48s.
T48 build thread: http://billfitzmaurice.info/forum/viewt ... 30&t=20315
OTop12 build thread: http://billfitzmaurice.info/forum/viewt ... 30&t=19214
OTop12 build thread: http://billfitzmaurice.info/forum/viewt ... 30&t=19214
Re: Titan 39 Build
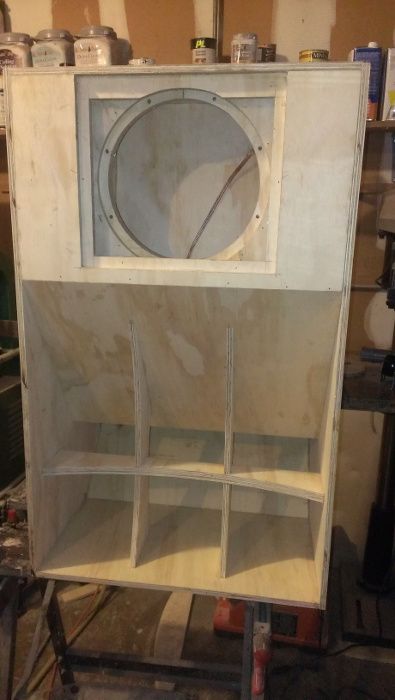
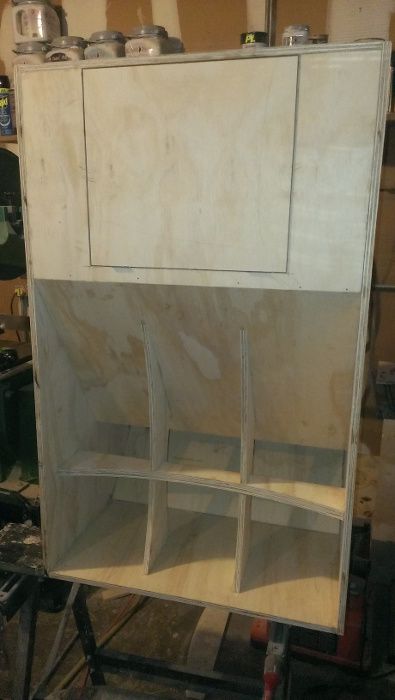
I managed to get the first sub *mostly* done last night. All of the "building" is complete - just need to do one cutout for the terminal cup. Then just the sanding/filling and I guess a quick radiusing of the edges. When I first started assembling this thing, I thought "this is a lot smaller than I had envisioned". In fact, I was a little concerned that they were going to feel "cute" instead of "beefy". As more panels went on, it did seem to get larger. With the thing fully assembled, I'm real happy I went with the T39 over the T48, and I like the 24" width. They're "big" but definitely still manageable. I can move the empty cabs around pretty easily, and I think with the LAB12 loaded it should still be a one man job to get in and out of the vehicle.
For the access cover, how do you guys normally handle that - just wood screws, or does that need to be t-nuts?
Here are the progress pics.
For the access cover, how do you guys normally handle that - just wood screws, or does that need to be t-nuts?
Here are the progress pics.


Re: Titan 39 Build
Looks great! Braces came out nice too. I noticed you have no handles cut into the front bottom panel. I see you have handles on the back though. I'm assuming you're putting wheels on it? If not, it will be difficult to move around with just the top/back handles.
AFA the access cover goes; countersunk screws, and lots of them. Every 2 inches is how I roll. Predrill all the holes so you don't risk splitting the wood. No need for t-nutted bolts. That's too much work and not needed. Obviously, you need gasket tape on the cover...just making sure!
AFA the access cover goes; countersunk screws, and lots of them. Every 2 inches is how I roll. Predrill all the holes so you don't risk splitting the wood. No need for t-nutted bolts. That's too much work and not needed. Obviously, you need gasket tape on the cover...just making sure!
T48 build thread: http://billfitzmaurice.info/forum/viewt ... 30&t=20315
OTop12 build thread: http://billfitzmaurice.info/forum/viewt ... 30&t=19214
OTop12 build thread: http://billfitzmaurice.info/forum/viewt ... 30&t=19214