Concerning this "light spritz of water" technique. I've never used it, but experienced similar-looking PL cracks when I built my OTops. I just piled on more PL on top of if. No problems.
But, I'll be building some T48's very soon and it is about 100F and 60% humidity in my garage...I don't want T48-size-PL-cracks. How do I do this "spritz thing?" Just get a spray bottle filled with water and lightly wet the entire jointing surface before adding the PL? Do I spray just one workpiece or both workpieces?
The journey begins.. 16 T60's and 12 DR280's!!
Re: The journey begins.. 16 T60's and 12 DR280's!!
T48 build thread: http://billfitzmaurice.info/forum/viewt ... 30&t=20315
OTop12 build thread: http://billfitzmaurice.info/forum/viewt ... 30&t=19214
OTop12 build thread: http://billfitzmaurice.info/forum/viewt ... 30&t=19214
Re: The journey begins.. 16 T60's and 12 DR280's!!
Bothmiked wrote: Just get a spray bottle filled with water and lightly wet the entire jointing surface before adding the PL?Do I spray just one workpiece or both workpieces?miked wrote:Yes
TomS
Re: The journey begins.. 16 T60's and 12 DR280's!!
No offense to you other fine builders out there, but this is the damn sexiest woodworking I've seen on here.
Holy crap! Imma have to rub one out now...
Holy crap! Imma have to rub one out now...

Re: The journey begins.. 16 T60's and 12 DR280's!!
Keep in mind the actual joint is probably fine. The excess outside the joint is what's cracking because it's so hot and humid. Since the joint is tight the dry time probably didn't exceed the expansion rate. It's only when it's hot and dry that you should spritz the surface to ensure good adhesion.
Now, spritzing the surface should keep the excess from cracking because the cure rate will be better balanced. I don't worry about the excess too often. In the DRs there's so much pressure at that joint that it's highly unlikely to fail anyway. Not trying to be a smart*** but I'd be moving on to the next step.
Now, spritzing the surface should keep the excess from cracking because the cure rate will be better balanced. I don't worry about the excess too often. In the DRs there's so much pressure at that joint that it's highly unlikely to fail anyway. Not trying to be a smart*** but I'd be moving on to the next step.
Re: The journey begins.. 16 T60's and 12 DR280's!!
Thanks biggerigger, Ya I'm definitely putting back covers on so I'm not overly concerned how ugly it is. It still is bonding though. I tried ripping the excess I cut off apart and it was holding just fine. Harley was spot on I tried the water on the last one and it cured like normal.biggerrigger wrote:Its the weather. I would leave it as it is and add a layer over top of what is there already. I had the same problem in the same place on 2 of my DR250's and the fix worked very well.
If you are using the back covers you can pile on as much PL as you want in this area as it will not be seen once the cover is in place. Just make sure that you are consistent from one cab to another on your application so it does not change the resonant frequency of the cab in that area.
As Harley had stated a light sprits of water from a spay bottle will help keep that from happening on future joints in this kind of weather.
Keep up the good work.
My build thread.. 11 T60's and 10 DR280's http://billfitzmaurice.info/forum/viewt ... 30&t=19854
My Review! http://billfitzmaurice.info/forum/viewt ... 13&t=20567
My Review! http://billfitzmaurice.info/forum/viewt ... 13&t=20567
Re: The journey begins.. 16 T60's and 12 DR280's!!
Mike I just simply wet the area and wiped it down with a damp rag, the wood was actually darker cus it absorbed the water. Worked like a charm!miked wrote:Concerning this "light spritz of water" technique. I've never used it, but experienced similar-looking PL cracks when I built my OTops. I just piled on more PL on top of if. No problems.
But, I'll be building some T48's very soon and it is about 100F and 60% humidity in my garage...I don't want T48-size-PL-cracks. How do I do this "spritz thing?" Just get a spray bottle filled with water and lightly wet the entire jointing surface before adding the PL? Do I spray just one workpiece or both workpieces?
Lol thanks Bob I appreciate it, but there are some pretty good woodworkers on here..No offense to you other fine builders out there, but this is the damn sexiest woodworking I've seen on here.
Holy crap! Imma have to rub one out now...
Ya your a 100% right Rick.. Its still doing its job..Keep in mind the actual joint is probably fine. The excess outside the joint is what's cracking because it's so hot and humid. Since the joint is tight the dry time probably didn't exceed the expansion rate. It's only when it's hot and dry that you should spritz the surface to ensure good adhesion.
Now, spritzing the surface should keep the excess from cracking because the cure rate will be better balanced. I don't worry about the excess too often. In the DRs there's so much pressure at that joint that it's highly unlikely to fail anyway. Not trying to be a smart*** but I'd be moving on to the next step.
My build thread.. 11 T60's and 10 DR280's http://billfitzmaurice.info/forum/viewt ... 30&t=19854
My Review! http://billfitzmaurice.info/forum/viewt ... 13&t=20567
My Review! http://billfitzmaurice.info/forum/viewt ... 13&t=20567
Re: The journey begins.. 16 T60's and 12 DR280's!!
Today was a good day I got a bunch done.. Got all the sides dado's done and installed..
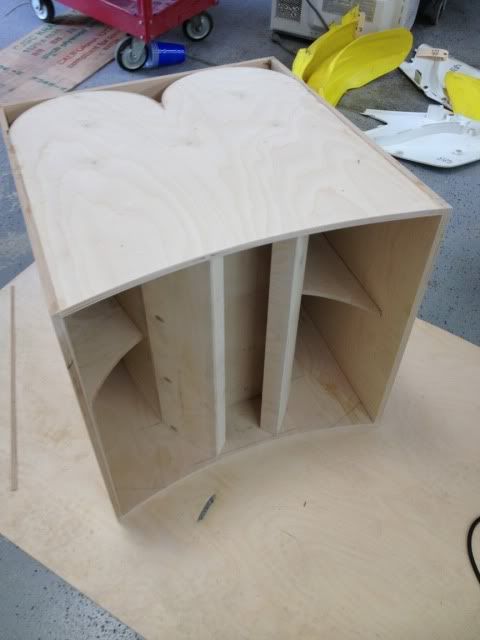
Trimmed everything up and decided to curve the face in instead of out.. For some reason Im wishing I did it the other way but its too late now
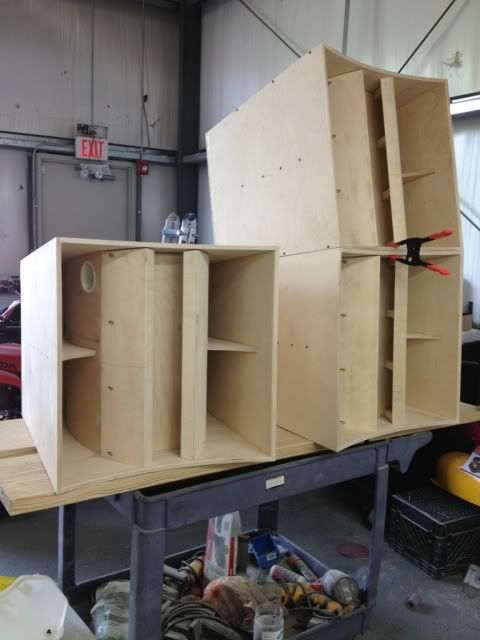
Had to hit the brakes at 3.. back at it tomorrow!

Trimmed everything up and decided to curve the face in instead of out.. For some reason Im wishing I did it the other way but its too late now


Had to hit the brakes at 3.. back at it tomorrow!

My build thread.. 11 T60's and 10 DR280's http://billfitzmaurice.info/forum/viewt ... 30&t=19854
My Review! http://billfitzmaurice.info/forum/viewt ... 13&t=20567
My Review! http://billfitzmaurice.info/forum/viewt ... 13&t=20567
-
Ian Westwood

- Posts: 301
- Joined: Wed Jan 16, 2013 11:35 am
- Location: Apple Valley, CA
Re: The journey begins.. 16 T60's and 12 DR280's!!
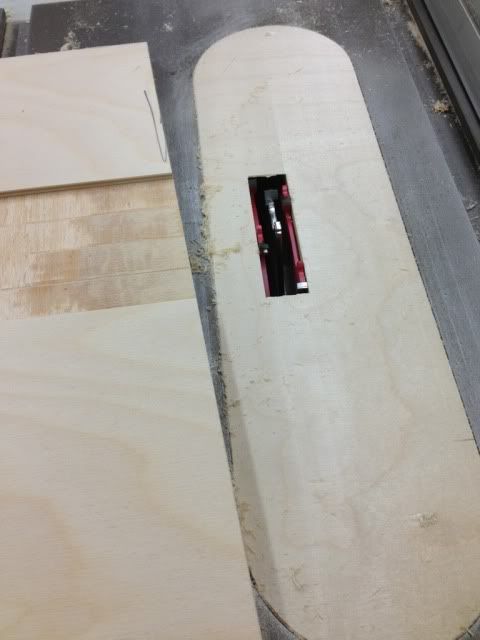
Cant figure out what I'm looking at here!!hifibob wrote:
Authorized BFM Builder
-
Scott Brochu

- Posts: 2473
- Joined: Sat Mar 10, 2007 11:53 pm
- Location: Maine
- Contact:
Re: The journey begins.. 16 T60's and 12 DR280's!!
It's the dado you need when the butt cheeks meet the side.Ian Westwood wrote: Cant figure out what I'm looking at here!!
Or are you talking about the table saw insert for the dado blade?
Drumming is a way of life.
ME LIKE TO HIT THINGS!
http://billfitzmaurice.info/forum/viewt ... 26&t=11232
ME LIKE TO HIT THINGS!
http://billfitzmaurice.info/forum/viewt ... 26&t=11232
-
Ian Westwood
- Posts: 301
- Joined: Wed Jan 16, 2013 11:35 am
- Location: Apple Valley, CA
Re: The journey begins.. 16 T60's and 12 DR280's!!
Ahhhhhh. Right. I see it now.Scott Brochu wrote:It's the dado you need when the butt cheeks meet the side.
Or are you talking about the table saw insert for the dado blade?
Hey Bob, any chance I could see a more detailed picture of that dado blade set up when you can please?
Authorized BFM Builder
Re: The journey begins.. 16 T60's and 12 DR280's!!
Yeah- not bad but ...it looked better in my head than it does in the picture. Sorry to have influenced that way...hifibob wrote:For some reason Im wishing I did it the other way but its too late now
Re: The journey begins.. 16 T60's and 12 DR280's!!
Sure I have another one I can snap some pics of, but basically its a bunch of spacers and saw blades you can stack together to get a desired thickness. I use it so much that I leave it installed on its own saw since its a pain in the butt to take it on and off.Ian Westwood wrote:Ahhhhhh. Right. I see it now.Scott Brochu wrote:It's the dado you need when the butt cheeks meet the side.
Or are you talking about the table saw insert for the dado blade?
Hey Bob, any chance I could see a more detailed picture of that dado blade set up when you can please?
My build thread.. 11 T60's and 10 DR280's http://billfitzmaurice.info/forum/viewt ... 30&t=19854
My Review! http://billfitzmaurice.info/forum/viewt ... 13&t=20567
My Review! http://billfitzmaurice.info/forum/viewt ... 13&t=20567
Re: The journey begins.. 16 T60's and 12 DR280's!!
lol not your fault.. I'm going to try and work with it, I'm going to bend a steel grill to cover the tweeters maybe that will do the trick.. All else fails I could arch it the other way or cut it straight per the plans..Rick Lee wrote:Yeah- not bad but ...it looked better in my head than it does in the picture. Sorry to have influenced that way...hifibob wrote:For some reason Im wishing I did it the other way but its too late now
My build thread.. 11 T60's and 10 DR280's http://billfitzmaurice.info/forum/viewt ... 30&t=19854
My Review! http://billfitzmaurice.info/forum/viewt ... 13&t=20567
My Review! http://billfitzmaurice.info/forum/viewt ... 13&t=20567
Re: The journey begins.. 16 T60's and 12 DR280's!!
could always glue the piece you cut out back in lol.
Built:
2x Tuba 30s delta12lf loaded (gone)
4x Otop12 d2512 loaded
8x t48s (18, 18, 24, 24, 30, 30) 3015lf loaded
2x AT (1 mcm, 1 gto 804)
2x SLA Pro (dayton pa6, 6 goldwood piezo loaded)
1x bastard XF208
2x OT212 (delta pro 450a loaded, eminence psd)
2x Tuba 30s delta12lf loaded (gone)
4x Otop12 d2512 loaded
8x t48s (18, 18, 24, 24, 30, 30) 3015lf loaded
2x AT (1 mcm, 1 gto 804)
2x SLA Pro (dayton pa6, 6 goldwood piezo loaded)
1x bastard XF208
2x OT212 (delta pro 450a loaded, eminence psd)
Re: The journey begins.. 16 T60's and 12 DR280's!!
lol.. I could try and do one of them patch thingies Ian did.. you cant even tell!!sine143 wrote:could always glue the piece you cut out back in lol.
My build thread.. 11 T60's and 10 DR280's http://billfitzmaurice.info/forum/viewt ... 30&t=19854
My Review! http://billfitzmaurice.info/forum/viewt ... 13&t=20567
My Review! http://billfitzmaurice.info/forum/viewt ... 13&t=20567