Page 2 of 3
Re: Tuba 30 CNC build
Posted: Sat Nov 11, 2017 1:27 pm
by chrisj360
A thought as I am finishing up my T30's, would the hand holds on panel 12 at the front of the mouth reduce output when on their side v-plated?
Re: Tuba 30 CNC build
Posted: Sat Nov 11, 2017 8:30 pm
by commander_dan
chrisj360 wrote:A thought as I am finishing up my T30's, would the hand holds on panel 12 at the front of the mouth reduce output when on their side v-plated?
Air will definitely get through them. Not sure how much output would be lost but we usually try and get things airtight when v plating. I wouldn't put handle holds there, only because the 6/12 brace in the mouth actually makes an excellent holding point at the mouth... I don't think you need them.
Re: Tuba 30 CNC build
Posted: Sat Nov 11, 2017 10:45 pm
by tactix
commander_dan wrote:chrisj360 wrote:A thought as I am finishing up my T30's, would the hand holds on panel 12 at the front of the mouth reduce output when on their side v-plated?
Air will definitely get through them. Not sure how much output would be lost but we usually try and get things airtight when v plating. I wouldn't put handle holds there, only because the 6/12 brace in the mouth actually makes an excellent holding point at the mouth... I don't think you need them.
The advantages of having modeled the Tuba keep coming- thanks for taking note of the extra handholds. I'll nix em. My big question remains were to put the connectors and casters (if any I'm now wondering).
One set on panel 10 and another on 7 has been suggested. For the set on 7 do any of you use the Neutrik NL4MPR Speakon Connector 4 Pole Round Chassis Mount
https://www.parts-express.com/neutrik-n ... t--092-054 ? or do you prefer a plate and separate panel mount connectors?
As for casters, if they get mounted on panel 10 then they are more likely than not facing the audience, assuming you've got a wall to turn them towards. Not exactly the most aesthetically pleasing presentation. How practical is wheeling around 24" Tuba 30s with a handcart? Will they get dinged up quick? If you're using casters on these units where do you prefer to put them?
Re: Tuba 30 CNC build
Posted: Sun Nov 12, 2017 4:45 am
by commander_dan
tactix wrote:One set on panel 10 and another on 7 has been suggested. For the set on 7 do any of you use the Neutrik NL4MPR Speakon Connector 4 Pole Round Chassis Mount
https://www.parts-express.com/neutrik-n ... t--092-054 ? or do you prefer a plate and separate panel mount connectors?
Up to you really, I've seen those ones on p7 and they looked fine.. I'd prefer plate style like the ones from speakerhardware.com. I only installed the inset plate style ones on p10
As for casters, if they get mounted on panel 10 then they are more likely than not facing the audience, assuming you've got a wall to turn them towards. Not exactly the most aesthetically pleasing presentation.
I don't mind it, pic below.
How practical is wheeling around 24" Tuba 30s with a handcart? Will they get dinged up quick? If you're using casters on these units where do you prefer to put them?
If it were me and I was going to skip the castors, I would build a simple dolly with 4 castors and move them around that way.. or a handcart if it were lined with wood, probably wouldn't ding them up much.
Re: Tuba 30 CNC build
Posted: Sun Nov 12, 2017 6:53 pm
by tactix
commander_dan wrote:tactix wrote:One set on panel 10 and another on 7 has been suggested. For the set on 7 do any of you use the Neutrik NL4MPR Speakon Connector 4 Pole Round Chassis Mount
https://www.parts-express.com/neutrik-n ... t--092-054 ? or do you prefer a plate and separate panel mount connectors?
Up to you really, I've seen those ones on p7 and they looked fine.. I'd prefer plate style like the ones from speakerhardware.com. I only installed the inset plate style ones on p10
As for casters, if they get mounted on panel 10 then they are more likely than not facing the audience, assuming you've got a wall to turn them towards. Not exactly the most aesthetically pleasing presentation.
I don't mind it, pic below.
How practical is wheeling around 24" Tuba 30s with a handcart? Will they get dinged up quick? If you're using casters on these units where do you prefer to put them?
If it were me and I was going to skip the castors, I would build a simple dolly with 4 castors and move them around that way.. or a handcart if it were lined with wood, probably wouldn't ding them up much.
Seeing your setup like that is hugely helpful. Looks pretty cool to me actually. My problem is the Tubas aren't going to be black so this is going to be an interesting
design problem to tackle. Might go the dolly route you suggest if I can't get it to look right. Thanks again for your thoughts on all of this.
Re: Tuba 30 CNC build
Posted: Sun Nov 12, 2017 7:54 pm
by tactix
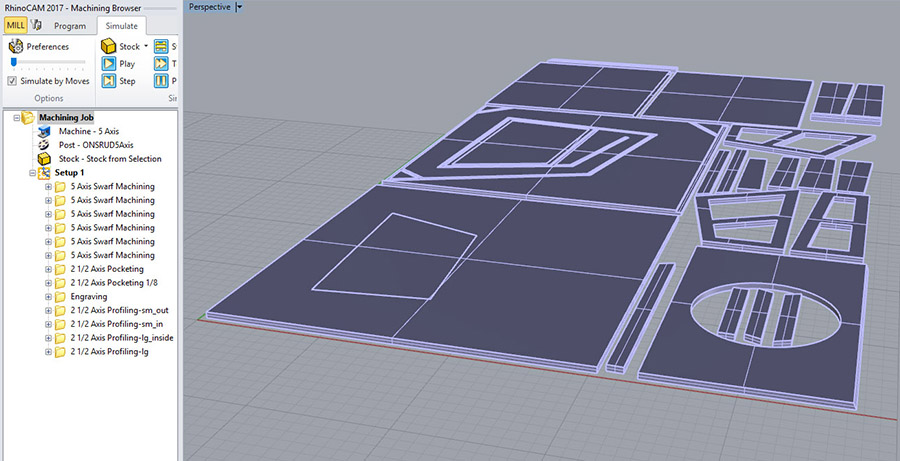
One more update before going milling the first sheet. It's taken quite a lot of prep to get these files together. Modeling has been a useful step though the work in setting up the CAM files has been a bit of a pain and represents probably 8h of labor (including deconstructing the model into a flat layout of sheets). Part of this time is due to my learning curve in using the mill this way - I've only ever used a CNC to build topography models which was a more forgiving experience. I'm also going to try to do the bevels/angular cuts using the 5 Axis capabilities of this router which is another first for me. Anyway the first panel is ready to go and hopefully will get milled later this evening. This is the easier of the two sheets because none of the parts have to be flipped over to cut the second angled edge. I've worked out the number of steps to deal with that condition (drilling into the spoil board, fitting it with dowels, flipping the sheet, another set of cuts etc) but it will take time to lay out that logic in the CAM software I'm using (RhinoCAM). Do the easy one first first and sort out the kinks before tackling the harder stuff is my thinking. Here the model of the panels and braces I'm trying to cut out and how that's translated in cut geometry
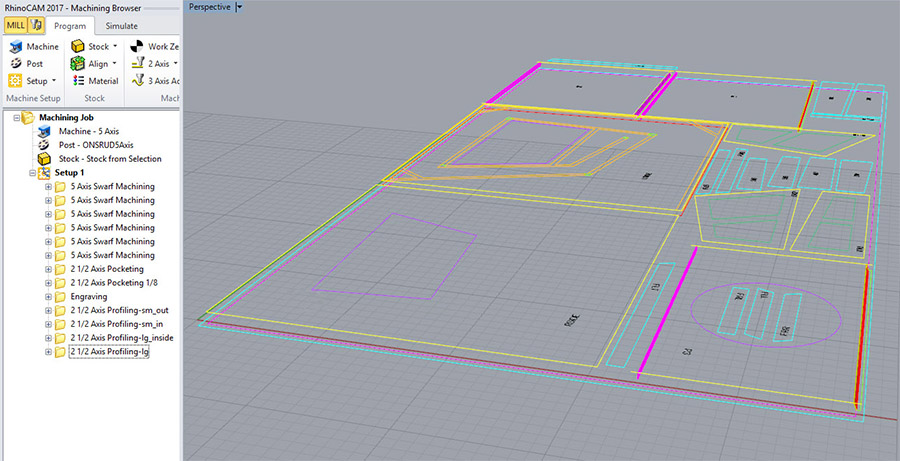
On the left are the different types of commands that are being issued to the mill and the order in which they are executed. Essentially all the angular cuts
/bevels are done first with a 5-axis cut (I separated all those cuts out into their own groupings but that probably wasn't necessary- that's just how I got it to work).
Next I cut the dados on the left side of cabinet. These are done with a 1/4" bit cutting to 3/16" deep. I then go over the corners that end up rounded (because of the tool diameter) with an 1/8" bit. I have a 1/16" on hand but I'm hopeful it won't be necessary to get things to fit as these corners have a radius of 1/2 the tool diameter so that leave a 1/16" of an inch rounded edge which I figure the give of the wood and glue will deal with.
Then I engrave each one of my pieces so I know what's what - always on the inside if it's an outward facing panel.
Finally I go through the step of cutting out all of the inside pieces, the small parts, and finally the big panels.
RhinoCAM gives you a simulation to check your work. The preview is looking good.

It all seems so logical... We'll see how it goes. Given the time I'm investing in this setup I'm having fantasies now of making eight of these. Ha! I'm sure the experience here will go along way in speeding up the process with the Otops.
Re: Tuba 30 CNC build
Posted: Sun Nov 12, 2017 9:27 pm
by commander_dan
Looking good! I'm super keen to see how they turn out.
I employed the services of a buddy and his CNC for the two T24's I'm currently helping a couple of friends build, and it's been a pleasure assembling the cabs, each panel is dead accurate. Didn't go to the detail of dado-ing the panel layout, that's even more luxurious. Beauty is, you can build 4 straight up, and if you need/want more, bang out more as needed. Also, since you have the CNC, don't forget the v-plate

What exterior finish do you intend on applying?
Re: Tuba 30 CNC build
Posted: Mon Nov 13, 2017 1:47 am
by Padde298
commander_dan wrote:Looking good! I'm super keen to see how they turn out.?
+1

Re: Tuba 30 CNC build
Posted: Tue Nov 14, 2017 11:12 am
by tactix
Milled the first panel yesterday. It worked out in the end but it was a bit touch and go. Couple of issues emerged due to the use of the 5 axis capabilities of the router. The first was that the job gave up the ghost midway through the job when trying to cut on angle near the edge of the milling bed. The mill threw an error when it tried to do an operation outside of the bed limits. The operation was to rotate the tool in place for the next cut - it took a minute but rearranging the code to change the order of operations from move to cut position, change cut angel, commence cut to change cut angel, move to cut position, commence cut solved the issue. RhinoCAM is outputting code in a non-logical way (at least from the perspective of my needs) and there doesn't seem to be a way to compensate automatically. Manually changing a text file solved the problem but it meant interpreting the CNC G code line by line.
Second problem related to the way the bevel cuts were programmed. The cuts didn't make it through the last layer of ply so I had to break it off and sand manually. Not a big deal but something I'm going to try correct in the next round.
Other than that it all worked out quite well. Things seems to be fitting quite well and as far as I can tell I haven't messed anything up yet. Glad I engraved the names of each part on its inside surface. I had a few bits from the inside of braces and the like left over and I could easily identify them as off cuts. It's also going to make working in a team to assemble these much easier.
Re: Tuba 30 CNC build
Posted: Tue Nov 14, 2017 11:16 am
by tactix
commander_dan wrote:
What exterior finish do you intend on applying?
Duratex but I'm not sure of the color/design yet. On thing we can say about the Tuba's is they are not much to look at as is - especially facing the wall. Going to have to spend some time figuring that out.
Re: Tuba 30 CNC build
Posted: Fri Nov 17, 2017 3:06 am
by Padde298

- download3.jpg (7.96 KiB) Viewed 2107 times
Looking great!!!
Re: Tuba 30 CNC build
Posted: Sat Nov 18, 2017 7:15 pm
by chrisj360
I am curious how the braces turn out. For both my builds, they seem to take the most time & adjusting to fit without bowing or pulling things out of square. Please keep me posted.
Cheers,
Chris
Re: Tuba 30 CNC build
Posted: Sun Nov 19, 2017 8:30 pm
by commander_dan
chrisj360 wrote:I am curious how the braces turn out. For both my builds, they seem to take the most time & adjusting to fit without bowing or pulling things out of square.
Same here. For my T24 builds where I used CNC, I oversized all braces by a small amount (1 or 2mm, can't remember exactly) preferring to sand them to size rather than have them turn out too small. It doesn't take much to sand them back.
Re: Tuba 30 CNC build
Posted: Mon Nov 20, 2017 1:21 am
by Radian
Funny, I've found that the braces (when their geometry is correctly lofted up from the side panel) actually do a great job of pulling the cab into square / straightening out warps. But of course I prefer to use screws just for that reason. A single box of cabinet screws is like having a 100 clamps at your disposal.
Re: Tuba 30 CNC build
Posted: Tue Dec 19, 2017 4:59 pm
by tactix
It's been a while but I've made some progress on the cab. Had to put things down for a minute but here's an update.
After CNCing the whole thing I test fitted the cab using tape to hold it together.
I guess because of the diameter of the bit I used to cut the dados (1/4" and then the corners with an 1/8" bit) a couple of the panels needed adjusting. Running them through a jointer corrected that but on one of the panels I had to do this at a non-ninety degree angle which was less fun. When I get to the next set I'm just going to shorten those pieces of the model by a 16th or so.
I also messed up a couple of cuts by programing the CNC to cut on the wrong side of a line - easily corrected and rerun but I now have a couple of extra panels that a 1/4" too short. I thought about cutting all the rest down but through better of it - I can reuse those pieces for braces and such on the next build.
More in the next post.