Well this thread has gone to sh*tBrentEvans wrote: And if there was a port or something right in the middle... Lol...
8 x DR250 build
-
CoronaOperator
- Posts: 1648
- Joined: Wed Mar 25, 2009 7:07 pm
- Location: Medicine Hat, Alberta, Canada
Re: 8 x DR250 build
Built:
17" width 10" driver Autotuba
2 x 29" width dual Lab12 Tuba60
6 x DR250 2510/asd1001
In progress:
2 x DR250 2510/asd1001
For best results, point the loud end of the array towards the audience
17" width 10" driver Autotuba
2 x 29" width dual Lab12 Tuba60
6 x DR250 2510/asd1001
In progress:
2 x DR250 2510/asd1001
For best results, point the loud end of the array towards the audience
-
CoronaOperator
- Posts: 1648
- Joined: Wed Mar 25, 2009 7:07 pm
- Location: Medicine Hat, Alberta, Canada
Re: 8 x DR250 build
Some updates:
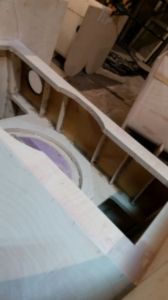
My tower of power has grown in height 13" and I added some left over convoluted foam to the ceiling:
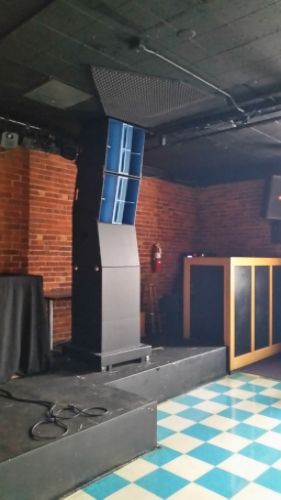
My original plan was to put these boxes tight against the ceiling to use the principal of "acoustic reflection" to simulate a 4 box high array using only 2 boxes ala "Don Keele's" CBT array. Well that didn't do anything other than muddy the highs which is where the acoustic foam came in. I tried different angles, power shading and delaying the boxes separately and am now convinced that that principal is rubbish, at least for my application. I still did get better throw with the boxes up higher which I need because our ceiling is only 10.5' high and once the crowd rolls in there is only a 4.5' high channel for the sound to travel through as the crowd blocks the bottom 6'.
These boxes are now separately amplified, each with their own amp channel and their own individual channel on my DBX Venue360. This allows me to power shade and separately EQ each box. The results are fantastic! I have the bottom boxes aimed right and just the right tone and volume level for the folks on the first half of the dancefloor, and then the top boxes are aimed over their heads with the gain +5 dB's louder than the bottom boxes and the highs boosted a bit to carry to the back.
You can now walk from about 40' out right up to 3' in front of the tower and the tone and volume level barely changes! Nothing short of amazing! Before, in order to carry to the back of the room, the people right in front of the stacks would get blasted, not anymore. Power shading is worth all the extra channels!
My tower of power has grown in height 13" and I added some left over convoluted foam to the ceiling:
My original plan was to put these boxes tight against the ceiling to use the principal of "acoustic reflection" to simulate a 4 box high array using only 2 boxes ala "Don Keele's" CBT array. Well that didn't do anything other than muddy the highs which is where the acoustic foam came in. I tried different angles, power shading and delaying the boxes separately and am now convinced that that principal is rubbish, at least for my application. I still did get better throw with the boxes up higher which I need because our ceiling is only 10.5' high and once the crowd rolls in there is only a 4.5' high channel for the sound to travel through as the crowd blocks the bottom 6'.
These boxes are now separately amplified, each with their own amp channel and their own individual channel on my DBX Venue360. This allows me to power shade and separately EQ each box. The results are fantastic! I have the bottom boxes aimed right and just the right tone and volume level for the folks on the first half of the dancefloor, and then the top boxes are aimed over their heads with the gain +5 dB's louder than the bottom boxes and the highs boosted a bit to carry to the back.
You can now walk from about 40' out right up to 3' in front of the tower and the tone and volume level barely changes! Nothing short of amazing! Before, in order to carry to the back of the room, the people right in front of the stacks would get blasted, not anymore. Power shading is worth all the extra channels!
Last edited by CoronaOperator on Fri Oct 28, 2016 6:45 am, edited 1 time in total.
Built:
17" width 10" driver Autotuba
2 x 29" width dual Lab12 Tuba60
6 x DR250 2510/asd1001
In progress:
2 x DR250 2510/asd1001
For best results, point the loud end of the array towards the audience
17" width 10" driver Autotuba
2 x 29" width dual Lab12 Tuba60
6 x DR250 2510/asd1001
In progress:
2 x DR250 2510/asd1001
For best results, point the loud end of the array towards the audience
-
CoronaOperator
- Posts: 1648
- Joined: Wed Mar 25, 2009 7:07 pm
- Location: Medicine Hat, Alberta, Canada
Re: 8 x DR250 build
I also managed to get 2 more boxes done as I need to use them this Saturday for a 2 room show. These are the green ones and are just in time for Halloween!
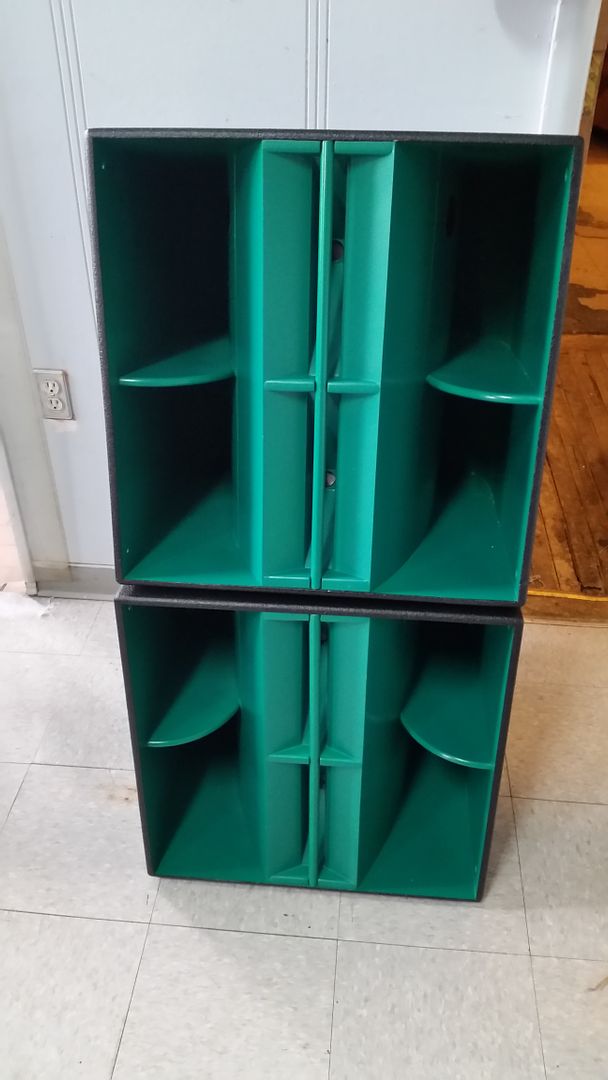
I know what you are all thinking, why on earth would you paint them green?
Well, they match the billiard tables and the decor in the areas where they will be mounted:
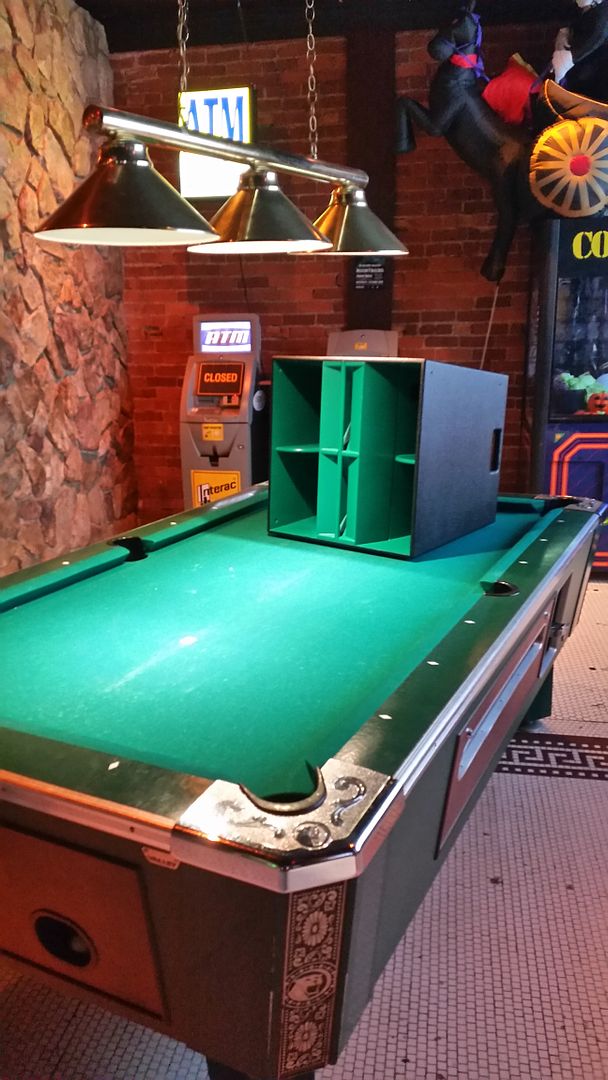
Pretty good match to the felt.
The other one will be in this area:
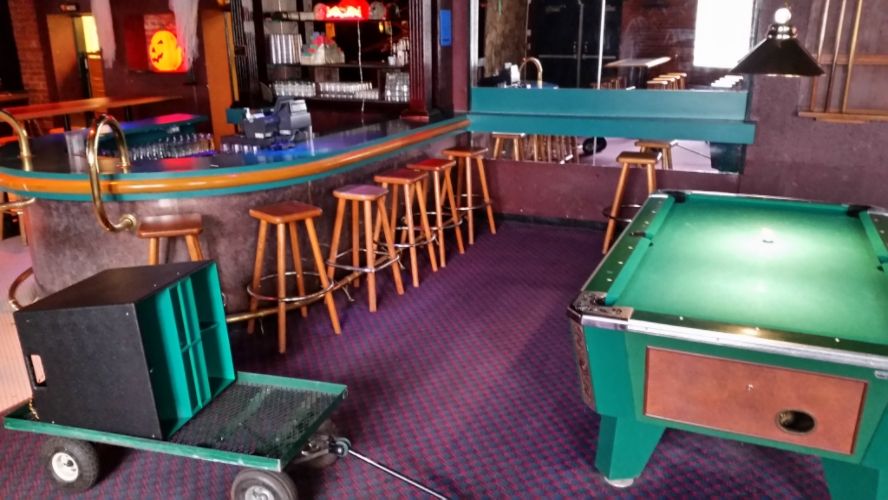
These ones also get the 4" port option as these will be used without subs during the day and slower nights:
I know what you are all thinking, why on earth would you paint them green?
Well, they match the billiard tables and the decor in the areas where they will be mounted:
Pretty good match to the felt.
The other one will be in this area:
These ones also get the 4" port option as these will be used without subs during the day and slower nights:
Built:
17" width 10" driver Autotuba
2 x 29" width dual Lab12 Tuba60
6 x DR250 2510/asd1001
In progress:
2 x DR250 2510/asd1001
For best results, point the loud end of the array towards the audience
17" width 10" driver Autotuba
2 x 29" width dual Lab12 Tuba60
6 x DR250 2510/asd1001
In progress:
2 x DR250 2510/asd1001
For best results, point the loud end of the array towards the audience
-
CoronaOperator
- Posts: 1648
- Joined: Wed Mar 25, 2009 7:07 pm
- Location: Medicine Hat, Alberta, Canada
Re: 8 x DR250 build
I am really surprised that nobody has called me out yet on the complete lack of nacelles on this build  ?
?
Well, I didn't want to post anything until my solution panned out and my 4 blue boxes have been going strong for 5 months now so here is my secret:
I'll refresh from a few pages back in this build:
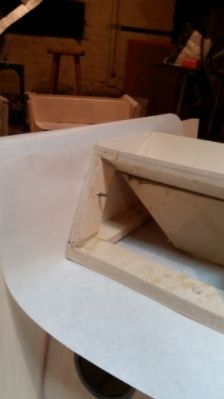
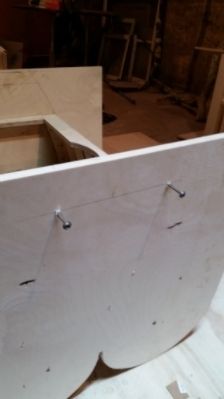
When I first built my HF modules I used spacers made out of 1/8" hardboard to simulate the gap that any weatherstripping would take. That way, when I sanded down the joint everything would be smooth and line up aesthetically:
Then I held everything in place with 4 screws, 1 each corner. The spacers are still in place:
Other side:
The only other modifications I made was to stiffen up the 1/8" sheets by pouring ~1/8" fiberglass resin onto the inside of the sheaths and some blocks added to double up the thickness for the screws to bite into:
More fiberglass resin and some ribs added to stiffen up the sheaths on the main box as well:
At that point I still had no idea how I was going to attach the modules, all I knew was that Ferrari's don't have any ugly nacelles on their works of art and these would be no different!
The one thing I did know was that the modules and the main box stringer was incredibly stiff! Maybe they naturally are or maybe the fiberglass resin and ribs I added had something to do with it but man were they stiff! I laid out a 1/8" x 1/8" x 12" thin strip of hardboard on the floor and placed the module on top centered and then proceeded to find out how much pressure I would have to apply to the ends to make them touch the floor. I pressed down on each end and there was no flex. I pressed down harder ... nothing! I ended up doing a handstand with my hands on the ends and absolutely no flex, I couldn't make the ends touch the floor with that thin strip in the middle no matter how hard I pressed down.
That led me to the realization that I didn't need the nacelles. All I needed was a way to press down on the ends and the weatherstripping would be pressed down just as hard in the center as there was no flex in the middle whatsoever! It came to me that the solution was already there! My 4 screws I had already used to hold the modules in place while I built them would suffice !
!
Next up was to try it out, I used 1/2" weatherstripping and it was way too thick and I couldn't compress it to line up with my screw holes no matter how much weight I used. Then I tried 3/8" thick weatherstripping, still too much. 3rd trip to the hardware store and I picked up some 1/4" thick x 3/8" wide weatherstripping. Success!
The magic 1/4" high x 3/8" wide weatherstripping!
In order to get the screws in, I have to lay the box on its back and place the module in its place. Then I have to sit on the module on one end to put about 160 lbs force on it to compress that side then put in the 2 screws. Then I sit on the other side to compress that side and put in the other 2 screws. There is about 320lbs force pressing that module down. That means there is about 14.5 PSI on that weatherstripping all the way around, more than enough to hold up to any air pressure inside the box without leaking.
The only evidence of my module attachment system:
These screws also squeeze the modules very tight to the top and bottom of the box helping to stiffen those pieces as well.
The results:
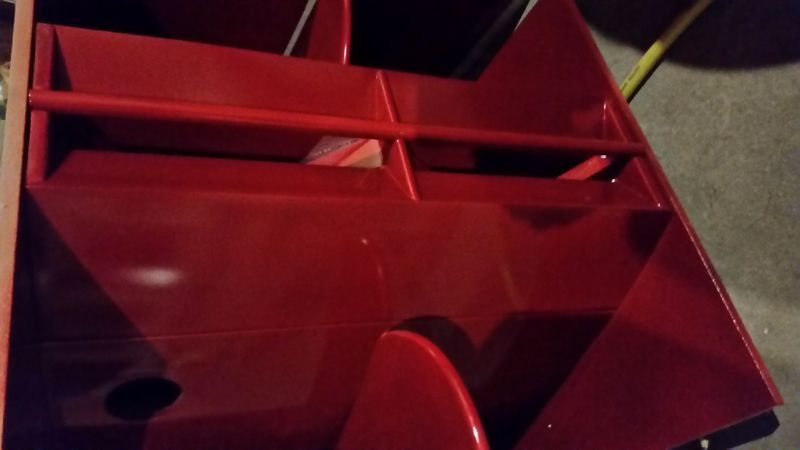
Lines that Enzo himself would approve of!
That is also a preview of the final 2 metallic red boxes in this build. About 12 or so coats of traditional lacquer. Primer, base, flake, clear, the whole nine yards on these babies. They are my favorites so I'm saving the best for last. About 15-20 hours left on them.
Well, I didn't want to post anything until my solution panned out and my 4 blue boxes have been going strong for 5 months now so here is my secret:
I'll refresh from a few pages back in this build:
When I first built my HF modules I used spacers made out of 1/8" hardboard to simulate the gap that any weatherstripping would take. That way, when I sanded down the joint everything would be smooth and line up aesthetically:
Then I held everything in place with 4 screws, 1 each corner. The spacers are still in place:
Other side:
The only other modifications I made was to stiffen up the 1/8" sheets by pouring ~1/8" fiberglass resin onto the inside of the sheaths and some blocks added to double up the thickness for the screws to bite into:
More fiberglass resin and some ribs added to stiffen up the sheaths on the main box as well:
At that point I still had no idea how I was going to attach the modules, all I knew was that Ferrari's don't have any ugly nacelles on their works of art and these would be no different!
The one thing I did know was that the modules and the main box stringer was incredibly stiff! Maybe they naturally are or maybe the fiberglass resin and ribs I added had something to do with it but man were they stiff! I laid out a 1/8" x 1/8" x 12" thin strip of hardboard on the floor and placed the module on top centered and then proceeded to find out how much pressure I would have to apply to the ends to make them touch the floor. I pressed down on each end and there was no flex. I pressed down harder ... nothing! I ended up doing a handstand with my hands on the ends and absolutely no flex, I couldn't make the ends touch the floor with that thin strip in the middle no matter how hard I pressed down.
That led me to the realization that I didn't need the nacelles. All I needed was a way to press down on the ends and the weatherstripping would be pressed down just as hard in the center as there was no flex in the middle whatsoever! It came to me that the solution was already there! My 4 screws I had already used to hold the modules in place while I built them would suffice
Next up was to try it out, I used 1/2" weatherstripping and it was way too thick and I couldn't compress it to line up with my screw holes no matter how much weight I used. Then I tried 3/8" thick weatherstripping, still too much. 3rd trip to the hardware store and I picked up some 1/4" thick x 3/8" wide weatherstripping. Success!
The magic 1/4" high x 3/8" wide weatherstripping!
In order to get the screws in, I have to lay the box on its back and place the module in its place. Then I have to sit on the module on one end to put about 160 lbs force on it to compress that side then put in the 2 screws. Then I sit on the other side to compress that side and put in the other 2 screws. There is about 320lbs force pressing that module down. That means there is about 14.5 PSI on that weatherstripping all the way around, more than enough to hold up to any air pressure inside the box without leaking.
The only evidence of my module attachment system:
These screws also squeeze the modules very tight to the top and bottom of the box helping to stiffen those pieces as well.
The results:
Lines that Enzo himself would approve of!
That is also a preview of the final 2 metallic red boxes in this build. About 12 or so coats of traditional lacquer. Primer, base, flake, clear, the whole nine yards on these babies. They are my favorites so I'm saving the best for last. About 15-20 hours left on them.
Built:
17" width 10" driver Autotuba
2 x 29" width dual Lab12 Tuba60
6 x DR250 2510/asd1001
In progress:
2 x DR250 2510/asd1001
For best results, point the loud end of the array towards the audience
17" width 10" driver Autotuba
2 x 29" width dual Lab12 Tuba60
6 x DR250 2510/asd1001
In progress:
2 x DR250 2510/asd1001
For best results, point the loud end of the array towards the audience
-
Chris_Allen

- Posts: 3355
- Joined: Wed Jul 11, 2007 2:43 pm
- Location: Huddersfield, UK
Re: 8 x DR250 build
I was about to ask the question of the nacelles when I saw the 4" ports but then spotted you clarified in the following post.
Nice looking builds - like the green colour.
Nice looking builds - like the green colour.
Built:
6xDR200, 2xT39, 2xT48, 2xJack110, 1xOmni10.5, 1xAutotuba, 1xT18, 1xSLA Pro, 1xW8, 1xW10
6xDR200, 2xT39, 2xT48, 2xJack110, 1xOmni10.5, 1xAutotuba, 1xT18, 1xSLA Pro, 1xW8, 1xW10
Re: 8 x DR250 build
Fantastic work! The colours are nice, but I am impressed with the red ones! 
TomS

Re: 8 x DR250 build
Great idea to screw top and bottom. The modules are strong with no flex so there's no need for more than 4 screws IMO. Probably could get away with just speaker caulk too.
Re: 8 x DR250 build
I have seen that shop somewhere before, oh its the set to every Saw movie ever
Advanced Concepts Underground Audio
Re: 8 x DR250 build
It's ooooonly one step at a time. It will take a bunch of steps but, it's doable.ACUA wrote:
I have seen that shop somewhere before, oh its the set to every Saw movie ever!!!
as good as i think i am, i am not sure i am up for a DR build after seeing this one!!! those cabinets are very intense
TomS

Re: 8 x DR250 build
Just gorgeous, gorgeous. I'm not up to building these but have a case of gear lust. Would love to hear these things in action.
Donny Collins
Built:
Two 18" Tuba 30's 3012 LF
Two 26" Tuba 30's Lab 12
Two OmniTop 12's DL 2512 (Melded Array)
Presonus Studio One DAW
Harrison Consoles MixBus 32C DAW
Built:
Two 18" Tuba 30's 3012 LF
Two 26" Tuba 30's Lab 12
Two OmniTop 12's DL 2512 (Melded Array)
Presonus Studio One DAW
Harrison Consoles MixBus 32C DAW
-
CoronaOperator
- Posts: 1648
- Joined: Wed Mar 25, 2009 7:07 pm
- Location: Medicine Hat, Alberta, Canada
Re: 8 x DR250 build
+1Tom Smit wrote:It's ooooonly one step at a time. It will take a bunch of steps but, it's doable.ACUA wrote: as good as i think i am, i am not sure i am up for a DR build after seeing this one!!!
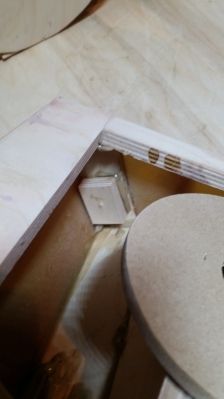
These weren't any harder to build than the T60's. Like Tom said, its just more steps. 3/4's of my time were spent on aesthetics and fixing screw-ups. I came back about 4-5 hours after every glue up to tool the joints nice, then fixed everything else with more PL, bondo, sandpaper, and high build primer and block sanding. These boxes are literally 20% PL, bondo and high build primer
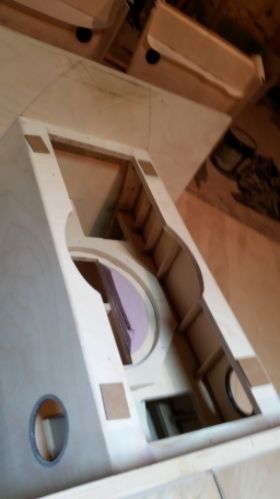
Exhibit A:
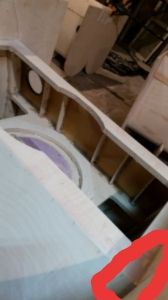
That sheath in the red circle isn't cut any closer than 1/4" from where it should be. Once I got a handle on how PL can fill cavities I didn't bother too much on my cuts. I would usually oversize the part, then slowly trim some back until I had an oops moment, then let PL fix the rest. Sometimes I would have to come back the next day and put another bead of PL in the cracks to fill the big ones.
I haven't heard the red ones yet but for some reason the green ones sound exactly like the blue ones I already completedTom Smit wrote:Fantastic work! The colours are nice, but I am impressed with the red ones!
ACUA wrote: those cabinets are very intense
Maybe not in tents, but how about inside mosquito netting?doncolga wrote: Would love to hear these things in action.
What is very impressive is that entire system (2 DR250's, 2 dual T60's, powered floor monitor, dj equipment and a couple lights were all powered by one 15 amp outlet! All powered by dcx/deq 2496 and a single nu4-6000 amplifier. It was also very loud and had to be turned down because this was a side room and it was drowning out the main room.
Last edited by CoronaOperator on Mon Oct 31, 2016 9:03 am, edited 1 time in total.
Built:
17" width 10" driver Autotuba
2 x 29" width dual Lab12 Tuba60
6 x DR250 2510/asd1001
In progress:
2 x DR250 2510/asd1001
For best results, point the loud end of the array towards the audience
17" width 10" driver Autotuba
2 x 29" width dual Lab12 Tuba60
6 x DR250 2510/asd1001
In progress:
2 x DR250 2510/asd1001
For best results, point the loud end of the array towards the audience
-
Bill Fitzmaurice

- Site Admin
- Posts: 28645
- Joined: Tue May 02, 2006 5:59 pm
Re: 8 x DR250 build
CoronaOperator wrote: It was also very loud and had to be turned down because this was a side room and it was drowning out the main room.
Re: 8 x DR250 build
I've got one of those NU4-6000's and I've been very happy with it. I've used it with my OT12's and four Tuba 30's.CoronaOperator wrote:All powered by dcx/deq 2496 and a single nu4-6000 amplifier. It was also very loud and had to be turned down because this was a side room and it was drowning out the main room.
Donny Collins
Built:
Two 18" Tuba 30's 3012 LF
Two 26" Tuba 30's Lab 12
Two OmniTop 12's DL 2512 (Melded Array)
Presonus Studio One DAW
Harrison Consoles MixBus 32C DAW
Built:
Two 18" Tuba 30's 3012 LF
Two 26" Tuba 30's Lab 12
Two OmniTop 12's DL 2512 (Melded Array)
Presonus Studio One DAW
Harrison Consoles MixBus 32C DAW
-
CoronaOperator
- Posts: 1648
- Joined: Wed Mar 25, 2009 7:07 pm
- Location: Medicine Hat, Alberta, Canada
Re: 8 x DR250 build
You get a lot of amp for the money and with ~49 volts stereo, ~97 volts bridged, these amps are a very good match for these cabinets. The efficient class D design and lightweight design is nice too.doncolga wrote: I've got one of those NU4-6000's and I've been very happy with it. I've used it with my OT12's and four Tuba 30's.
My amp rack for this room used to weigh over 100 lbs and just the sub amp alone would trip the breaker for that outlet. Everything is on one 15 amp breaker for this setup and output levels that have no problem exceeding 130 dBC.
Built:
17" width 10" driver Autotuba
2 x 29" width dual Lab12 Tuba60
6 x DR250 2510/asd1001
In progress:
2 x DR250 2510/asd1001
For best results, point the loud end of the array towards the audience
17" width 10" driver Autotuba
2 x 29" width dual Lab12 Tuba60
6 x DR250 2510/asd1001
In progress:
2 x DR250 2510/asd1001
For best results, point the loud end of the array towards the audience